Introduction
Overview
Forms are a visual representation of data and information. You can use the Forms as a communication channel between Buddies and Humans as part of more extensive BPA process automation.
The IntelliBuddies Form Designer platform enables users to design, build, and manage forms within web applications. It provides a drag-and-drop form designing experience within IntelliBuddies BPA designer.
Enabling Form Designer Feature
By default, the Form Designer feature is inactive inside your AI Command Center. The administrator must activate the Form Designer feature to Add and edit forms.
To enable the Form Designer, follow the steps provided below:
- Login to IntelliBuddies AI Command Center with Admin role
- Go to Administrator > Features
- Activate the Form Designer feature by clicking on the Activate button associated with the Form Designer entry
The Form Designer feature will only be available if included in the AI Command Center License.
Adding a Form
To add a new form to the BPA process,
- Right-click the Forms node and select the Add Form menu.
- It will bring up a New Form dialog, in which you can provide the name and description. When you add a new Form to your process, it opens the form designer page where you can design it. Alternatively, you can add a new form from the main toolbar.

Designing your Form
The Form enables you to gather diverse types of information. It provides a variety of UI components that you can use to design custom forms based on your use case's logic.
You can drag and drop any Form Components, which opens a configuration dialog with Form Component settings.
Most Form Components have unique settings, but some settings apply to all. These are called General Settings.

To see how your Form looks, you can preview it on the preview tab in Form Designer.
Form Components
Form Components are grouped into different tabs based on the component type. Drag and drop a component to the Form in design mode, and the configuration wizard opens.
Form Component Settings
Depending on the type of Form Components, specific wizard tabs are available to customize it. For more details, refer to Form Component settings.
Inline Form Component Settings
When designing a form, clicking on any Component will reveal form Component settings at the top right corner. View the tooltip by hovering over each button to perform the appropriate operation. Here are the details of each button in the Component setting:
| Field Settings | icon | Description |
|---|---|---|
| Edit | Click this button to edit the Component settings. | |
| Move | Click and drag the selected Component to a new location. | |
| Edit JSON | Click on this button to open and edit the JSON string of the Component. | |
| Copy | Click this button to copy the Component. | |
| Paste below | Click this button to paste the copied Component by clicking the Copy button. This button is visible only by clicking the Copy button | |
| Remove | Click this button to remove a Component from the Form. |
Copying the Components
Click the Copy and Paste below buttons to clone the same Component in the Form Designer.
Bind Data And Events to Form
IntelliBuddies provides a platform for managing complex business automation processes by connecting data and events. The bind data feature lets you easily link real-time data from external databases and custom lists. This powerful feature ensures that your processes remain efficient and up-to-date, allowing you to automate your business processes quickly.
By using Bind Data, you can link the process data with the Form.

Bind Data
You can connect a data source to a form to display data based on user input and interactions. To bind the data source with the Form, follow the below steps.
-
Create the data source pointing to the appropriate connections or lists you want to bind your Form
-
Choose the Form for which you want to bind the data source.
-
Right-click on the Form and choose the Bind Data and Events option
-
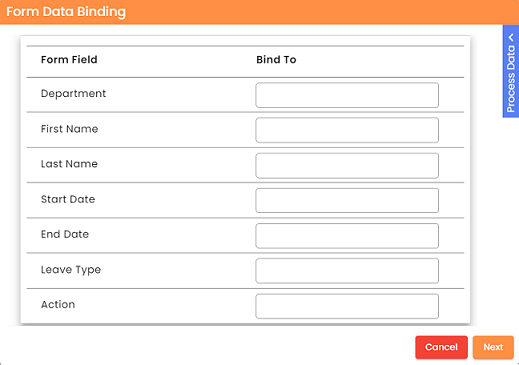
Opens the following Form Data Binding dialog.
-
The first column of the above dialog displays all existing form controls in the selected Form. The second column allows dragging and dropping any process data field from the process data panel.
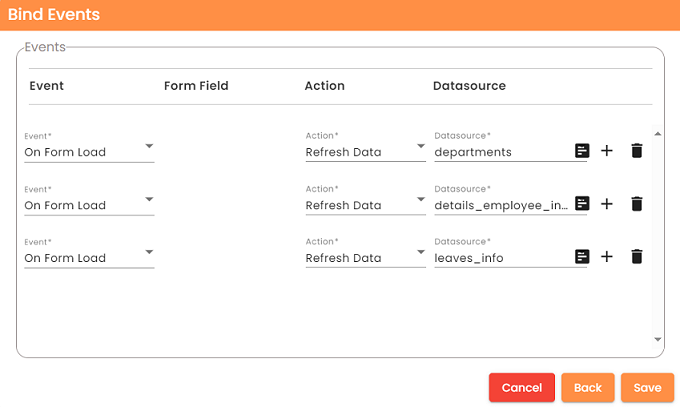
Bind Events
Bind Events enables loading form fields with user-specified filters executed against the selected data source, provided data source fields are bound to the Form.
-
All data sources are default loaded during the On Form Load Event.
Events Option Description Event List of events that are available for subscription. Form Field Lists the form fields in the selected Form. Action Action to perform when the event has occurred. Refresh Data To update the data source, it executes the corresponding filter to refresh the data. This option is available only under action. Datasource Displays a list of all data sources configured in Form Data binding. Select the Datasource to perform the intended action.
Editor Dialog
The editor dialog consists of all the required components for adding a filter to the data source, sorting, and determining the number of rows to return upon executing the filter.
- Filter
- The dynamic UI filter allows users to add multiple rows and a conjunction.
- The Field drop-down lists all the fields in the Form.
- In the Operator drop-down, you can see a comprehensive list of all the supported operators.
- Value control allows you to Drag and Drop the Process Data fields.
In the Events dialog, it hides the Datasource tab.
-
Sort
- The Field drop-down displays a list of all the form fields available.
- The Direction field specifies whether to sort Ascending or Descending.
-
Row Limit This option determines the number of rows of data to retrieve after the execution of the filter.
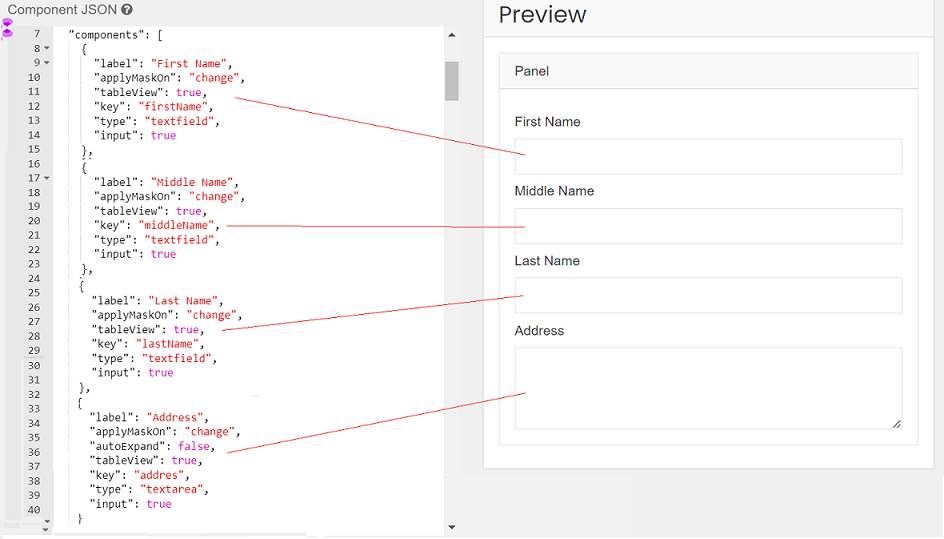
Relation between Form Component and JSON
The Form Designer is a user interface that helps create JSON schemas to render forms. It acts as a JSON schema builder where adding every field to the Form translates to a JSON schema of that Component. The diagram below shows how the Form Designer relates to the JSON schema.
Edit JSON String of form components
To modify the JSON data of a field in a Form, follow the steps outlined below:
-
Open the Form with the field to edit from Project Explorer > Forms tab.
-
To edit a field, click on it in the Form Designer.
-
Field settings appears in the top right corner of the field.
-
Click on the Edit JSON option in the Field settings.
-
Clicking the Field Component button opens a dialog where you can edit the JSON string in the Component JSON pane.