When Chat Message Received
Description
Use the When Chat Message Received trigger activity to start a conversational workflow when a user sends a chat message.
This trigger activity is primarily used together with the Conversational Agent activity to build AI-powered chat and voice experiences in IB-X.
The trigger listens for incoming conversation requests from supported communication channels and starts the workflow execution automatically.
- This activity is a trigger activity and must be placed at the beginning of the workflow.
- The activity is intended for conversational and chat-based workflows.
- Session behavior may vary depending on the configured communication channel.
- The trigger works together with the Conversational Agent activity to build conversational experiences.
Usage
The When Chat Message Received trigger is commonly used for:
- AI chatbots
- Conversational assistants
- Support chat workflows
- Knowledge assistants
- AI voice assistants
- Multi-turn conversational experiences
This activity must be used as the starting point of the conversational workflow.
Workflow Structure
Typical workflow:
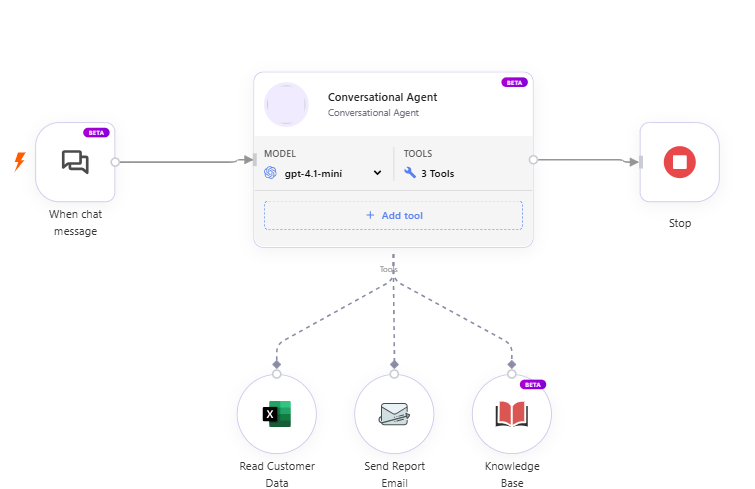
The trigger receives the incoming message and passes the conversation context to the Conversational Agent activity.
Customize Chat Experience
To customize the behavior and appearance of your conversational agent, double-click the When Chat Message Received trigger activity on the designer canvas.
The trigger configuration allows you to configure the chat interface, voice settings, and conversation behavior for the agent.
The configuration is organized into the following sections:
- AI Persona
- Welcome
- Greeting
- Features
- Voice
- Transcriber
- Advanced
- Embed
AI Persona
Use the AI Persona section to customize the visual identity and personality of the conversational agent.
Agent Name
Specify the display name of the AI agent.
Example:
Lily
Agent Role
Specify the role or designation of the agent.
Example:
Conversational Agent
Avatar of your Agent
Select the avatar image that represents the conversational agent.
The selected avatar is displayed in:
- Chat conversations
- Greeting messages
- Voice assistant view
- Floating assistant widget
Theme Color of Chat Window
Specify the primary color theme for the chat window.
The selected color is applied to:
- Chat headers
- Accent elements
- Action buttons
- Avatar highlights
Welcome
Use the Welcome section to configure the initial behavior and appearance of the chat widget.
Greeting
Enable or disable the welcome greeting message.
When enabled, the configured greeting message is automatically displayed when the chat widget opens.
Welcome Message
Specify the initial greeting text displayed to the user.
Example:
Hi! How can I assist you today?
Open by Default
Specify how the chat window should behave when the page initially loads.
You can choose whether the chat window remains minimized, opens immediately, or automatically expands after a short delay.
| Option | Description |
|---|---|
| Do not open automatically | The chat window remains minimized when the page loads and must be manually opened by the user. |
| Always open | The chat window automatically opens in expanded mode when the page loads. |
| Open after 5 seconds | The chat window remains minimized initially and automatically expands 5 seconds after the page loads. |
| Open after 10 seconds | The chat window remains minimized initially and automatically expands 10 seconds after the page loads. |
Avatar Size
Specify the display size of the AI agent avatar within the chat window.
| Option | Description |
|---|---|
| Small | Displays a compact avatar suitable for minimal chat window space usage. |
| Medium | Displays the avatar with a balanced size suitable for most conversational interfaces. |
| Large | Displays a larger avatar to provide stronger visual presence within the chat interface. |
Position
Specify the screen position where the conversational widget should appear.
| Option | Description |
|---|---|
| Left | Displays the conversational widget on the left side of the screen. |
| Right | Displays the conversational widget on the right side of the screen. |
Pulsing
Enable or disable pulsing animation for the avatar.
This effect helps draw user attention to the conversational assistant.
Greeting
Use the Greeting section to configure how the conversation starts.
First Message Mode
Specify how the conversation should begin when the chat session starts.
| Option | Description |
|---|---|
| Agent speaks first | The conversational agent automatically starts the conversation using the configured greeting message. |
| Agent waits for user | The conversational agent waits for the user to send the first message before responding. |
| Agent speaks first with AI generated message | The conversational agent automatically starts the conversation with a dynamically AI-generated greeting based on the configured instructions and conversation context. |
Greeting Message
Specify the greeting message that should be displayed or spoken when the conversation starts.
This message is used when the selected First Message Mode allows the agent to initiate the conversation.
Sample greeting message:
Hello! I'm Lily, your AI Agent for knowledge improvement. How may I assist you today?
Features
Use the Features section to enable or disable conversational capabilities.
Chat
Enable or disable text chat functionality.
Voice
Enable or disable voice conversation capability.
File Attachments
Enables or disables file attachments in the chat window.
When enabled, the chat window displays an Attach File option, allowing end users to upload one or more files as part of a conversation. Attached files are sent along with the user's message and can be processed by the Conversational Agent.
When disabled, the attachment option is hidden from the chat window.
Default: Enabled
The attachment option is displayed only when the configured AI model and provider support file attachments. If attachments are not supported, the option remains hidden even when this setting is enabled.
Download Conversation
Enables or disables the ability for end users to download their conversation from the chat window.
When enabled, users can export the conversation from the chat window menu in one of the following formats:
| Format | Description |
|---|---|
| TXT | Plain-text conversation transcript |
| JSON | Structured conversation including message metadata |
When disabled, the download option is not displayed in the chat window.
Default: Disabled
This setting controls only the ability to download the conversation transcript. It does not affect downloading files that were shared as part of the conversation.
Transport
Specify the communication transport mechanism used for real-time text and voice interactions between the client and the conversational service.
The selected transport determines how conversational data, audio streams, and real-time events are transmitted during the session.
| Option | Description |
|---|---|
| WebSocket | Uses WebSocket-based real-time communication for text and conversational event streaming. Suitable for standard chat-based conversational experiences. |
| Small WebRTC | Uses a lightweight WebRTC-based communication channel optimized for low-latency voice and conversational interactions with reduced infrastructure requirements. Suitable for smaller-scale or embedded voice experiences. |
Voice
Use the Voice section to configure text-to-speech(TTS) settings for the conversational agent.
Select Provider
Select the provider used for text-to-speech voice synthesis.
The selected provider determines how the conversational agent generates spoken responses during voice interactions.
| Option | Description |
|---|---|
| Deepgram | Uses Deepgram text-to-speech services for generating AI voice responses with low-latency speech synthesis capabilities. |
| ElevenLabs | Uses ElevenLabs text-to-speech services for generating highly natural and expressive AI voice responses. |
Text-to-Speech Connection
Select the connection used for text-to-speech processing.
You can either:
- Use a customer-managed provider connection configured with your own provider API keys, or
- Use an Integration Gateway managed service connection provided by IB-X.
Integration Gateway managed service connections consume IB-X Currency based on usage.
The selected connection determines:
- The text-to-speech provider used for voice synthesis
- Authentication and API access configuration
- Available voice models and capabilities
- Usage billing behavior
Model
Specify the text-to-speech model to be used for voice synthesis.
The available models are dynamically populated based on the selected text-to-speech provider and configured connection.
Different providers and connections may expose different voice synthesis models and capabilities.
Agent Voice
Select the virtual voice used by the conversational agent for speech responses.
The available voices are dynamically populated based on the selected voice provider and text-to-speech model.
After selecting the provider and model, the system displays the list of supported virtual voices available for that configuration.
Available voices may vary based on:
- Provider capabilities
- Selected model
- Supported languages
- Accent variations
- Gender options
- Voice profiles
Users can preview and evaluate available voices before finalizing the preferred voice for the conversational agent.
Transcriber
Use the Transcriber section to configure speech-to-text(STT) settings for voice conversations.
Select Provider
Select the provider used for speech-to-text transcription.
The selected provider determines how spoken audio is converted into text during voice conversations.
| Option | Description |
|---|---|
| Deepgram | Uses Deepgram speech-to-text services for real-time audio transcription with low-latency conversational capabilities. |
| ElevenLabs | Uses ElevenLabs speech-to-text services for AI-powered voice transcription and conversational speech recognition. |
Speech-to-Text Connection
Select the connection used for speech-to-text transcription processing.
You can either:
- Use a customer-managed provider connection configured with your own provider API keys, or
- Use an Integration Gateway managed service connection provided by IB-X.
Integration Gateway managed service connections consume IB-X Currency based on usage.
The selected connection determines:
- The speech-to-text provider used for transcription
- Authentication and API access configuration
- Available transcription models and capabilities
- Usage billing behavior
Language
Specify the language used for speech-to-text transcription.
The available languages are dynamically populated based on the selected speech-to-text provider and transcription model.
The system automatically selects English as the default language unless a different language is explicitly selected.
Available languages may vary depending on the provider capabilities and selected transcription model.
https://developers.deepgram.com/docs/models-languages-overview
Use Case
Specify the speech recognition optimization profile used for transcription.
The available use cases are dynamically populated based on the selected speech-to-text provider and transcription model.
Different providers may expose specialized transcription profiles optimized for scenarios such as:
- General conversations
- Phone call audio
- Meetings
- Voice assistants
- Customer support interactions
- Noisy environments
- Domain-specific speech recognition
The supported use cases and their behavior vary by provider and model.
For detailed information about supported use cases and optimization profiles, refer to the provider documentation:
Model
Specify the speech-to-text model used for audio transcription.
The available models are dynamically populated based on the selected speech-to-text provider and configured connection.
Different providers and connections may expose different transcription models with varying capabilities, performance characteristics, language support, and optimization profiles.
Advanced
The Advanced section provides additional configuration options to fine-tune how the Voice Agent listens, detects speech, handles interruptions, and manages idle conversations.
These settings are intended for advanced scenarios where the default behavior needs to be adjusted to suit specific telephony environments or conversational requirements.
For most deployments, the default values are recommended and do not require modification.
For detailed information about each advanced setting, see Advanced Voice Settings.
Embed
The Embed section provides the URLs and configuration required to integrate the conversational agent with external websites, portals, and third-party applications.
Chat URL (Testing)
Displays the testing URL for the conversational agent.
Use this URL during development and validation to test the latest version of the conversational experience before using the production endpoint.
You can:
- Open the testing chat in a new browser tab.
- Copy the testing URL.
Chat URL (Production)
Displays the production URL for the conversational agent.
Use this URL when the conversational agent is ready for production use or for embedding into customer-facing websites and applications.
You can:
- Open the production chat in a new browser tab.
- Copy the production URL.
Embed Script
Provides the JavaScript snippet required to embed the chat widget into an external website or web application.
Copy the generated script and paste it into the HTML page where the chat widget should appear.
The embed script automatically connects the widget to the configured conversational agent.
If required, additional context such as user information, page URL, or custom data can also be supplied to the embedded widget.
Authentication
Configures authentication requirements for accessing the conversational agent.
Use this section when requests to the chat endpoint must be authenticated before users are allowed to start a conversation.
Click Add to configure one or more authentication providers or credentials.
Response Mode
Specifies how responses are returned to the chat client.
| Option | Description |
|---|---|
| Streaming | Streams the response to the user as it is generated, providing a real-time conversational experience. This is the default mode. |
| When Workflow Execution Finishes | Returns the response only after the workflow has completed execution. |
| Using Respond to Webhook or Respond to Chat Activity | Allows the workflow to explicitly determine when and how the response is returned by using the Respond to Webhook or Respond to Chat activity. |
IP Whitelist
Restricts access to the chat endpoint based on the client's IP address.
Click Add IP Address to specify one or more allowed IP addresses.
Supported formats include:
- IPv4 addresses
- IPv6 addresses
- CIDR ranges
- Requests originating from IP addresses outside the configured whitelist are rejected with 403 Forbidden.
- If no IP addresses are configured, the chat endpoint accepts requests from any IP address.
Allowed Origins (CORS)
Specifies which browser origins are permitted to access the chat endpoint through Cross-Origin Resource Sharing (CORS).
Click Add Origin to configure one or more allowed origins.
Supported values include:
- Individual website origins
- Comma-separated lists of origins
*to allow all origins
If the chat widget is embedded into an external website, add that website's origin to allow browsers to communicate with the chat endpoint.
This setting applies only to browser-based requests. It does not restrict server-to-server requests.
Outputs
The When Chat Message Received trigger activity produces the following outputs, which can be consumed by downstream conversational and workflow activities.
SessionId
Represents the unique identifier associated with the active conversation session.
The SessionId is used to:
- Maintain conversational continuity
- Associate multiple messages with the same conversation
- Preserve conversation memory and context
- Track user interactions across the session lifecycle
The Conversational Agent activity uses the SessionId to maintain and retrieve conversation history for the active session.
Chat Message
Represents the incoming user message received by the conversational trigger.
This output contains the text message provided by the user and is typically consumed by the Conversational Agent activity for response generation.
Context
Represents the contextual information associated with the current conversation request.
The context may include:
- Conversation metadata
- User-specific information
- Session-level variables
- Custom contextual data
- Channel-related information
This output helps maintain contextual awareness across conversational interactions.
Attached Files
Represents the files uploaded by the user as part of a chat message.
This output contains the files the user attached and sent in the conversation. It does not include conversation export downloads (TXT or JSON) initiated from the chat window download menu.
Files are uploaded when the user selects them in the chat composer, before the message is sent. Upload requires an active conversation session. Once uploaded, the files are associated with the user's message and passed to downstream workflow activities.
When a user sends a message with attachments, the platform also passes attachment file identifiers to the conversational pipeline so the Conversational Agent can include the uploaded files in its reasoning context.
This output can be used for scenarios such as:
- Document analysis
- Image processing
- File-based AI interactions
- Knowledge extraction workflows
- Attachment validation or storage
Multiple files may be included depending on the client capabilities and conversation flow.
Conversation Flow
When a user sends a message:
- The trigger receives the incoming message.
- A conversation session is created or resumed.
- The conversation context is initialized.
- The workflow execution starts.
- The message and context are passed to the Conversational Agent activity.
Best Practices
- Use this trigger only for conversational workflows.
- Configure appropriate session timeout values.
- Enable conversation history for multi-turn conversations.
- Ensure the trigger is connected to a Conversational Agent activity.
- Enable Download conversation only when end users need to export conversation records or download tool responses.
- Disable File attachments when the agent does not require file input or when the configured model does not support attachments.
- Use meaningful display names for easier maintenance.