Connect
Description
This activity connects to the specified database and gives the database context handle needed to perform operations on the database. It lets you specify the Connection String to connect. You are also allowed to specify the provider for the connection.
There are two ways to specify the connection configuration, and it depends upon the IntelliBuddies Edition deployed. If you are utilizing Enterprise Edition, then you can connect to the database using the connections defined as part of your AI Command Center. You can also create a new connection by configuring the needed parameters.
Utilizing AI Command Center Connections (Enterprise Edition Only)
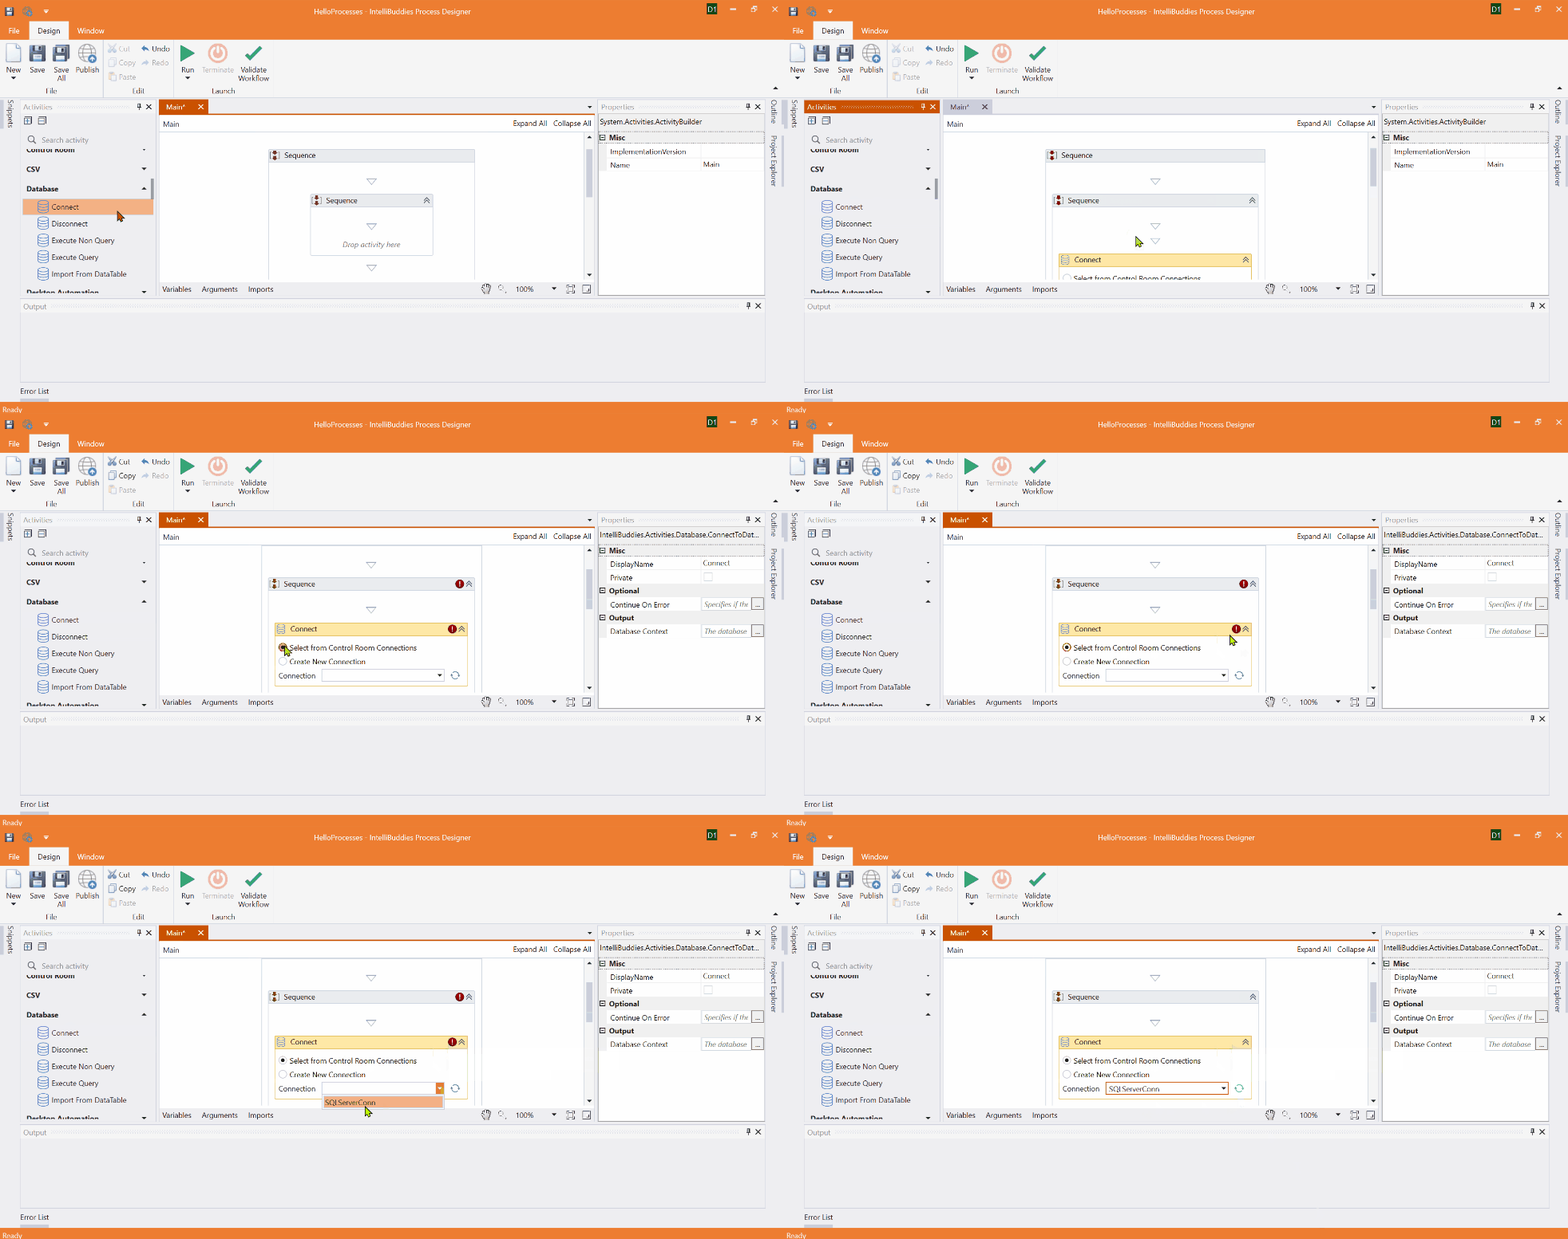
You can choose the Select from AI Command Center Connections option and select the appropriate AI Command Center connections from the dropdown.
Creating New Connection using Connecting Builder Dialog
Alternatively, choose the Create New Connection option to specify new connection parameters and click on the Edit Connection button to bring up the Connection Builder Dialog interface. Connection Builder Dialog provides a user-friendly interface to simplify configuring connection-related parameters, making it easier to provide the necessary details for establishing a connection.
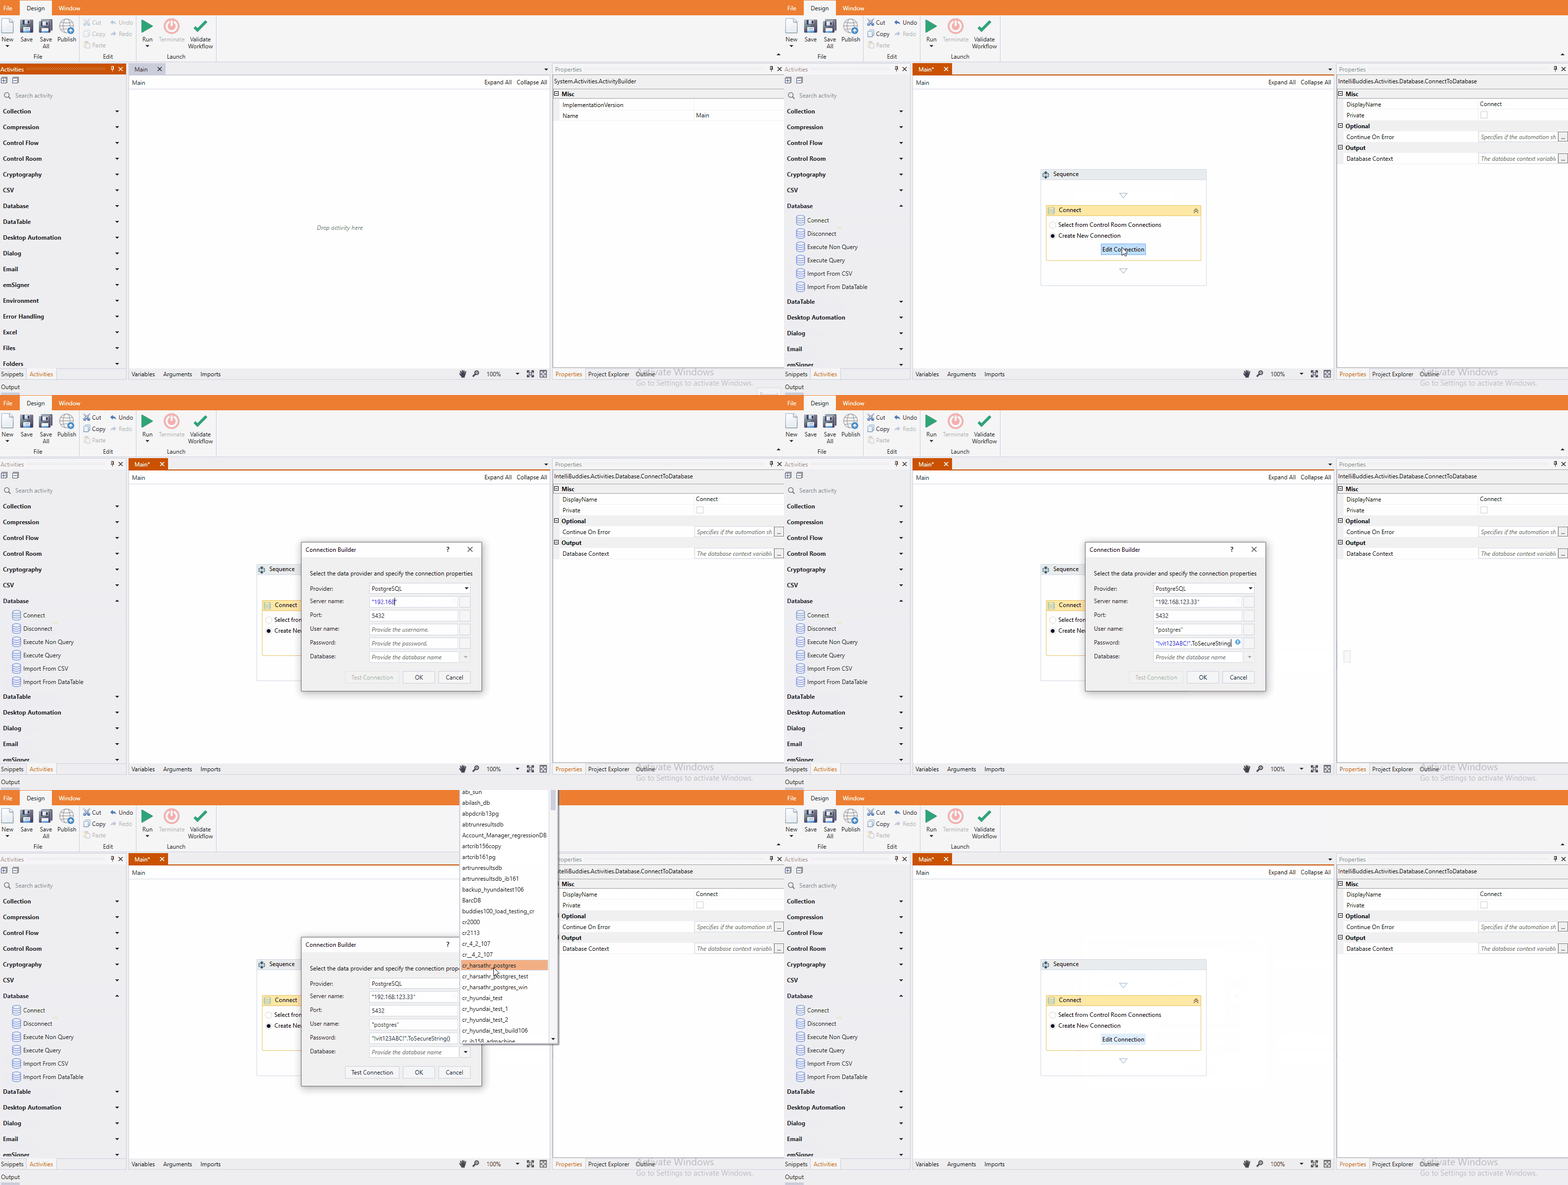
You can select the appropriate provider from the dropdown to configure the connection. The following options are currently supported:
- Microsoft SQL Server
- SQLite
- MySQL
- PostgreSQL
- Oracle
- ODBC Data Source Name (DSN)
- Custom Connection String
After configuring the connection, you can verify the connection by clicking on Test Connection, ensuring a successful link is established.
The Test Connection option will be disabled if the connection is configured using variables that might have values only during runtime.
Microsoft SQL Server
Once you select this option, the following screen is where you can provide SQL Server connection configuration.
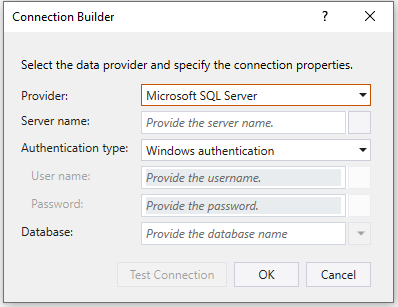
- Server name – Specify the Microsoft SQL Server name or IP address.
- Authentication type – Choose the appropriate authentication type.
| Authentication type | Description |
|---|---|
| Server authentication | Choosing this type requires users to provide an SQL Server username and password to connect to the database. |
| Windows authentication | Choosing this authentication type leverages the user's Windows login credentials to grant access to the database. If you log into a Windows machine with a valid user account, you can use these credentials to access SQL Server without providing a separate username and password. |
- User name – Specify the user name for connecting to the database.
- Password – Specify the password for the user name.
- Database – Select the database from the dropdown or provide the name directly in the expression box.
SQLite
Once you select this option, the following screen is where you can provide SQLite connection configuration.
- Database File – Specify the SQLite Database File.
- Password - Specify the password for the Database File.
PostgreSQL
Once you select this option, you can provide PostgreSQL connection configuration on the following screen.
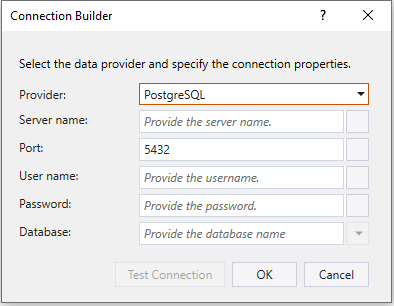
- Server name – Specify the PostgreSQL Server name or IP address
- Port – Specify the port number to connect to the PostgreSQL server.
- User name – Specify the user name for connecting to the database.
- Password - Specify the password for the user name.
- Database – Select the database from the dropdown or provide the name directly in the expression box.
MySQL
Once you select this option, the following screen is where you can provide MySQL connection configuration.
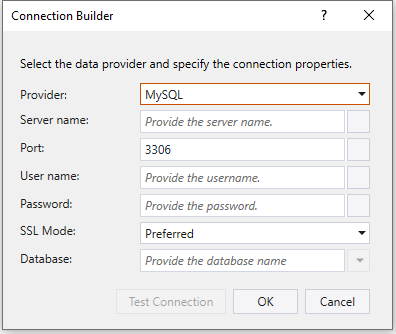
- Server name – Specify the MySQL Server name or IP address
- Port – Specify the port number to connect to the MySQL server.
- User name – Specify the user name for connecting to the database.
- Password - Specify the password for the user name.
- Database – Select the database from the dropdown or provide the name directly in the expression box.
- SSL Mode – Choose SSL Mode from dropdown. The SSL (Secure Sockets Layer) mode is a configuration option that determines how the MySQL client and server establish secure connections using SSL/TLS encryption. Secure connections are essential to protect the confidentiality and integrity of the MySQL client and server data. Here are the supported SSL modes.
| SSL Mode | Description |
|---|---|
| Preferred | In the PREFERRED mode, the MySQL client attempts to connect using SSL encryption if the server supports it. If the server doesn't support SSL, the connection proceeds without encryption. |
| None | In this mode, SSL encryption is completely disabled, and MySQL establishes connections without encryption. |
Oracle
Once you select this option, the following screen is where you can provide Oracle connection configuration.
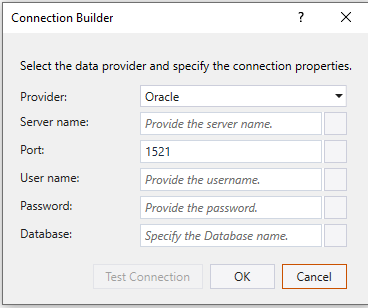
- Server name – Specify the Oracle Server name or IP address
- Port – Specify the port number to connect to the Oracle server.
- User name – Specify the user name for connecting to the database.
- Password - Specify the password for the user name.
- Database – Specify the Service ID (SID) here.
Custom Connection String
If you want to connect to a database provider not listed here, you can select the Custom Connection String option to directly provide your ODBC connection string.
If the specifying database objects (for example, tables or columns) whose names contain characters such as spaces or reserved tokens, you might have to enclose them within the quote prefix and quote suffix character as shown below: - QuotePrefix=";QuoteSuffix=";
ODBC Data Source Name (DSN)
- When selecting a provider, the dialog automatically selects the best suitable ODBC driver installed on your machine for the chosen database provider.
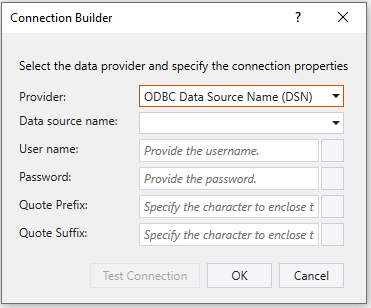
- Data source name – Choose the drivers in your system listed in the dropdown.
Before using this activity, you must install the ODBC driver for the corresponding database provider. If no drivers for the selected database provider exist on your system, the driver dropdown selection will be left empty.
- User name – Specify the user name for connecting.
- Password - Specify the password for the user name.
- Quote Prefix - Specify a beginning character or set of characters used to enclose database object names (e.g., tables, columns) that contain special characters, spaces, or reserved keywords.
- Quote Suffix - Specify an ending character or set of characters used to enclose database object names (e.g., tables, columns) that contain special characters, spaces, or reserved keywords.
For example,
Assume that you have a table in the PostgreSQL database, and its name is Your Table. As per PostgreSQL, if the database object names have special characters, spaces, etc. Enclose the object name with a quoted identifier (").
To do that, provide double quotes (") in Quote Prefix and Quote Suffix properties.
Property
Misc
- DisplayName – Add a display name to your activity.
- Private – By default, activity will log the values of your properties inside your workflow. If private is selected, then it stops logging.
Optional
- Continue On Error – Specifies if the automation should continue even when the activity throws an error. This field only supports Boolean values (True, False). The default value is False.
If you include this activity in Try Catch and the value of this property is True, it will catch no error during the execution of the project.
Output
- Database Context – The activity returns the context variable of the database. You can subsequently use it for other database operations.
Example
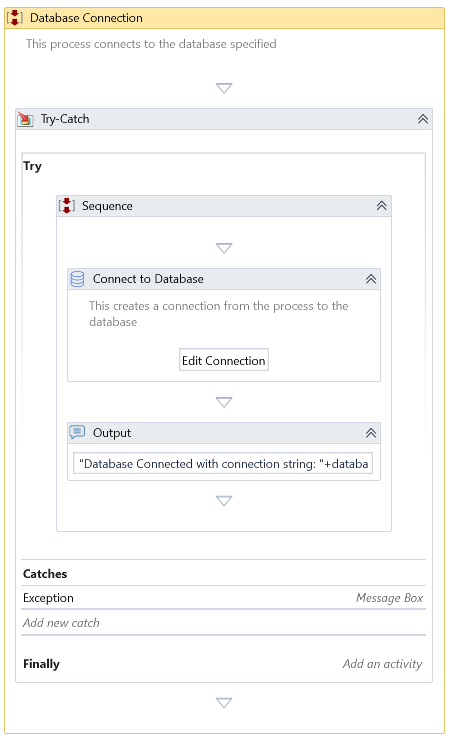
Download Example
