Manage your Partner Account
Once you register as an Implementation Partner inside IntelliBuddies Account Manager, you can log in to the portal and perform the following functions.
- Manage your IntelliAppZ Subscriptions
- Download and Deploy IntelliBuddies Software
- Register and Publish your IntelliAppZs'
- Register your Customers
- Monitor your Deployments
- Managing Support Tickets
Manage your IntelliAppZ Subscriptions
Once a partner account is approved, it enables an IntelliAppZ Development Subscription and is ready to be activated for Partners.
The default IntelliAppZ Development Subscription provides one(1) license of IntelliAppZ Designer.
Understanding Subscription Status
The Status column under Subscription would indicate the current Status of your Subscription, and it would hold one of the following values.
| Status | Description |
|---|---|
| Submitted | The Subscription has been successfully created and is awaiting approval from the IntelliBuddies Team. |
| Approved | The Subscription has been approved by the IntelliBuddies Team, and a Serial Key has been generated. The Subscription is now ready for activation using the generated Serial Key. |
| Rejected | The Subscription has not been approved. |
| Active | The Subscription is activated and currently in use. |
| Suspended | The Subscription is suspended. This Status applies only to IntelliAppZ subscriptions. |
| Expired | The Subscription has expired. |
Understanding Subscription Types
Understanding the Subscription Types is necessary before creating a Subscription. The table below lists the different Subscription Types available for partners and their corresponding descriptions.
| Subscription Type | Description |
|---|---|
| Development | The Partner should use the Development Subscription type to request IntelliAppZ Designer and IntelliAppZ Development licenses. It is strictly for Development purposes and should not be used commercially. |
| Trial | Partner will use this type of Subscription to provide a trial of their registered IntelliAppZ to their Customers. |
| Production | Partner will use this type of Subscription to provide the production license of their registered IntelliAppZ to their Customers. |
Understanding Unit Types
IntelliAppZ supports credits metering. Currently, the metering can be performed for two types of units, as described below.
| Unit Type | Description |
|---|---|
| Page | When Page is selected as the unit type for the AppZ, users can define the exact number of pages they wish to purchase. |
| Execution | When Execution is selected as the unit type for the AppZ, users can specify the desired number of executions to purchase. |
Available Products or SKUs
The table below lists the Product (s) or SKU(s) that can be added to the subscription.
| Product | Description |
|---|---|
| IntelliAppZ Designer | You can select this if you need more licenses for IntelliAppZ Designer |
| IntelliAppZ | You can select this if you need licenses for your IntelliAppZ. You can select IntelliAppZ from the drop-down for which you need a license. |
Creating New Subscription
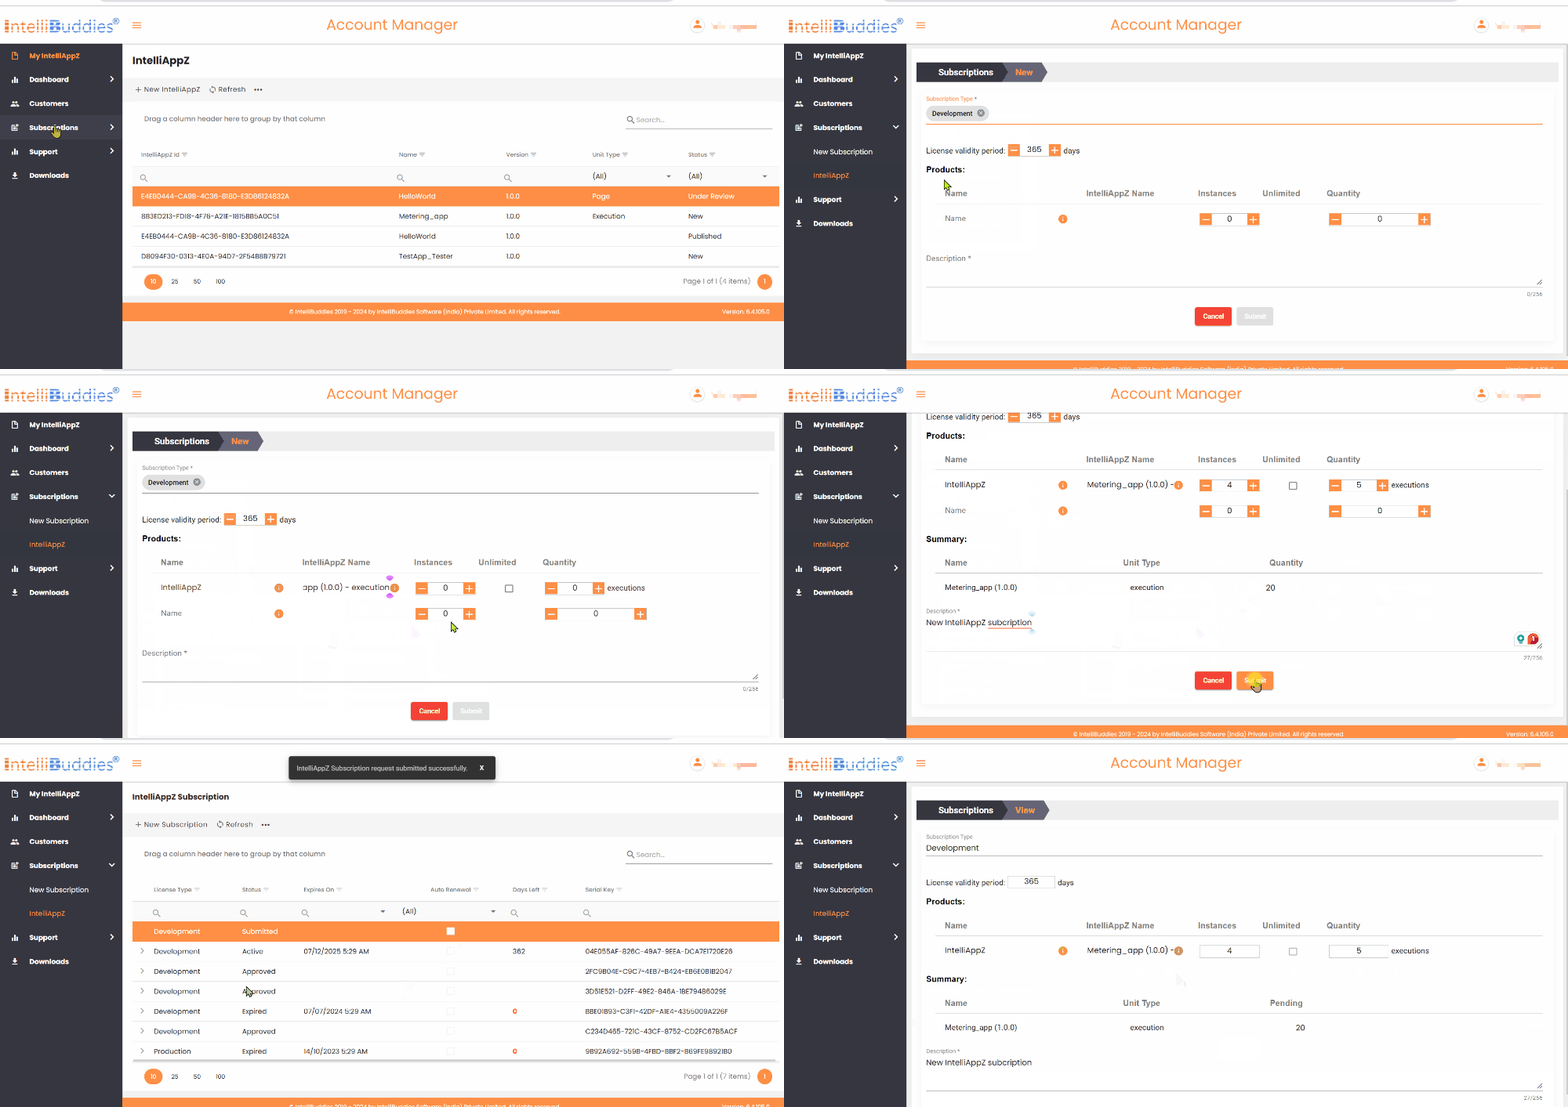
- Login to the Account Manager Portal using your registered email or partner-id
- Expand the Subscriptions menu from the left-hand pane.
- Click New Subscription
- OR
- Navigate to IntelliAppZ and then click on
.
- The New Subscription page appears.
- Configure the following properties
| Subscription Property | Description |
|---|---|
| Subscription Type | Select the appropriate Subscription Type. |
| Customer Name | Select the Customer Name from the drop-down for whom the subscription is requested. Note: This option is only available for Trial and Production Subscription types. |
| License validity period | Specify the License validity period in days; the default setting is 365 days. |
| Perpetual License | Check this option to allow products indefinite use after a one-time purchase, with limited updates and support and optional maintenance for future updates. |
| Products | Configure the following settings: 1. Name - Select relevant Product(s) or SKU(s) from the drop-down under Name. 2. IntelliAppZ Name - Choose the corresponding Product(s) or SKU(s) from IntelliAppZ registered, to allocate the license count. 3. Instances - Specify the required number of instances. 4. Unlimited - Check this to turn off metering and allow unlimited execution of this IntelliAppZ 5. Quantity - Specify the metering quantity in terms of Unit Type. Ignore this if Unlimited is checked. |
| Summary | Displays an overview of the product and services SKUs opted under this Subscription. |
| Description | Provide a relevant Description for the subscription for future reference. |
- Click on the Submit button
Perpetual License
A Perpetual License is a software licensing model that grants indefinite usage rights (up to 20 years) following a one-time purchase. Unlike subscription-based licenses, which require regular payments to maintain access, a perpetual license allows users to pay a single upfront fee for continued use of the software without recurring costs. It typically includes a limited period of complimentary updates and support (e.g., 1 year), after which users may purchase additional maintenance or support plans for further updates.
Top Up existing Subscription
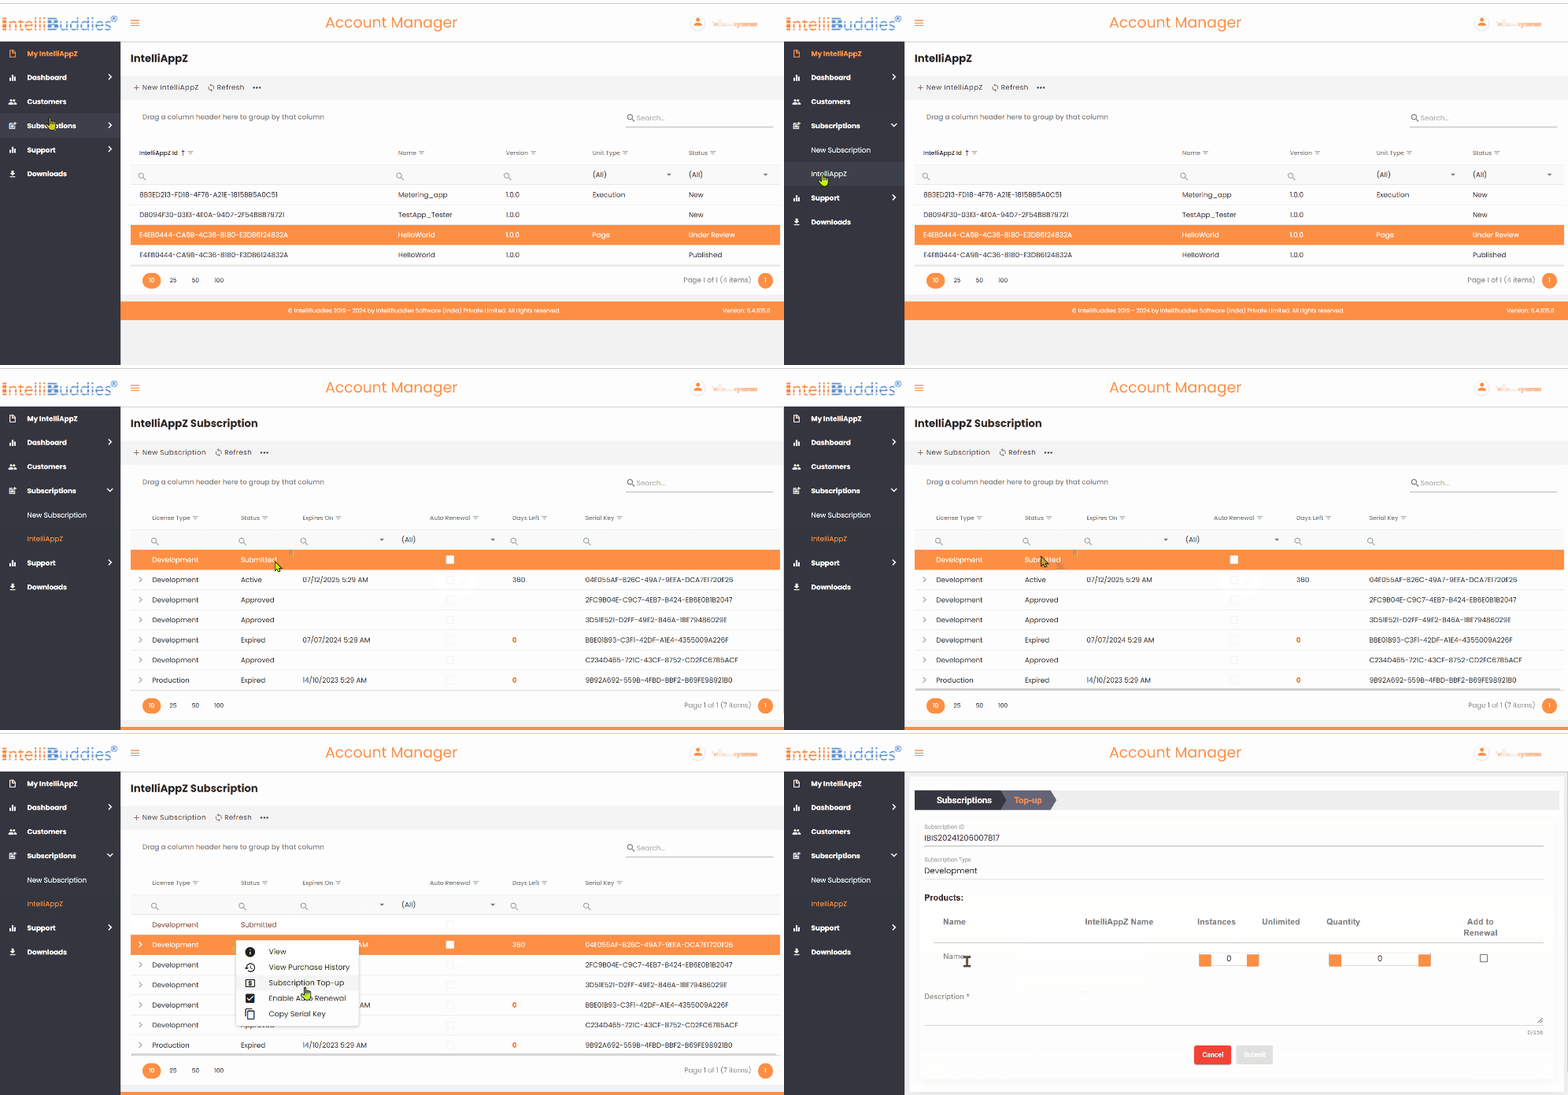
- Login to the Account Manager Portal using your registered email or partner-id.
- Expand the Subscriptions menu from the left-hand pane.
- Click on IntelliAppZ to view all existing subscriptions in the right-hand pane.
- Select the Subscription you want to top up from the list.
- Right-click and select Subscription Top-Up.
The Subscription Top-Up option is only available for active subscriptions.
- Select one or more Products or SKUs from the drop-down menu.
- Specify the corresponding incremental license count.
- Optionally, turn on Auto Renewal to enable auto-renewal of this Subscription.
- Click on Submit
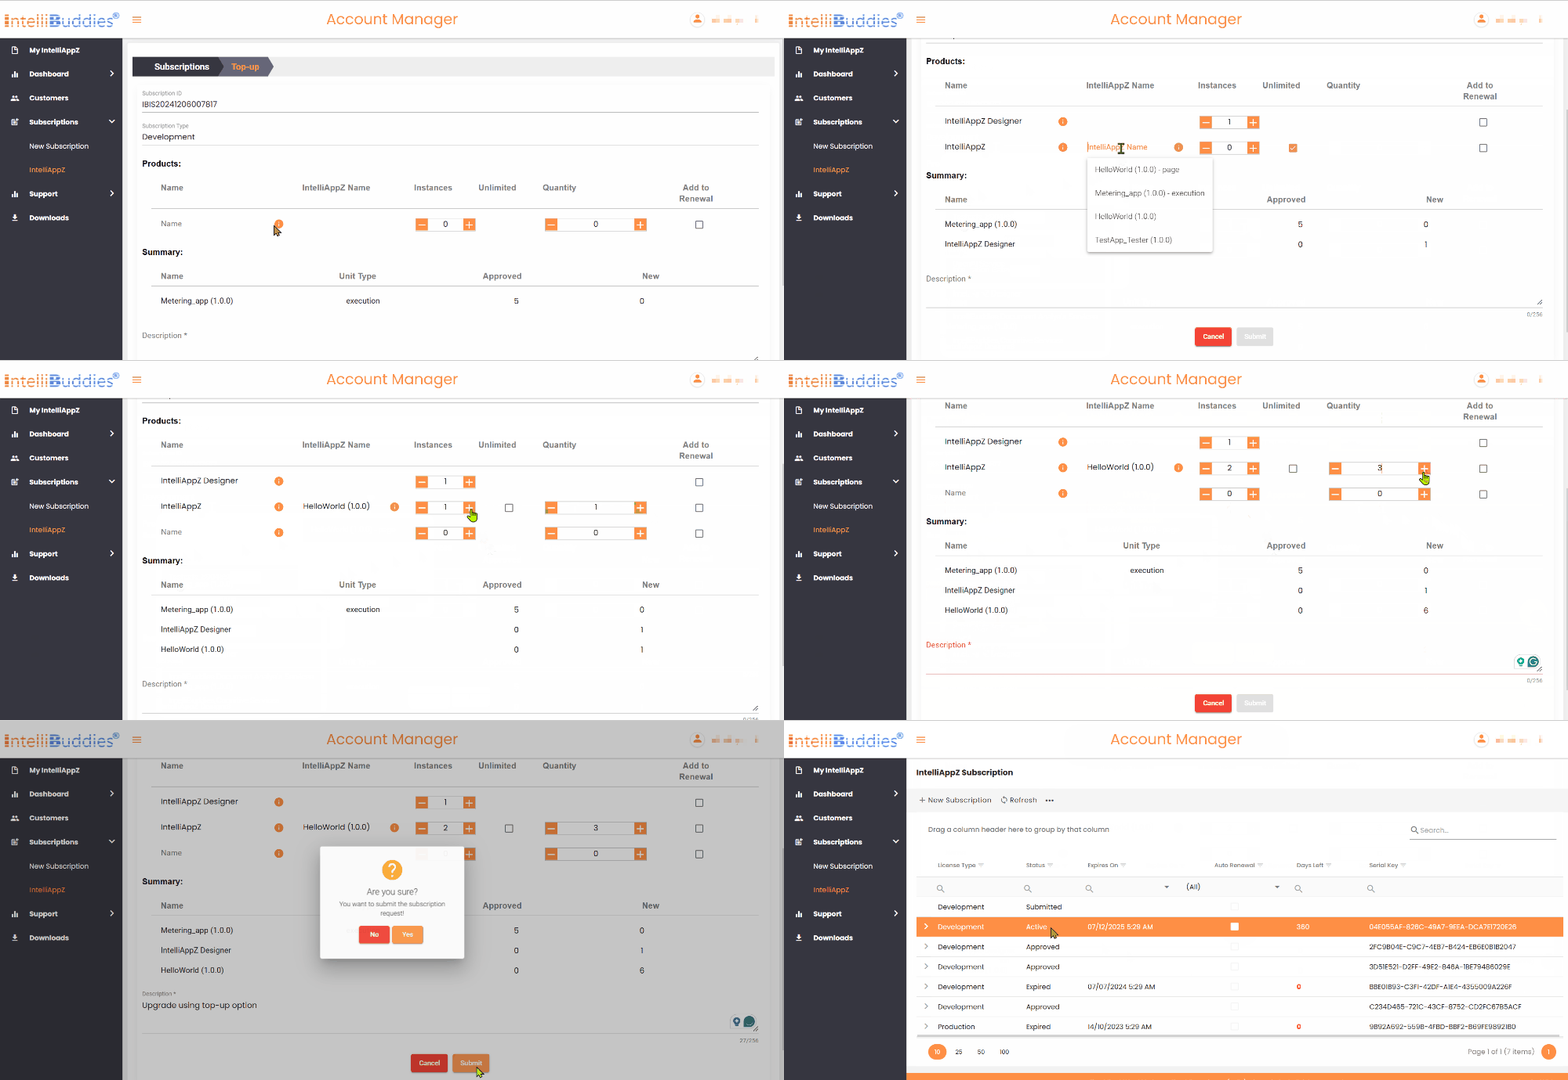
Upon approval of your top-up request, you can activate new deployments using your Subscription Serial Key.
Renewing your Subscription
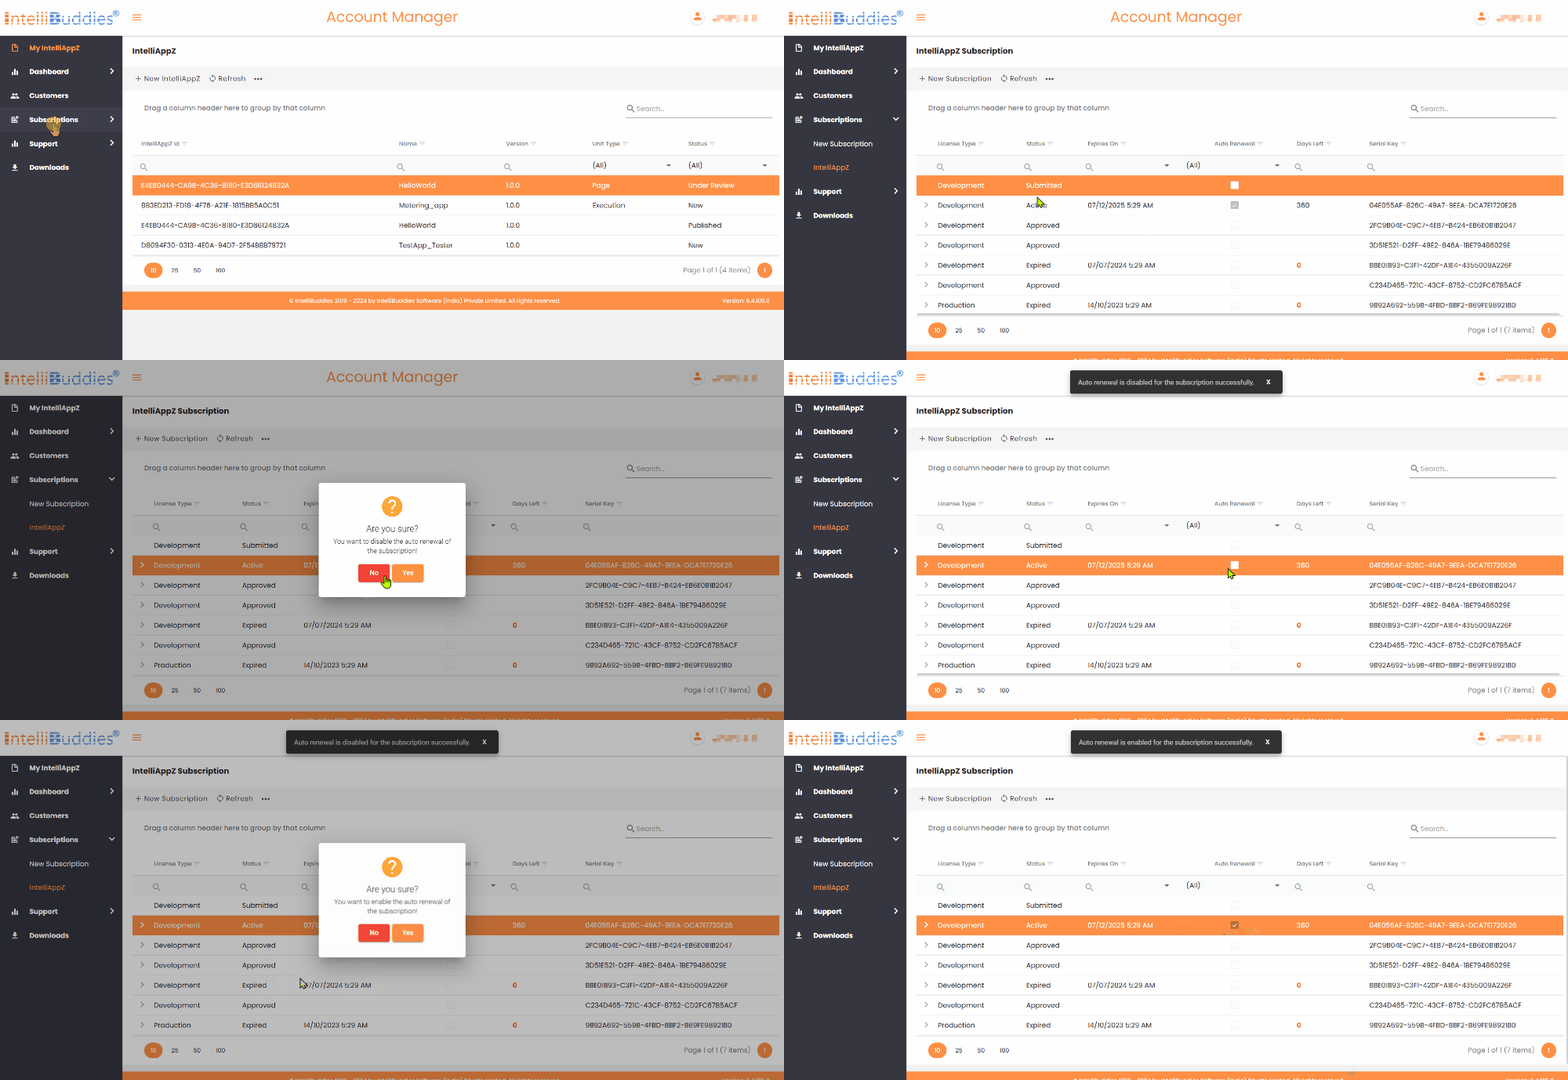
The only way to renew your IntelliAppZ subscription is to enable Auto Renewal for the Subscription. To enable auto-renewal, follow the steps provided below.
- Login to the Account Manager Portal using your registered email or partner-id.
- Expand the Subscriptions menu from the left-hand pane.
- Click on IntelliAppZ to view all existing subscriptions in the right-hand pane.
- Select the Subscription you want to renew from the list.
- Right-click on the Subscription and select Enable Auto-Renewal to enable the feature.
Activating your IntelliAppZ Development Subscription
To activate your Subscription, you need to complete the following prerequisites:
- Downloaded and deployed IntelliAppZ Designer
- Obtained and have access to your Subscription Serial Key
There are two ways to activate your Subscription: Online and Offline.
Online Activation
It is the recommended and easiest way to activate your Subscription. It requires internet connectivity on the system where you are activating your deployment.
Offline Activation
If you do not have an internet connection on the system to activate your deployment, you can go with Offline Activation.
You can activate your IntelliAppZ Development Subscription by activating the IntelliAppZ Designer license.
Subscription Serial Key
On approval of your Subscription request, the Account Manager will generate and associate a Serial Key with your Subscription. You can use this Serial Key to activate your deployments.
Once your Subscription is approved, you can come to the IntelliBuddies Account Manager and copy the Serial Key. To get your Subscription Serial Key:
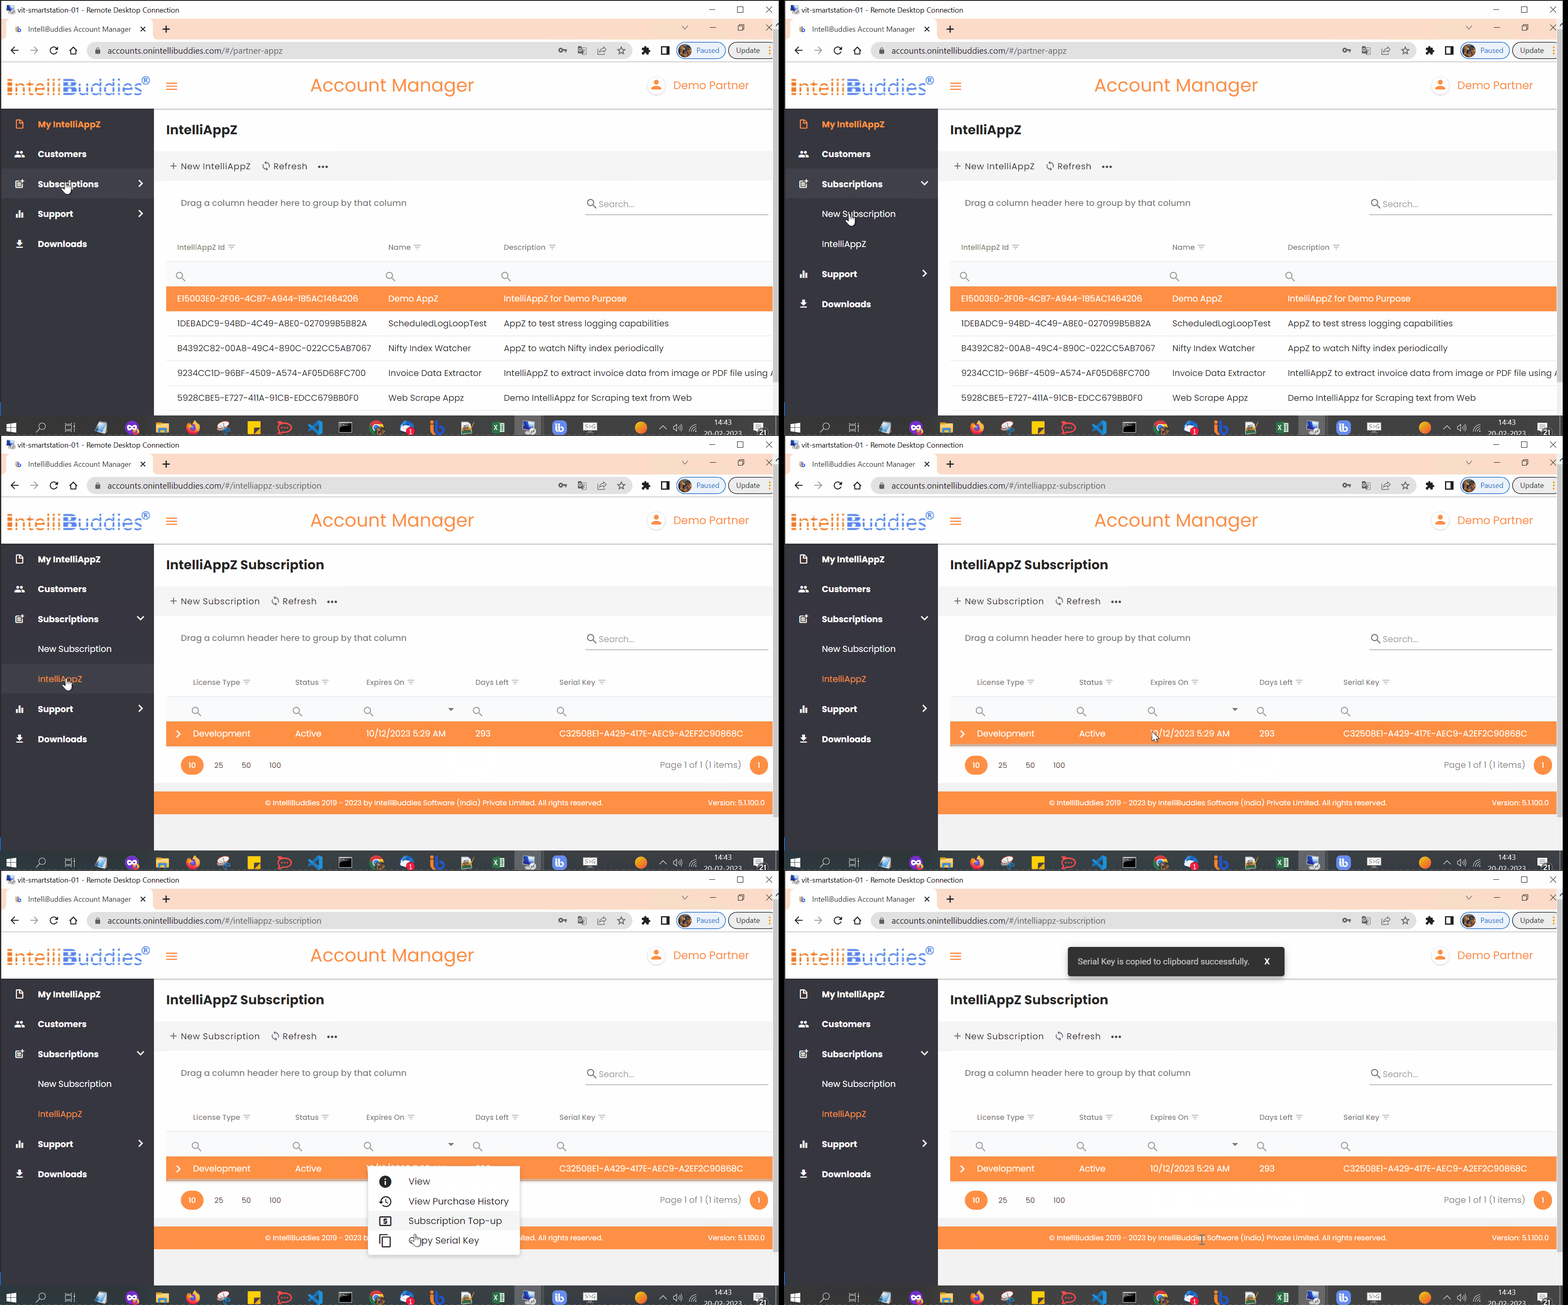
- Login to Account Manager Portal using your registered email or partner-id
- Click on Subscriptions
- Right-click on the Subscription and click on Copy Serial Key
- Save the copied Serial Key in a safe location
Registering and Publishing your IntelliAppZs'
IntelliAppZ ID
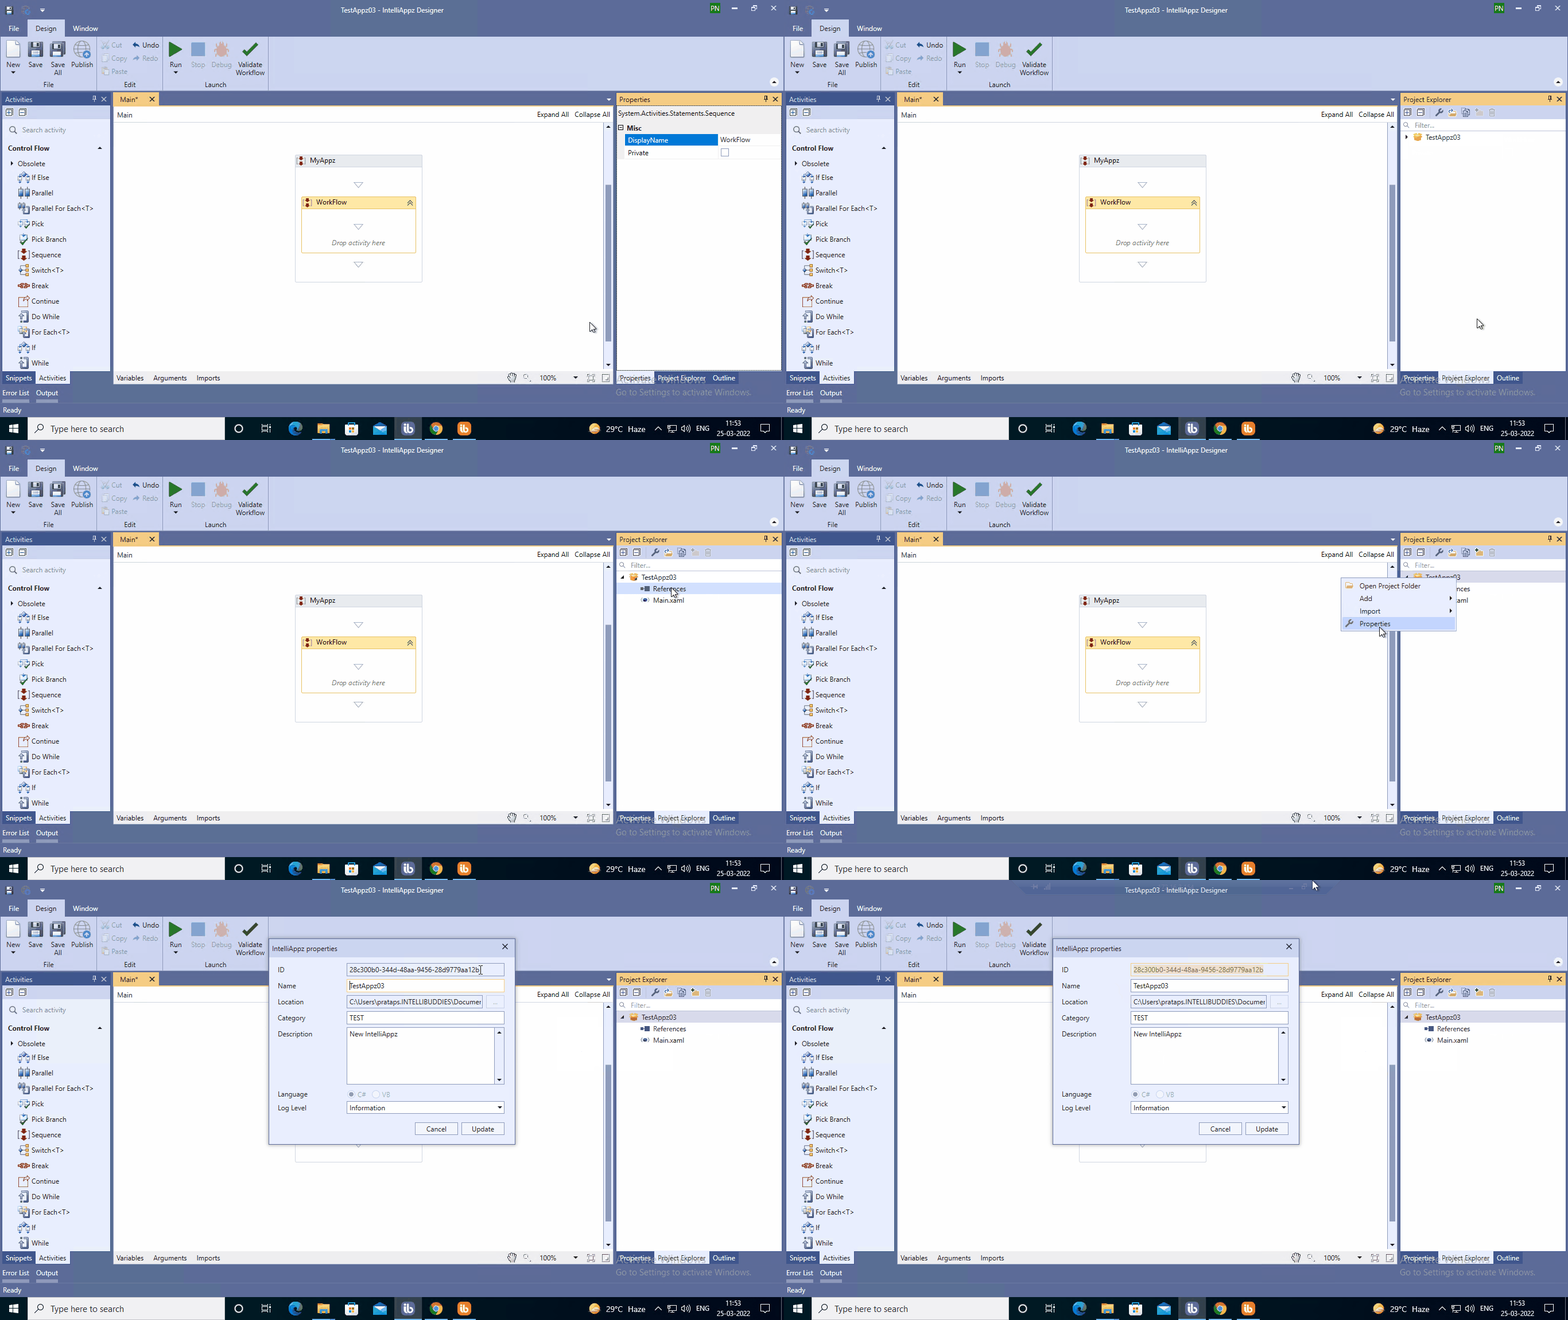
Every IntelliAppZ generated by our IntelliAppZ Designer would have a unique ID. You can find this unique ID by following the steps below:
- Start IntelliAppZ Designer
- Open the IntelliAppZ
- Go to the Project Explorer pane
- Right-click on the project name and select Properties
- A properties dialog pops up, and the first property is the ID
- You can select and copy the ID using Ctrl + C
Registering your IntelliAppZ
Every IntelliAppZ generated by our IntelliAppZ Designer should be registered inside IntelliBuddies Account Manager before generating Development / Trial / Production licenses to that IntelliAppZ.
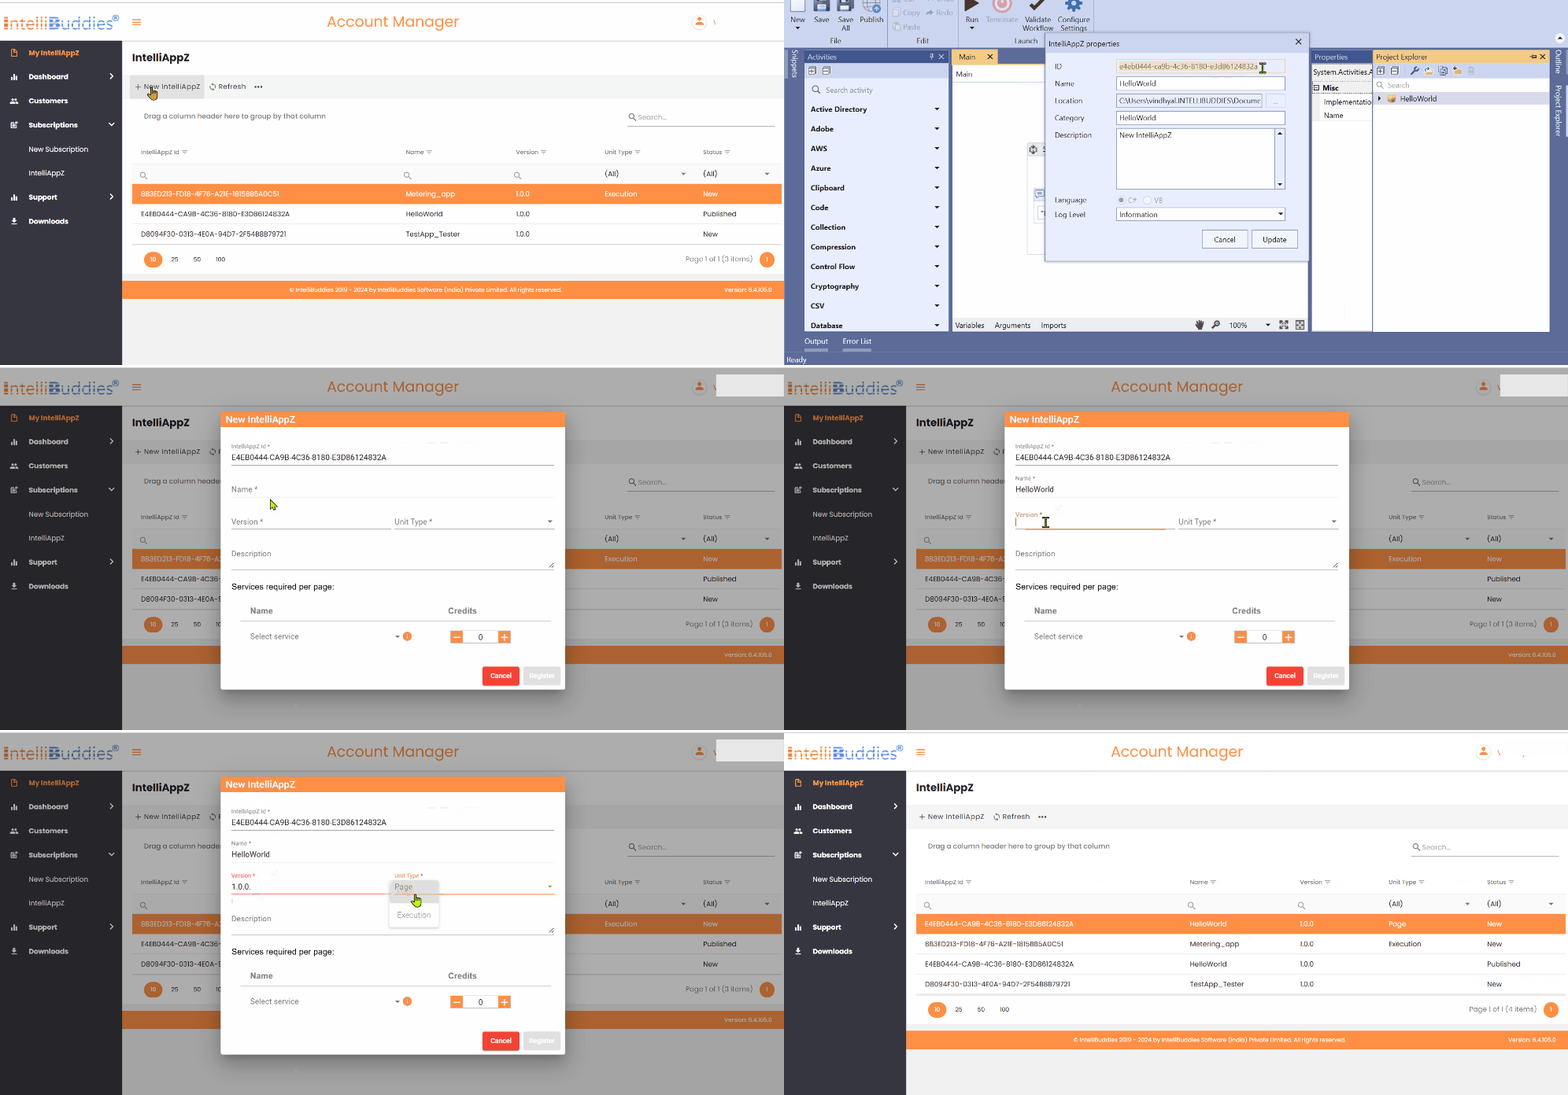
To register your IntelliAppZ:
- Login to IntelliBuddies Account Manager Portal using your registered email and password
- Click on My IntelliAppZ
- Click on the
button
- New Appz registration dialog pops up
| Dialog Settings | Description |
|---|---|
| IntelliAppZ ID | Specify unique ID generated by IntelliAppZ Designer. |
| Name | Specify a name for your IntelliAppZ. |
| Version | Specify the current version for your IntelliAppZ. |
| Unit Type | Choose the IntelliAppZ Credit Unit Type. |
| Description | Optionally, specify the type in a description for this IntelliAppZ. |
| Services Credit Mapping | Specify the Integration Gateway Services required or utilized by this IntelliAppZ along with its credit mapping. |
- Click on the Register button
Registering an IntelliAppZ will enable one(1) Development license for that IntelliAppZ. A Serial Key will be generated and prepared for activation.
Publishing your IntelliAppZ
To publish your IntelliAppZ, you must request a Review of your IntelliAppZ by IntelliBuddies Review Team.
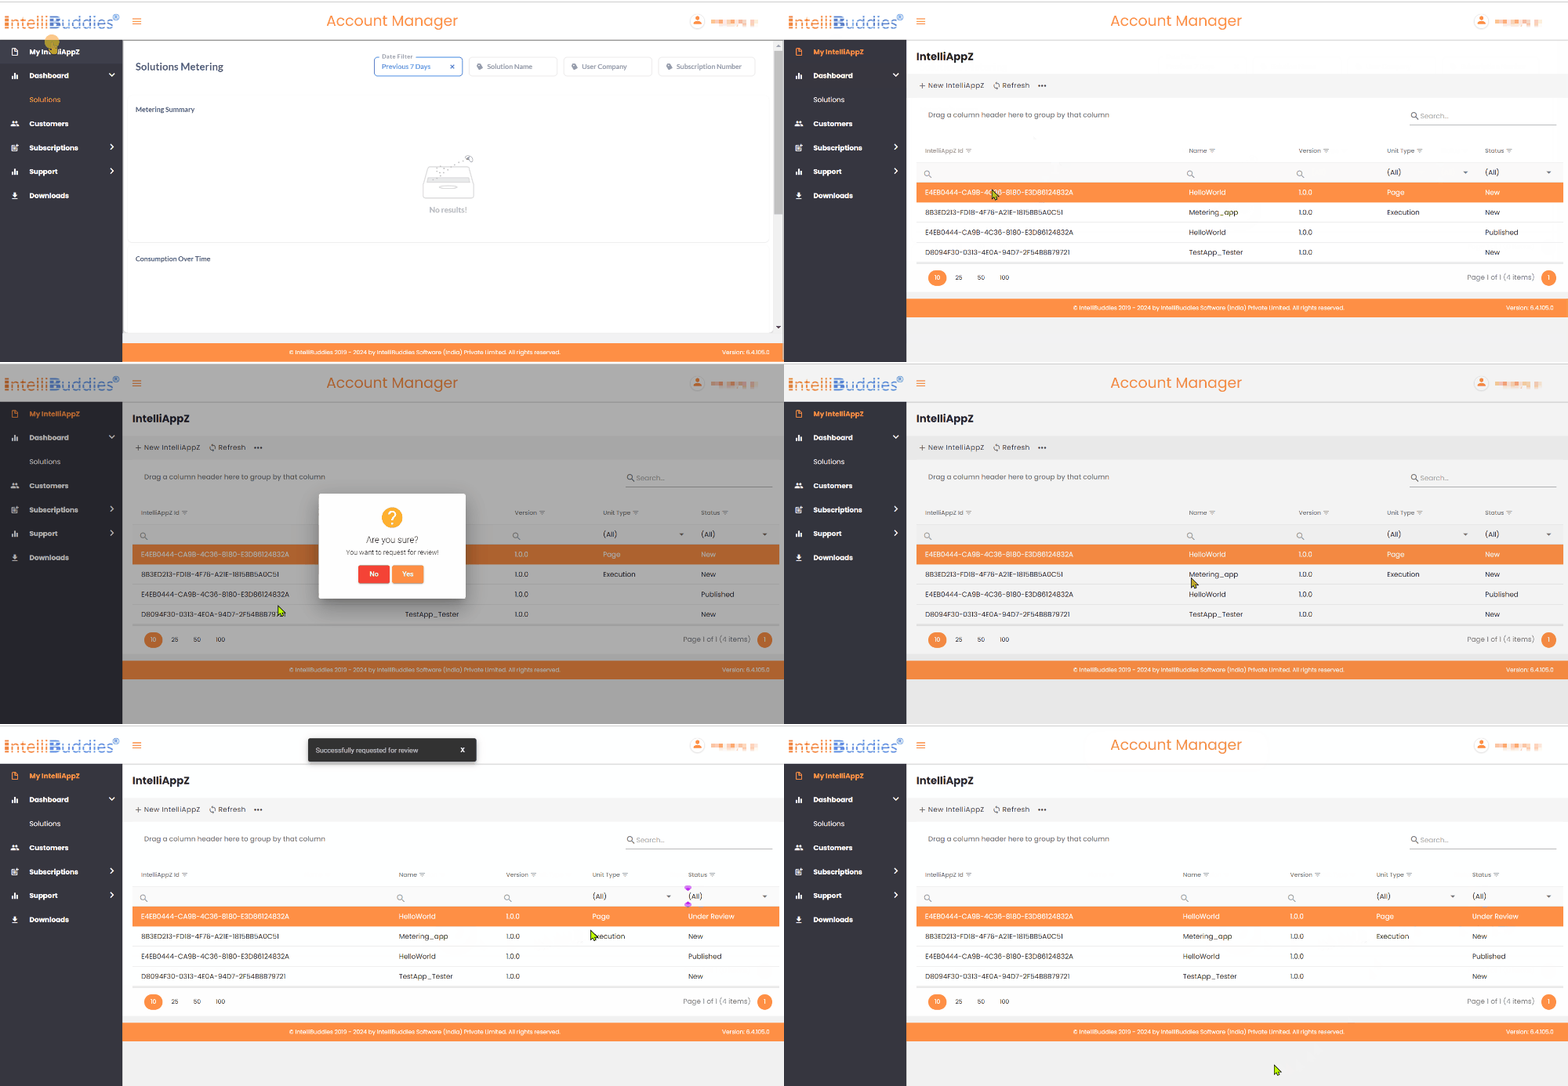
To request for Review:
- Go to IntelliBuddies Account Manager Portal
- Log in using your registered email and password
- Click on My IntelliAppZ
- Select the IntelliAppZ to be reviewed
- Right-click and select Request for Review
- The Status of the IntelliAppZ would turn into Under Review
IntelliBuddies Review Team might request a copy of the IntelliAppZ to review and approve your IntelliAppZ
Once your IntelliAppZ is approved, its Status will change to Published. You can subscribe to the Trial or the Production licenses for those IntelliAppZ.
Registering your IntelliAppZ Customer
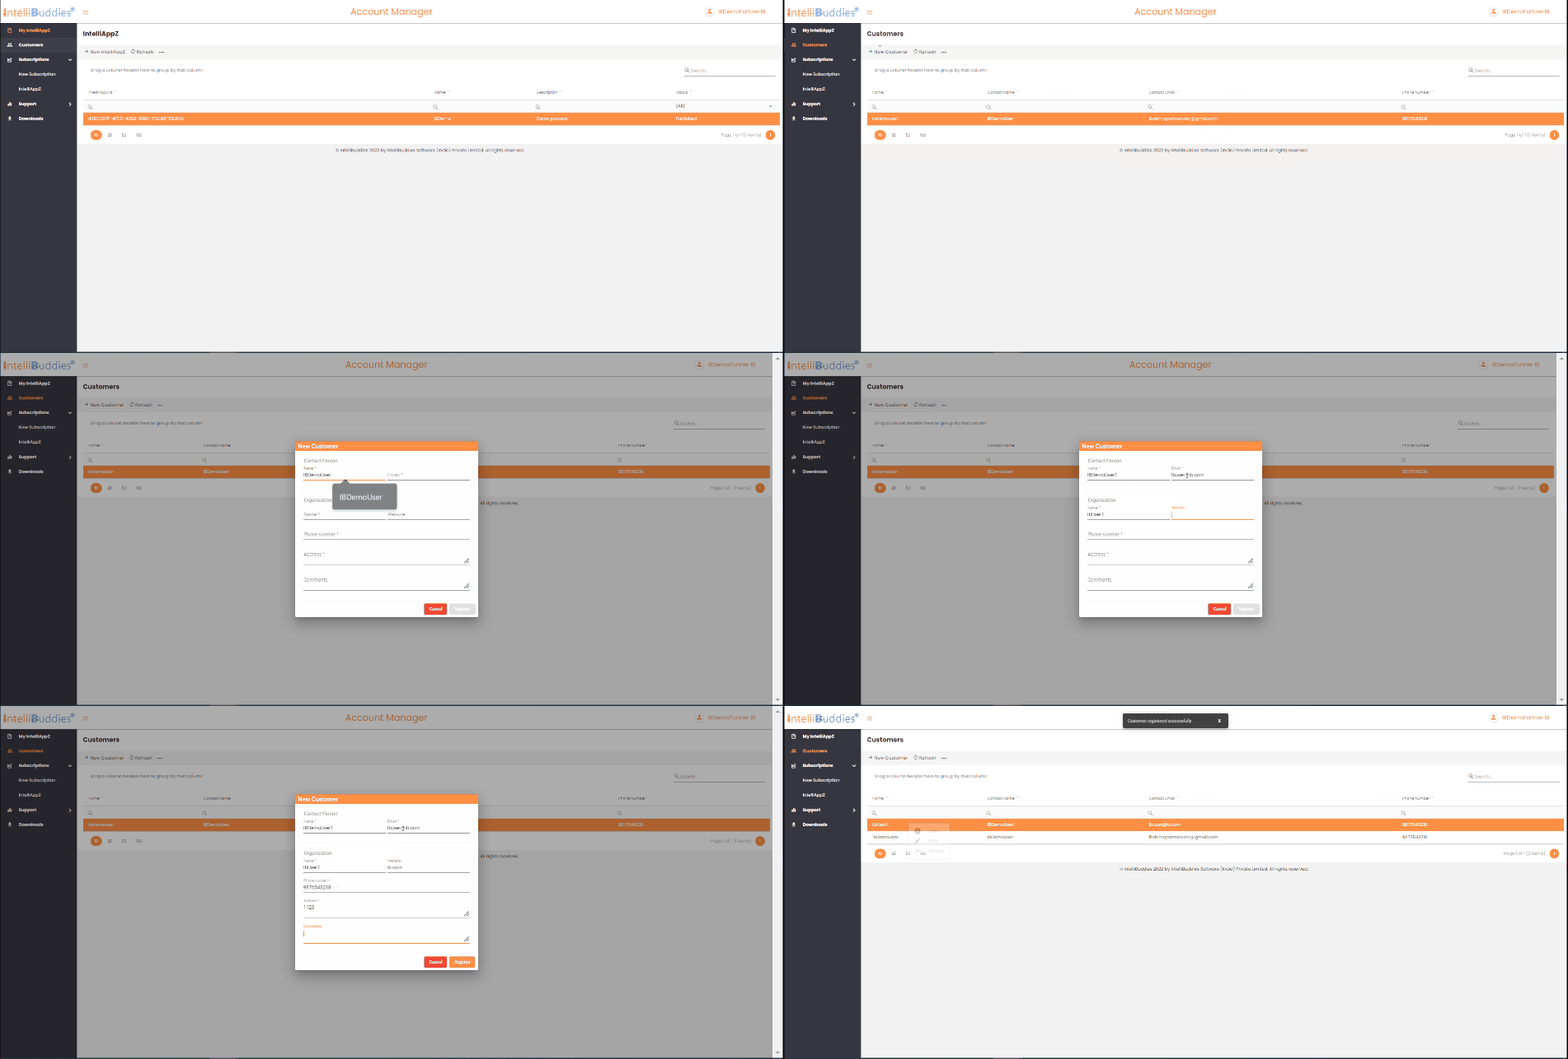
Your Customer must be registered inside IntelliBuddies Account Manager to generate a Production License Key for your IntelliAppZ. Please follow the steps below to register your Customer.
- Login to IntelliBuddies Account Manager Portal using your registered email and password
- Click on Customers
- Click on the +New Customer button
- A new Customer dialog pops up
- Fill in the Customer details
- Click on Register
Managing Support Ticket
To get technical assistance related to the Product, email support@intellibuddies.com or raise a support ticket inside Account Manager by logging in using your registered email or customer ID.
Account Manager provides the following functionalities to manage your support tickets.
Support Dashboard
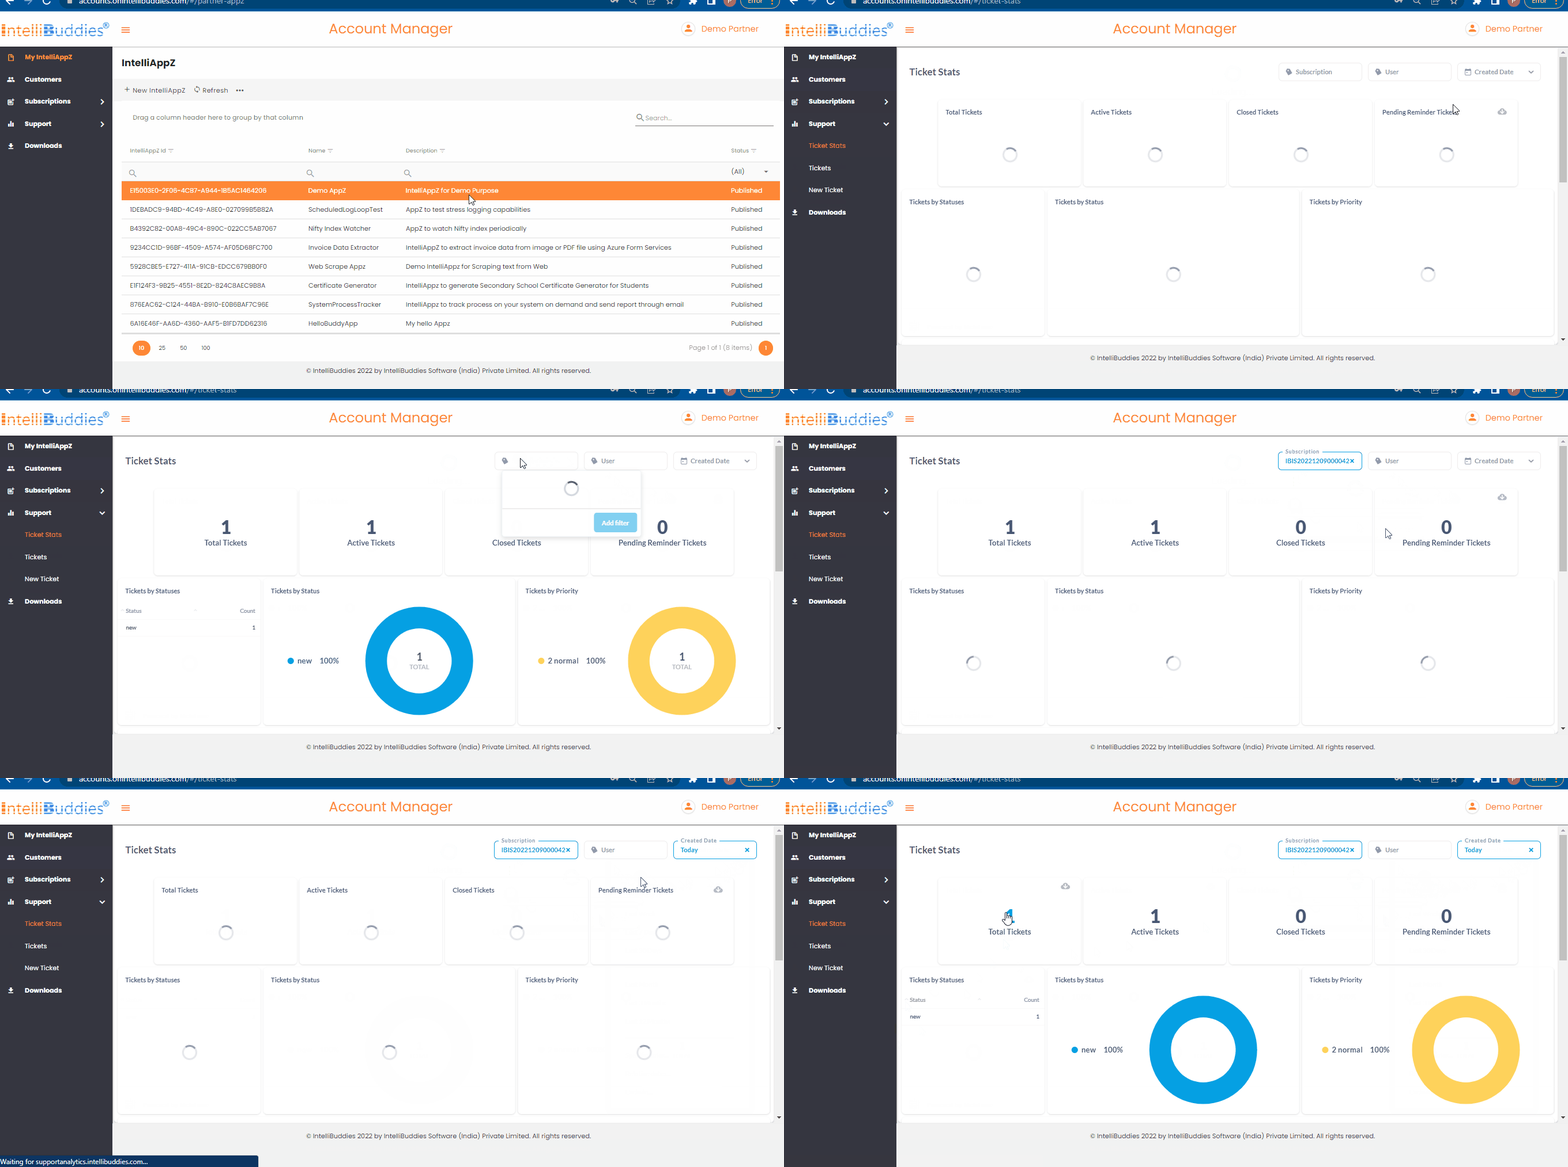
The Support Dashboard provides a brief analysis of your Support Tickets. It gives information about the total number of support tickets raised by you across your Subscriptions and their status analytics.
It also provides you valuable filters where you can filter it based on a specific Subscription or tickets created after or before a particular date.
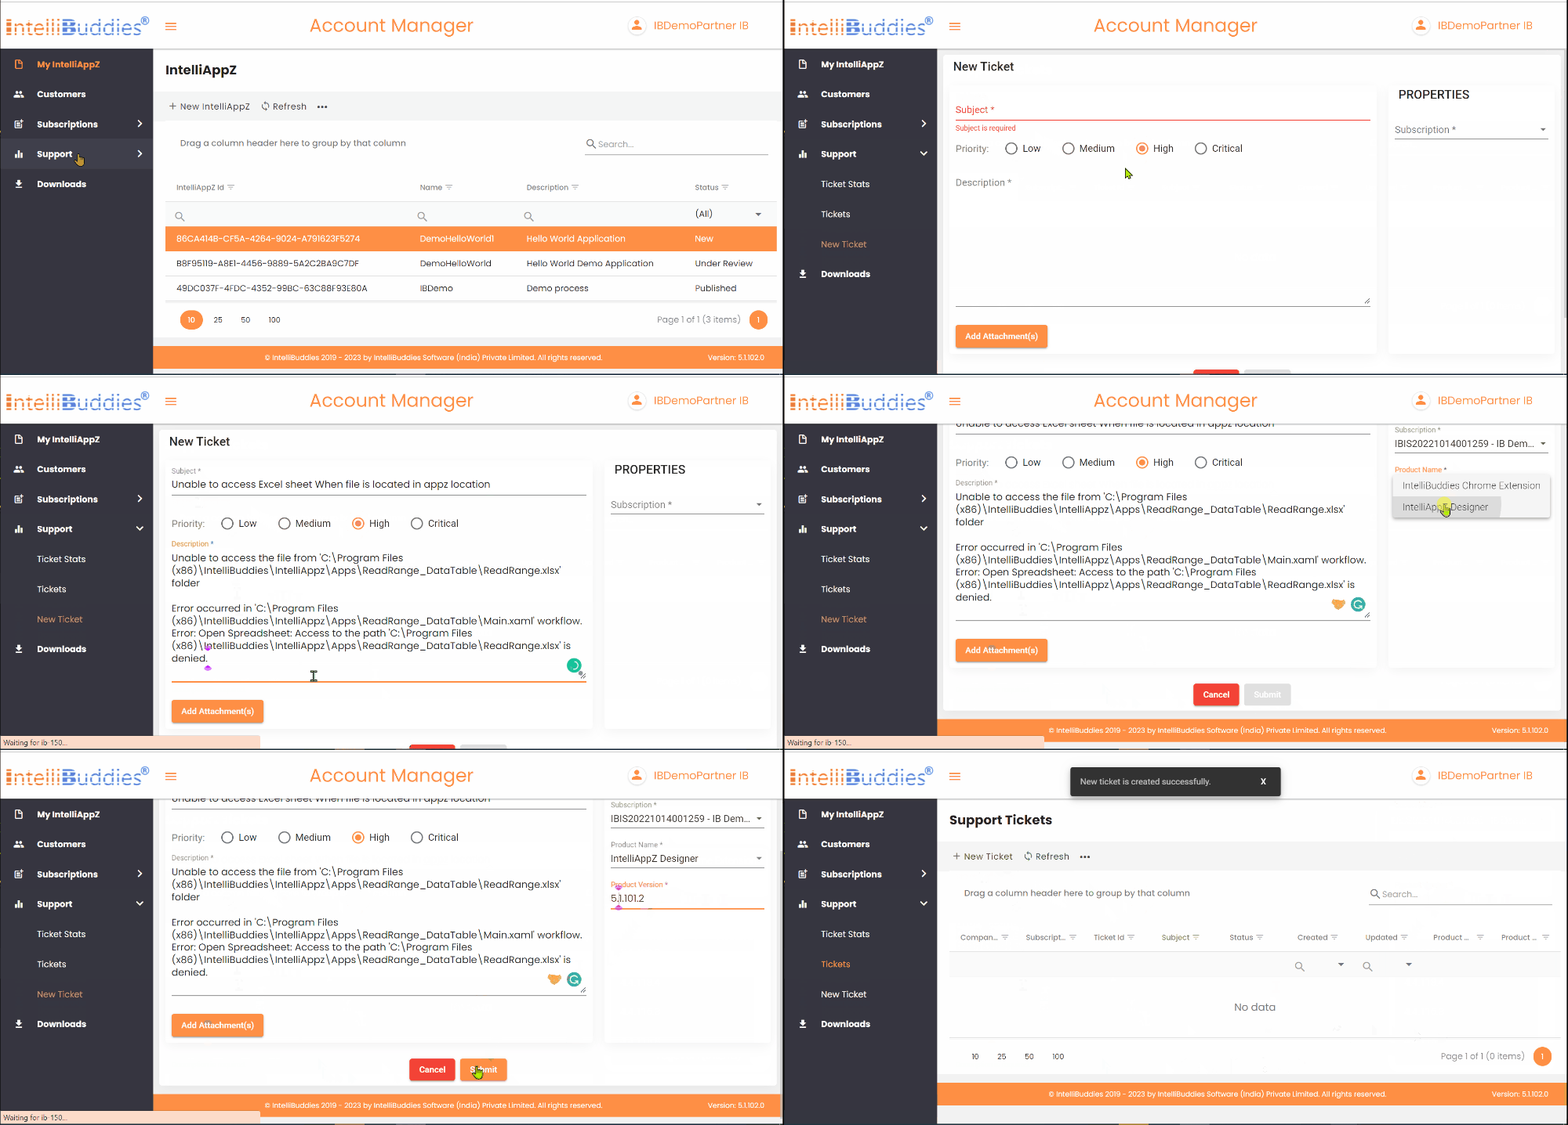
Creating Support Ticket
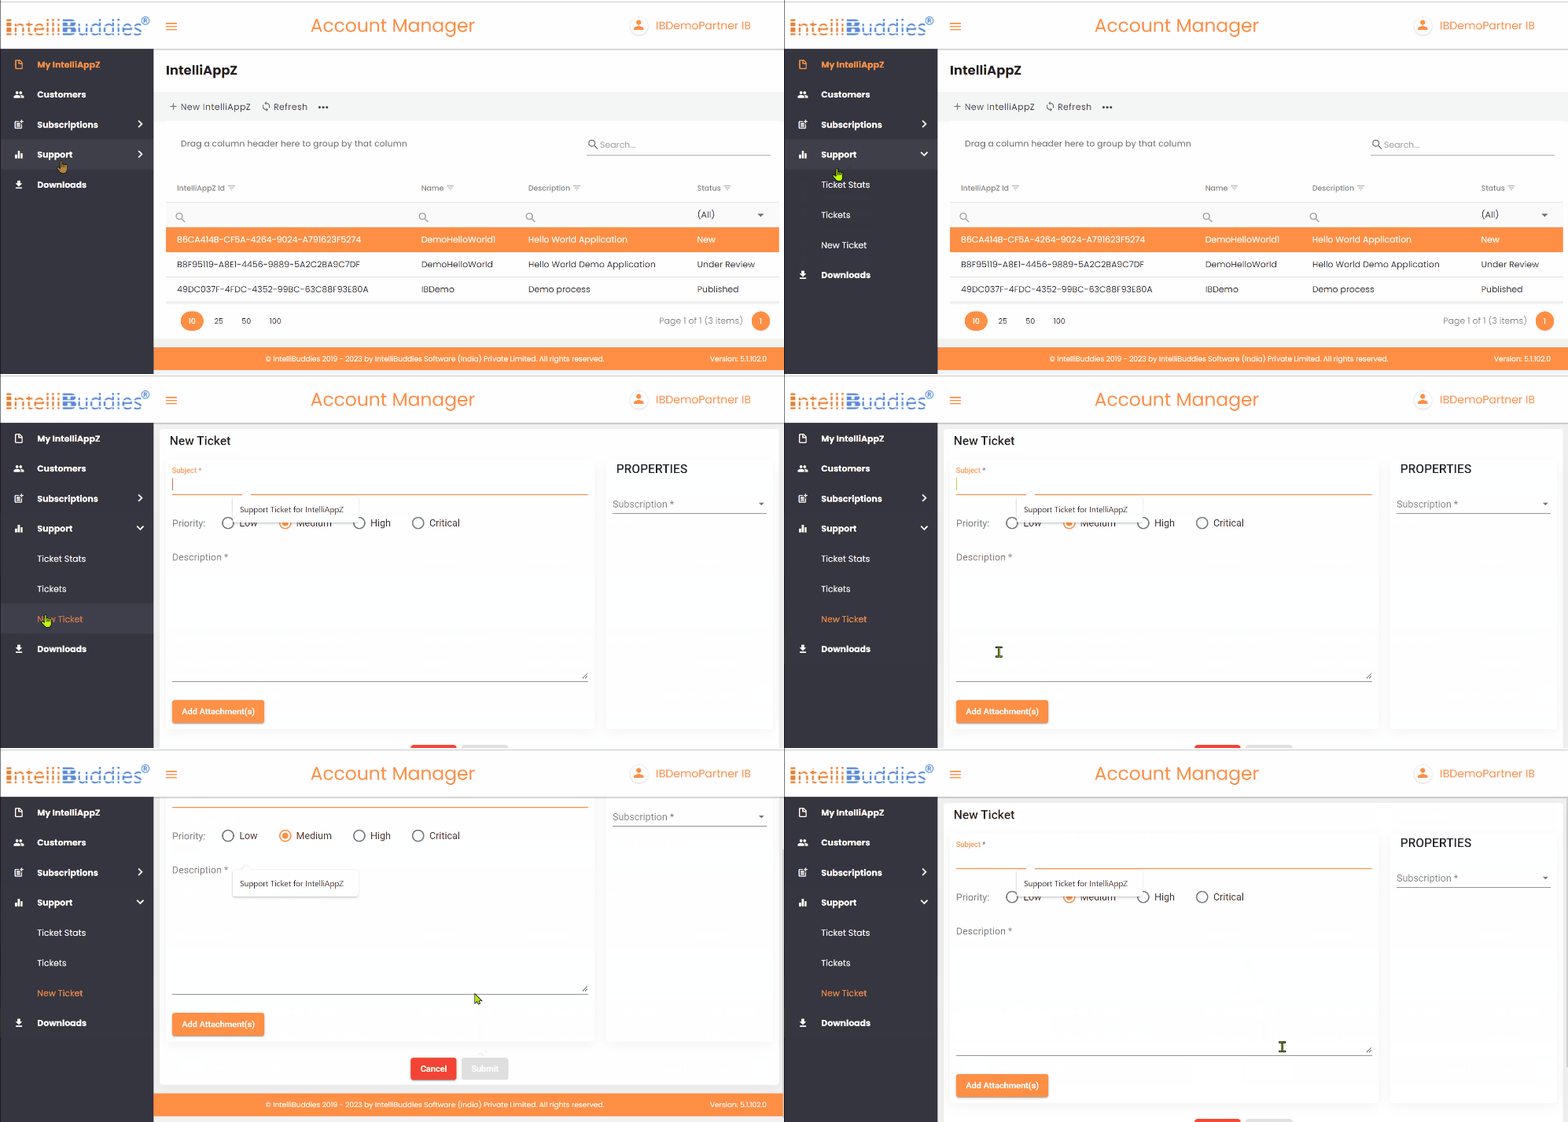
- Login to Account Manager Portal using your registered email or customer-id
- Expand the Support menu in the left pane.
- Click on New Ticket
- The New Ticket dialog appears.
- From the Properties pane inside the New Ticket dialog - Choose the appropriate Subscription for which you need to raise a ticket - Choose the appropriate Product(s) or SKU(s) - Select the Product Version that you have currently deployed and using
- Provide the Ticket summary in the Subject text box.
- Set the ticket's priority (Low, Medium, High, or Critical) by selecting the appropriate radio button.
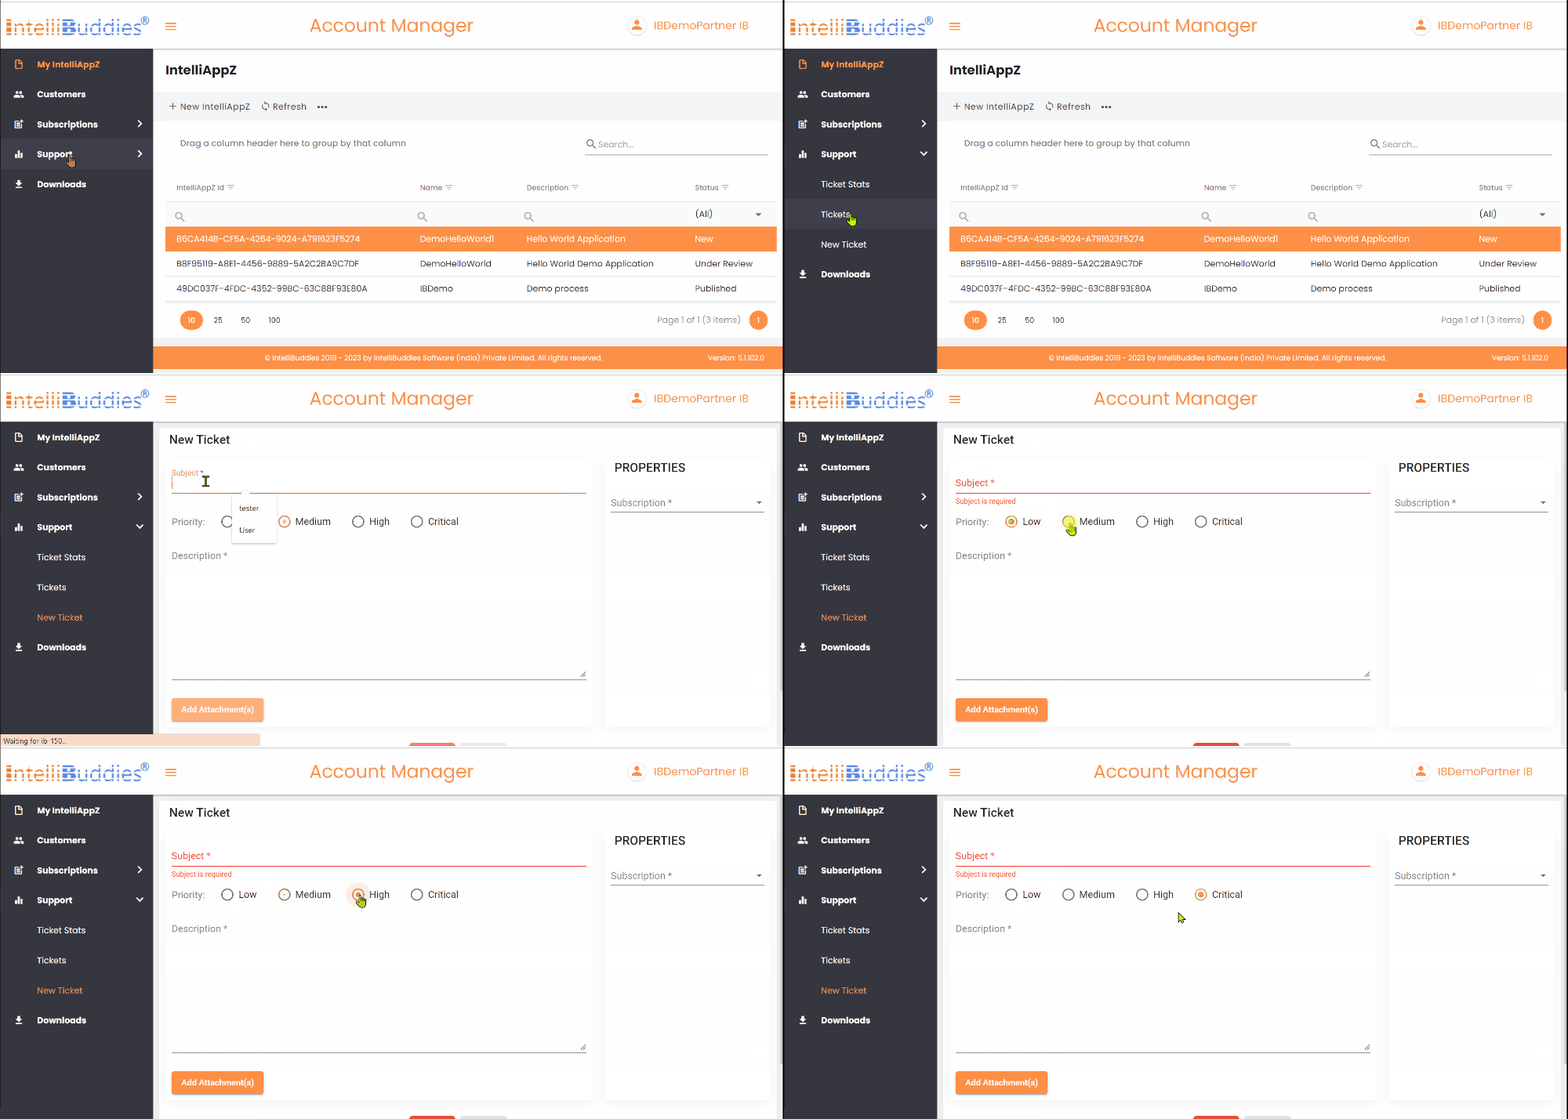
- Provide a detailed Description of this ticket to help our Support or Engineering team understand the support request.
- If your description requires you to attach a few files, you can do the same by using Add Attachment(s)
- Click on the Submit button
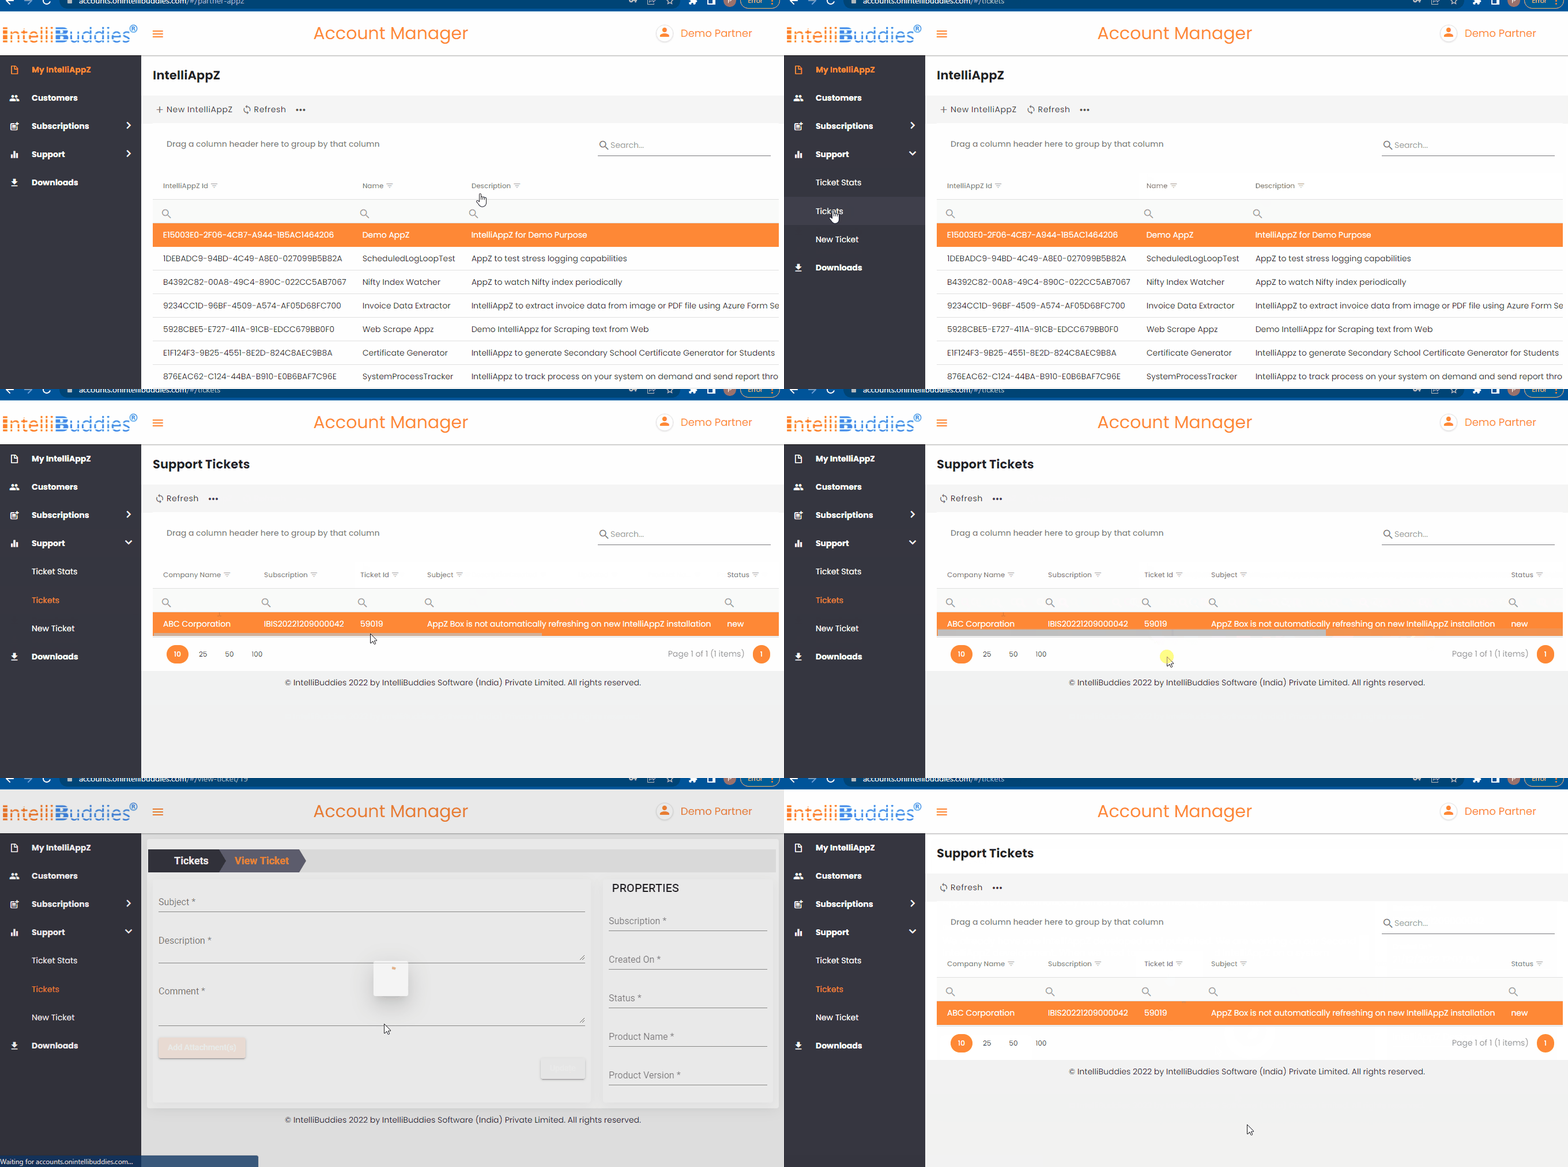
Ticket List
- Login to Account Manager Portal using your registered email or customer-id
- Expand the Support menu in the left pane.
- Click on Tickets
- You will see all the tickets raised by you in the right pane along with their corresponding Status
- You can select a specific ticket, right-click it, and select View. It will give you a descriptive view of the ticket.
Support Ticket Status Details
| Status | Description |
|---|---|
| New | Support Ticket was successfully created and is waiting to be taken by the IntelliBuddies Support Team. |
| Open | The IntelliBuddies Support Team has acknowledged the receipt of this ticket and is currently working on it. |
| Close | Your Support Ticket is addressed and closed. |
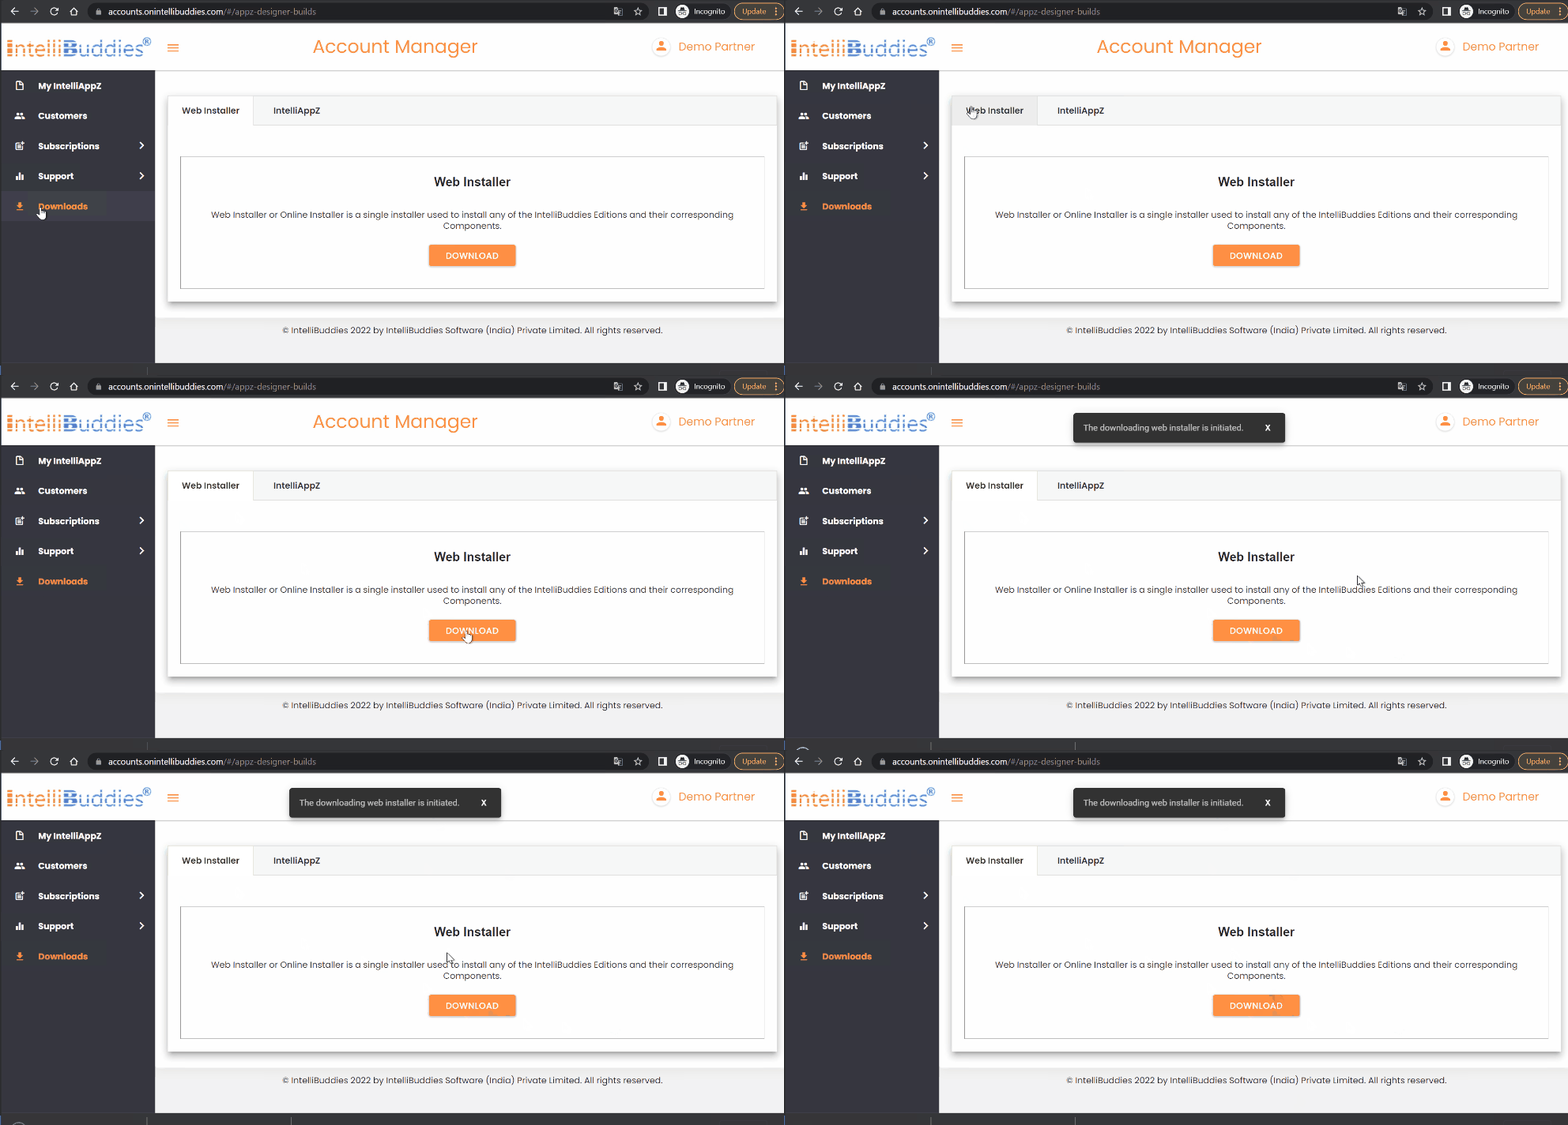
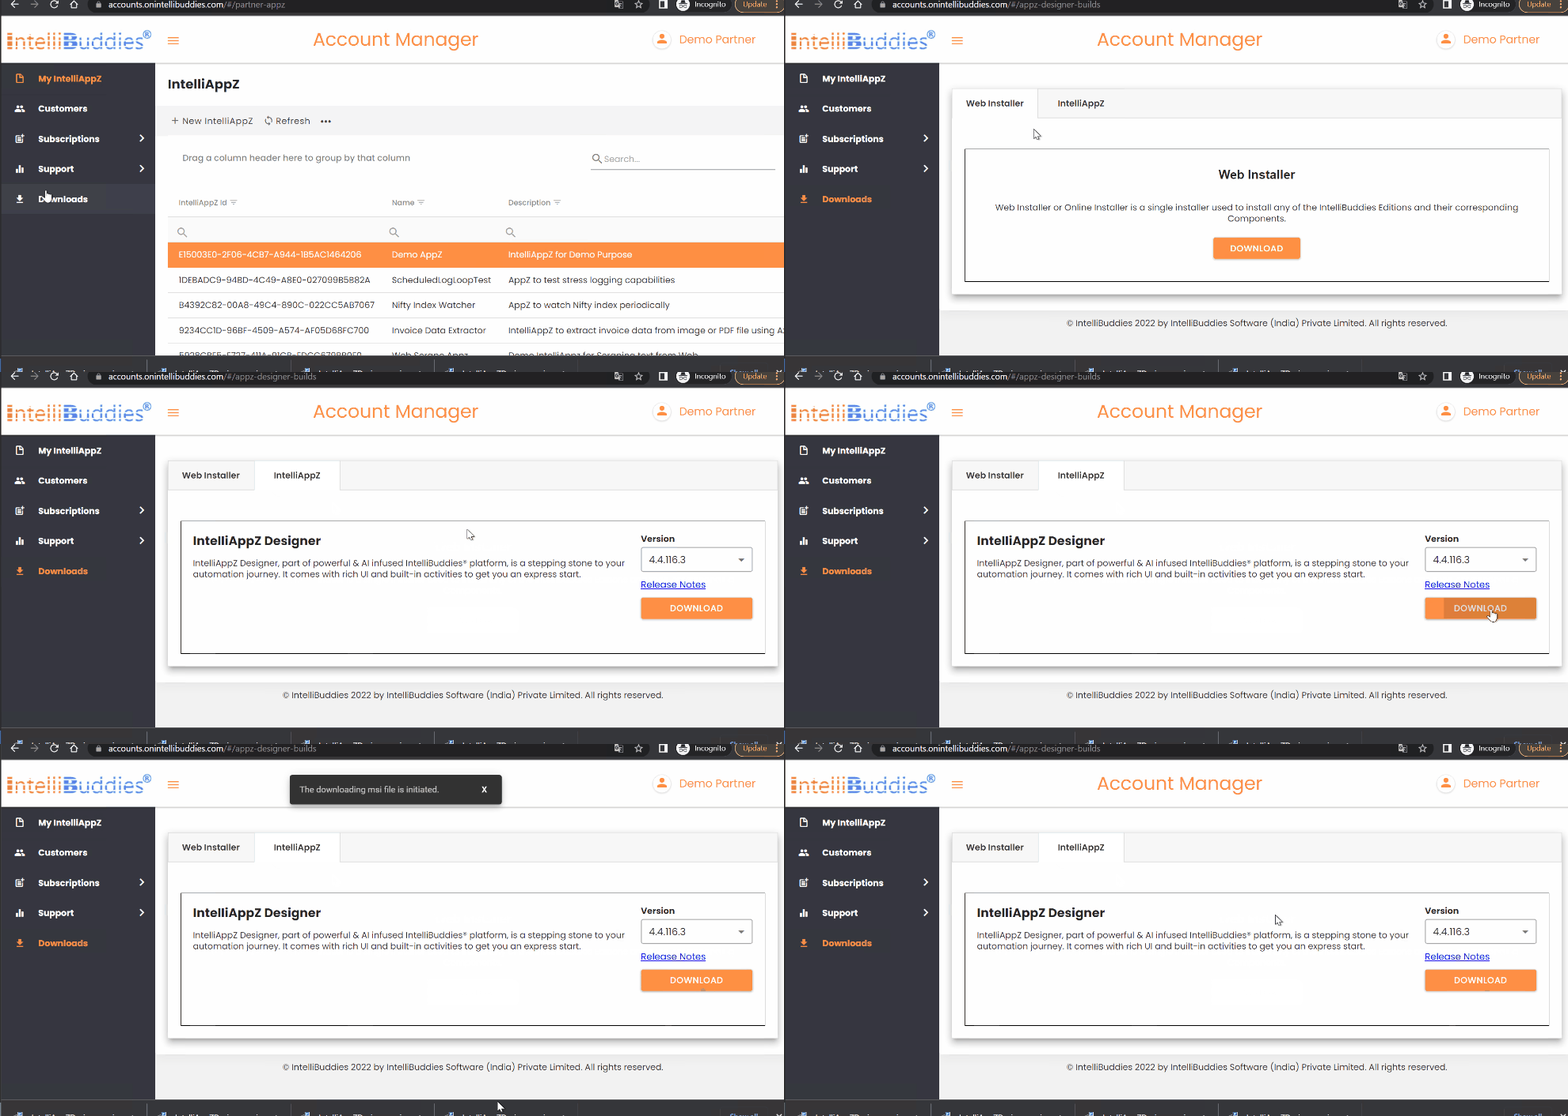
Download and Deploy IntelliBuddies Software
- Login to Account Manager using registered email or partner-id.
- Click on the Downloads in left pane.
- Click on the appropriate tab and download the corresponding MSI onto your system.
Web Installer
IntelliAppZ Designer
Monitor your Deployments
- Login to Account Manager using registered email or partner-id.
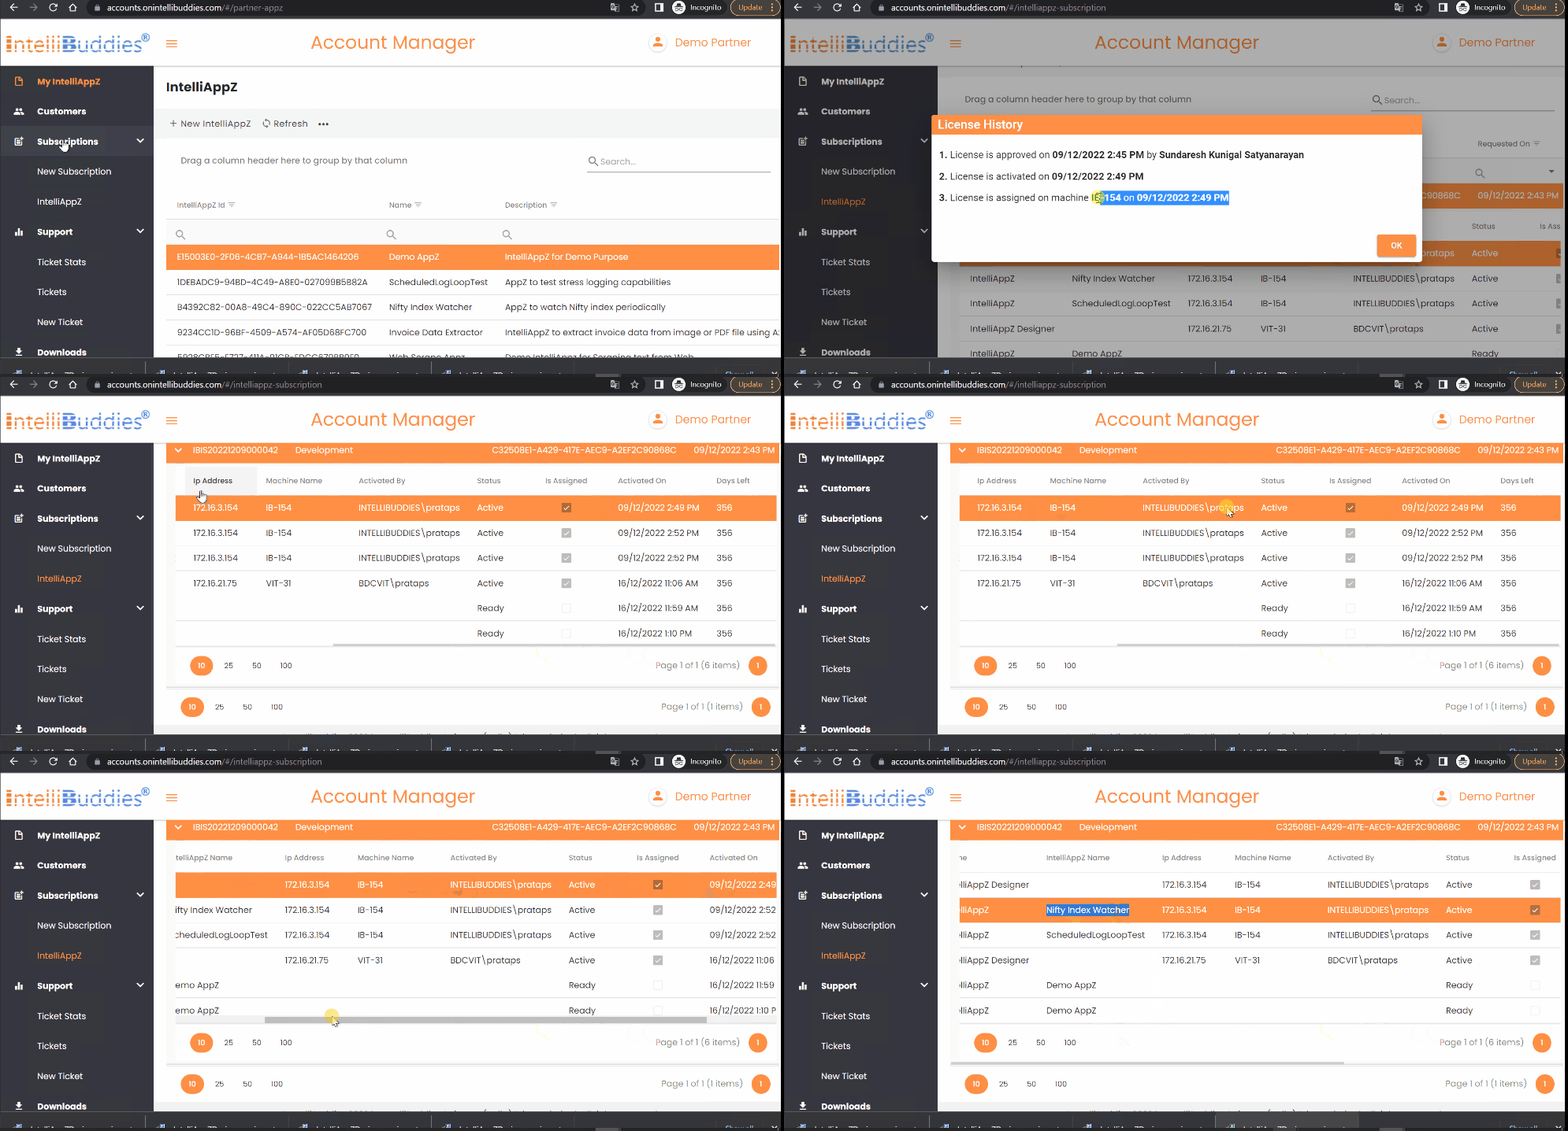
- Expand the Subscriptions menu in the left pane.
- Click on IntelliAppZ. It will display all your existing subscriptions in the right pane.
- You can monitor your subscriptions by checking the following details. - The activation date and time. - Number of Days left for expiry of license. - Status (Active, Ready, etc.) of license - Who activated the license - Machine details where the App is activated