Buddies
Overview
Two types of Buddies, Assistant and Smart, could execute your automation. Buddies always run in the context of a specific user identity. Hence, access to the Control Room's resources depends on access to the associated user identity. A user gets required access to perform certain operations through one or multiple roles. For more information, refer to Automation Roles.
View Smart Buddies
To view your Smart Buddies, go to the RPA Environment > Buddies > Smart page in the Control Room and select View from the Context Menu. You have the following viewing options.
| View | Description |
|---|---|
| All Buddies | Shows all the Buddies created by all the users. This is the default view for users with Maintainer role. |
| My Buddies | Shows a list of all the Buddies created or owned by the currently logged-in user of the Control Room. This is the default view for users other than Maintainer role. |
| Shared With Me | Shows a list of all the Buddies shared with the currently logged-in user of the Control Room. |
Context Menu Options
To manage your Buddies, you must have appropriate permissions for this entity to access and perform operations on the Buddies page.
| Context Menu Option | Description |
|---|---|
| Share | Manage your Smart Buddy permissions with other users. You can share your Buddy with other users so that they can use your Buddy to execute Jobs. |
| View | View all registered Assistant and Smart buddies |
| Edit | View and modify buddy details |
| Disable | You can disable the Buddy by clicking on this option |
| Delete | Delete a buddy |
| Audit | You can view the Audit Logs for each Buddy by clicking the Audit option on the Buddies page. |
| Shared With | This option lists all users accessing this Smart Buddy. |
Assistant Buddies
Assistant buddies impersonate real users and run under real user context. You can manage your Organization's assistant buddies from the Buddies > Assistant page.
Registering Assistant Buddy
Assistant Buddy gets registered into the Control Room automatically on its first connection to the Control Room. Assistant Buddies are node-locked, and the machine key sent during the registration process will bind the Assistant Buddy to a specific user and the machine associated with that user.
The user should have the Assistant Buddy application license to register a buddy successfully. For more information on how to assign a license to the user, please refer: Assigning Licences
Deleting an Assistant Buddy
On the Buddies > Assistant page, click on Context-Menu > Delete to delete an assistant buddy.
Note: Deletion of an Assistant Buddy will release its license to the pool so that you can assign it to another user
Smart Buddies
Smart buddies typically run under the virtual user's context. Virtual users are special user accounts dedicated to specific applications or Smart Stations.
You can manage your Organization's smart buddies from the Buddies > Smart page.
Registering Smart Buddy
You can add or register a new Smart Buddy from the Buddies > Smart page:
- Click on Toolbar-Menu >
 button
 - Select the automation user to be associated with this Buddy
Note: For more information on how to create an automation user, please refer: Adding Users Note: For more information on how to assign a license to the user, please refer: Assigning Licences
- Type in a name for this Buddy
- Assign a Smart Station to this buddy through Station Name field
- Type in Domain Name to be used by this Buddy to login into the smart station
- Type in Domain User to be used by this Buddy to log into the smart station
- Type in Domain Password to be used by this Buddy to log into the smart station
For more information, please refer to Setting User Credential.
- Provide a short description for this Buddy inside the Description field
- Click on the Add button
Setting User Credentials for Smart Buddy
Smart Buddy utilizes the user session to run the automation. This user might be a domain user or a local computer user. Hence, it is mandatory to provide the domain name and user name for our Smart Buddy to recognize the user session under which it has to run. You can configure the user associated with the Smart Buddy during creation.
Password
If the associated user session doesn't exist to run the automation, Smart Buddy will create a new session using RDP with the credentials supplied. If a password is not specified, Smart Buddy can run the automation only if the user session is already available.
Standalone Computer User
In the case of a local computer user, you can get the domain name and the user name by following the steps below:
- Run Windows Powershell application in Administrator mode
- On the command prompt, type in the following command and press the <Enter> key:
Get-Process -Name Explorer -IncludeUserName
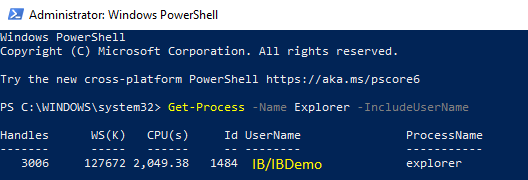
- Under the UserName column, copy the text before \ to the domain name field of Smart Buddy
- Under the UserName column, copy the text after \ to the user name field of Smart Buddy
Disabling a Smart Buddy
Disabling a smart buddy will turn off all the schedules or triggers associated with this Buddy and stop job executions by this Buddy. You can disable a smart buddy by following the steps below:
- On Smart Buddies page, select and click on Context-Menu > Disable option
- Confirm your operation by clicking on the Yes button
You can enable a smart buddy by selecting the Buddy and clicking on Context-Menu > Enable option.
Deleting a Smart Buddy
On Buddies > Smart page, click on Context-Menu > Delete to delete a smart buddy.
Deletion of a Smart Buddy will release its license to the pool so that you can assign it to another user.
Sharing a Smart Buddy
The Owner can share a Smart Buddy in the Control Room with other users. You can share a Smart Buddy with the following permission types.
| Permission Type | Description |
|---|---|
| Viewer | Users with this permission type can use this Smart Buddy to execute Jobs. |
| Editor | Users with this permission type can use this Smart Buddy to execute Jobs and also edit, disable, and enable this Smart Buddy. |
| Owner | Users with this permission type can use this Smart Buddy to execute Jobs, edit, disable, enable, delete, and share the Smart Buddy with other users. By default, the Control Room user whose license is assigned for Smart Buddy for the first time into the Control Room would be the Owner of the Smart Buddy |
You must be the Smart Buddy Owner to share a Smart Buddy with other users. You can share the Smart Buddy by performing the following actions:
- Go to Buddies > Smart page
- Select the Smart Buddy to share inside the grid
- Select Context-Menu > Share option
- Select the User to whom you want to share this Smart Buddy
- Change the permission type based on your needs. By default, a user gets Viewer permission.
- Click on Share
You can view the sharing information by selecting the Context-Menu > Shared With option. It will display a list of Smart Buddy users along with their Permissions.