Users
Overview
A User represents an individual who can access and interact with the AI Command Center based on assigned roles and permissions.
The AI Command Center supports multiple authentication providers. How users are created and managed depends on the selected authentication type.
The Users tab is available to users with appropriate user management permissions. It displays all users available to the system, regardless of whether they are locally managed or synchronized from an external identity provider.
How to access: From the AI Command Center, open Settings (⚙️) and navigate to Manage → Users.
Supported Authentication Providers
Basic Authentication
- Users are created, managed, and authenticated locally within the AI Command Center. - Administrators can manually add, edit, disable, or delete users.
LDAP Authentication
- Users are synchronized from an external LDAP directory (for example, Microsoft Active Directory). - User creation and updates are managed in the directory, not in the AI Command Center.
Azure Active Directory Authentication
- Users are synchronized from Azure Active Directory using OAuth / OpenID Connect. - User lifecycle management is handled in Azure AD.
User Synchronization Behavior
For authentication providers other than Basic Authentication, the AI Command Center relies on periodic synchronization.
How Synchronization Works
During synchronization, the system: - Imports new users from the external directory - Updates existing user attributes (such as name, email, or status) - Reflects enable/disable changes made in the identity provider
Important Notes
- Users are not manually created in the AI Command Center for LDAP or Azure AD authentication.
- User lifecycle management must be performed in the source identity provider.
- The AI Command Center acts as a consumer of identity data.
- Roles, groups, licenses, and automation permissions are managed within the AI Command Center.
Default Administrator
The User specified during AI Command Center deployment is created as the Default Administrator.
- This User cannot be deleted or replaced.
- The Default Administrator always retains administrative privileges.
- This account is used to log in immediately after installation and to complete initial system configuration.
Available Actions
User operations depend on assigned permissions.
| Option | Description |
|---|---|
| View | View user details in read-only mode. |
| Edit | Modify locally managed user details (for example, roles). |
| Disable | Disable the User and prevent access to the AI Command Center. |
| Delete | Permanently remove the User from the system (available only with Basic Authentication). |
| Assign Apps | Manage application licenses assigned to the User. |
| Audit | View audit logs related to the selected User. |
For LDAP and Azure AD users, identity attributes are read-only and synchronized from the external provider.
Adding Users
Basic Authentication
To create a user:
- Open the Users tab
- Select Add User.
- Enter the user details.
- Assign roles.
- Click Add.
LDAP / Azure AD Authentication
- Users cannot be created manually from the Users page.
- Users appear automatically after the next synchronization.
- Administrators assign roles, groups, and licenses after synchronization.
User Details
Each user profile includes:
| Property | Description |
|---|---|
| Username | Unique identifier from the authentication provider. |
| Password | Used only for Basic Authentication. |
| Email Address | Used for system and process notifications. |
| First Name | User’s first name. |
| Last Name | User’s last name. |
| Manager | Reporting manager, if available from the provider. |
| Department | User’s department, if available. |
| Roles | Roles directly assigned within the AI Command Center. |
Inherited Roles
Users may inherit roles from group memberships.
- Roles assigned to a group are automatically granted to all group members.
- Inherited roles are read-only at the user level.
- To revoke an inherited role: - Remove the User from the group, or - Remove the role from the group.
Editing a User
- Locally managed attributes (roles, groups, licenses) can be modified.
- Identity attributes synchronized from LDAP or Azure AD are read-only.
Removing and Disabling Users
Removing Users
- Supported only for Basic Authentication users.
- Removed users have their resources transferred to the Default Administrator.
Disabling Users
- Supported for all authentication types.
- Disabling a user: - Prevents login - Disables triggers and buddies - Releases client licenses back to the pool
Managing Application Licenses
To manage client tool licenses:
- Select the User.
- Choose Assign Apps.
- Enable or turn off licenses as needed.
- Apply changes
Importing Users (Basic Authentication Only)
The Import Users feature applies only to Basic Authentication users.
The import process runs asynchronously and is tracked through Background Jobs.
Importing users requires the Add User permission.
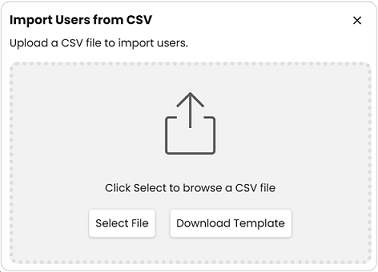
CSV File Requirements
For a successful import, the CSV file must strictly conform to the system-defined template. Modifying column headers or structure will cause the import to fail.
- Do not modify column headers.
- Always download the latest template from the import dialog.
Field Specifications
- The table below describes the supported fields and validation rules.
- Rows that do not meet these requirements are skipped during processing.
| Field Name | Mandatory | Max Length | Format / Rules |
|---|---|---|---|
| User Name | Yes | 100 | Must start with a letter or number. Allowed characters: A–Z, 0–9, @, _, -, . |
| First Name | Yes | 50 | Cannot be empty. |
| Last Name | Yes | 50 | Cannot be empty. |
| Email Address | Yes | 320 | Must be a valid email address (for example, name@domain.com). |
| Roles | No | N/A | Multiple roles must be separated by a semicolon (;). |
| Groups | No | N/A | Multiple groups must be separated by a semicolon (;). |
| Other Fields | No | N/A | Optional fields supported by the template. |
Import Processing Behavior
Password Generation
Passwords are not required in the CSV file.
- Passwords are not required in the CSV.
- Users receive an email with a password reset link.
Error Handling
- Row-Level Validation: Each row is validated individually.
- Continued Processing: Invalid rows are skipped.
- Processing continues for the remaining rows.
- Detailed Reporting: A detailed report is generated.
You may correct failed rows and re-import only those rows.
Cancellation & Batch Processing
Import jobs are processed in batches.
- Cancelling a job stops processing of future batches.
- Users already created before cancellation remain active.
- Cleanup, if required, must be performed manually.
For example, if 50 out of 100 users are processed before cancellation, those 50 users remain in the system.
Tracking Import Progress
Import jobs are displayed in the Background Jobs panel.
Each job shows:
- Status (Queued, Processing, Completed, Failed, Cancelled)
- Timestamp
- Search capability
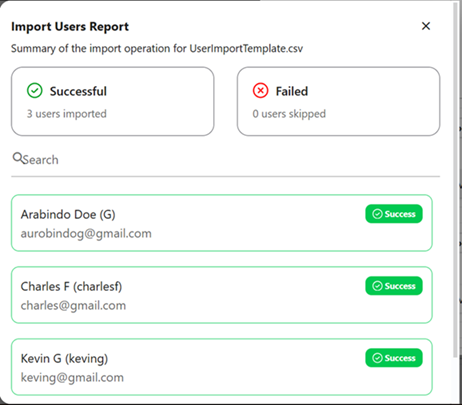
Viewing Import Reports
After completion:
- Open the corresponding Background Job
- Select View Report.
- Review success and failure details - Total users successfully created - Failed or skipped rows - Detailed error messages for each failure