AI Command Center - Installation
Introduction
This IntelliBuddies® Installation and Configuration manual provides information on installing and configuring IntelliBuddies® AI Command Center Software. This document describes IntelliBuddies®' AI Command Center system requirements, configuration settings, installation process, and post-installation activities.
IntelliBuddies® AI Command Center is a web portal software needed to orchestrate the automation designed and executed by the IntelliBuddies® platform.
Before proceeding further, please check our Server System Requirements
Architecture
Although there isn't a physical limit on the number of Buddies and Processes that a AI Command Center can handle, it is recommended that a single AI Command Center instance be restricted to up to 100 Buddies and 1000 processes.
AI Command Center supports multi-tenancy architecture where a single application instance serves multiple customers. A unique 'Tenant-ID' represents each Tenant sharing the same AI Command Center Database and front end.
AI Command Center Components
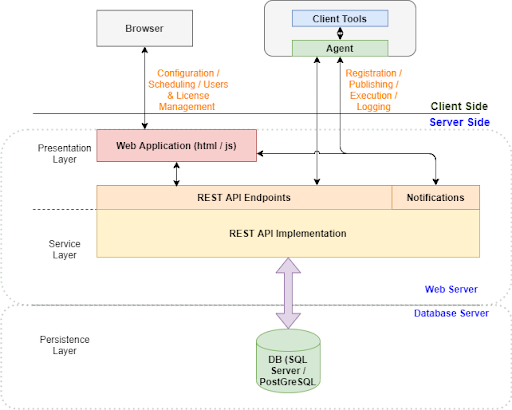
The AI Command Center has the following logical components grouped into three layers:
- Presentation Layer
- Web Application
- REST API End Points
- Web Service Layer
- REST API Implementation
- Persistence Layer
- SQL Server / PostgreSQL Server

The AI Command Center is a web application that contains both UI and backend modules. Using supported Internet browsers, users can configure users, schedule jobs, and manage licenses within their enterprise.
IntelliBuddies® AI Command Center utilizes the database to store and operate on many entities supported, such as processes, users, roles, and schedules. Web Application manages the above data.
On the client side, the client tools represent all IntelliBuddies® client software, including Process Designer, Smart & Assistant Buddies, IntelliTrainer to train your Buddies to understand your documents, and web browser plugins required to perform web automation.
Installation
Download Installer
If you have not yet downloaded the AI Command Center Windows Installable, please download it from your IntelliBuddies® Account Manager using a customer account.
Once you log in to the IntelliBuddies® Account Manager portal with your customer login credentials, go to the Downloads section and download the installable onto the system where you need to install the AI Command Center.
The IntelliBuddies® AI Command Center Windows Installer (IntelliBuddies.Server.<version>.msi) can help you install AI Command Center by enabling you to perform the following things:
- Install IntelliBuddies® AI Command Center
- Configure IIS settings
- Configure database settings either for Microsoft SQL Server or PostgreSQL Server
- Enable Windows Authentication
NOTE: By default, IntelliBuddies® AI Command Center is installed under C:\Program Files (x86)\IntelliBuddies\Control Room directory.
Installation Steps

Step-1: Invoke Installer
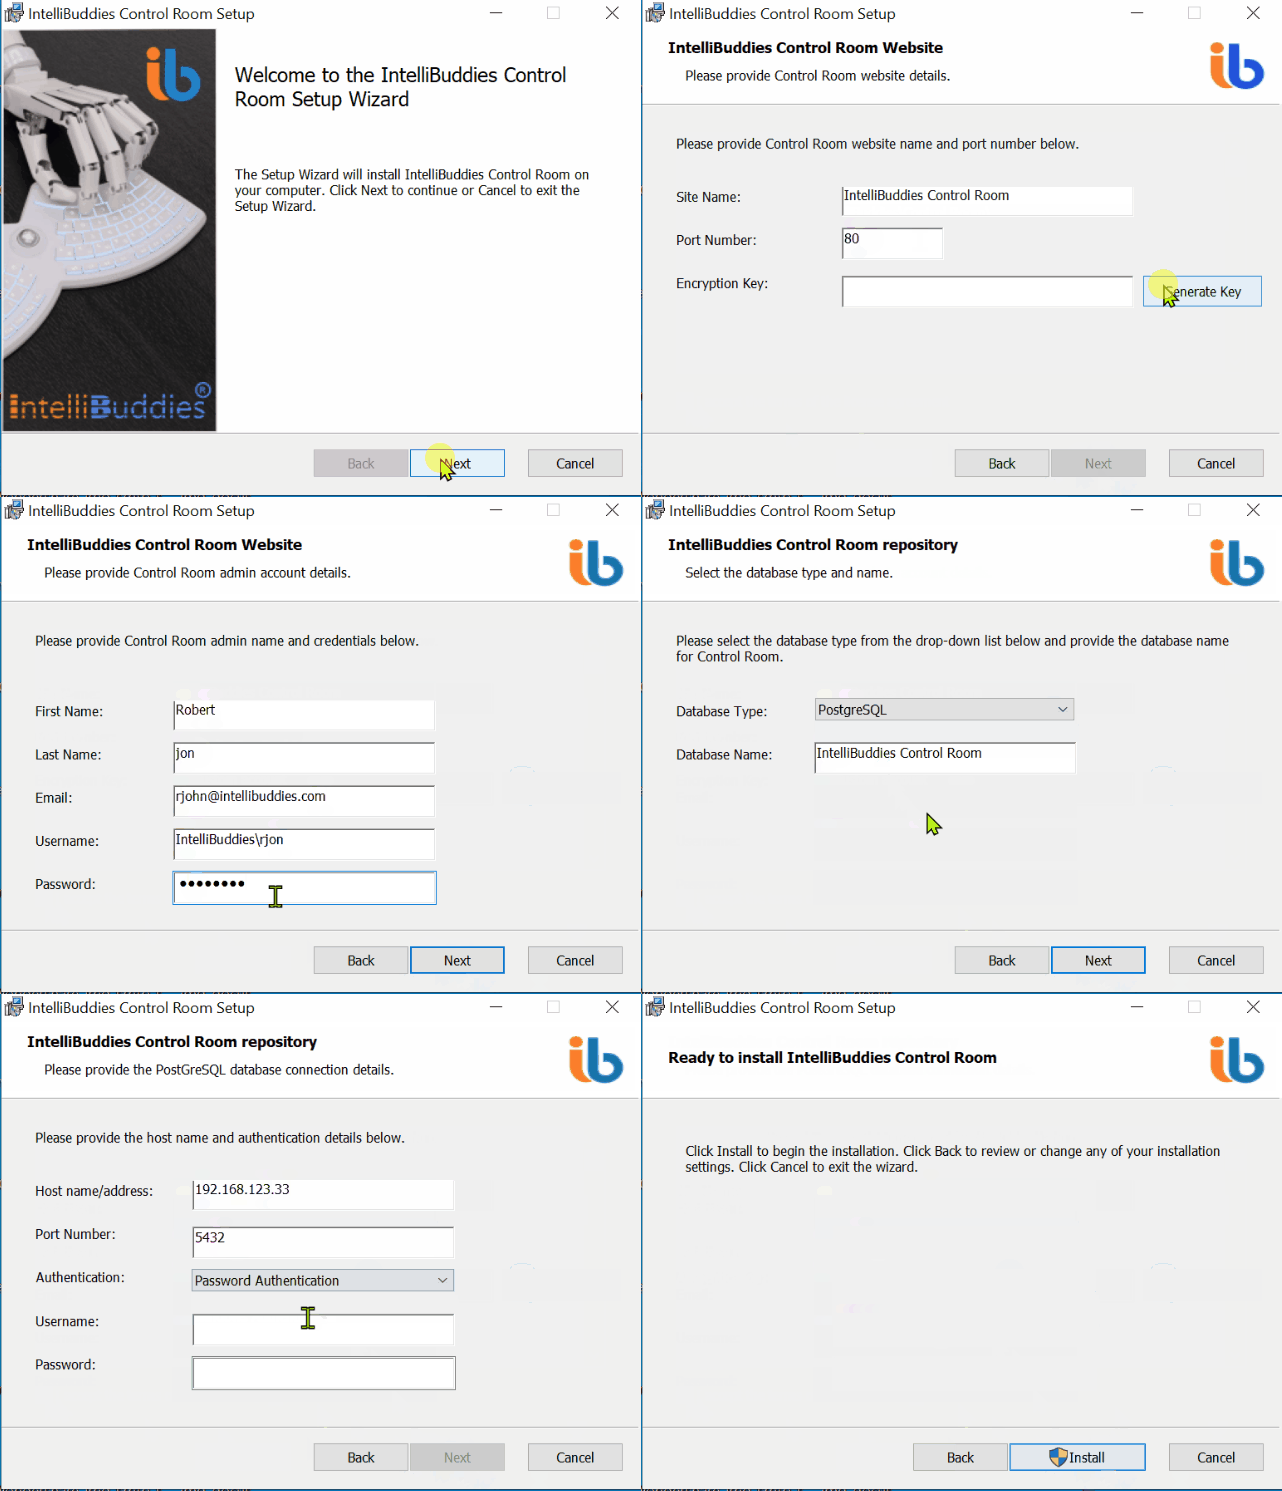
- Run the Windows Installer (IntelliBuddies.Server.msi). The IntelliBuddies® AI Command Center Setup wizard will be displayed.
Step-2: End User License Agreement
- The setup wizard will bring the End User License Agreement. Please go through the License Agreement and then check I accept the above licensing terms and privacy policy before clicking on Next
Step-3: Select Installation Folder
- Change the installation folder during installation. By default, it deploys the AI Command Center under C:\Program Files (x86)\IntelliBuddies\Control Room.
Step-4: Website & Authentication Details
- You can configure the website name and port and select the appropriate Authentication methodology while accessing the AI Command Center as part of this setup.
| Configuration | Description |
|---|---|
| Site Name | The Name of the AI Command Center website. By default, it is set to IntelliBuddies AI Command Center |
| port | The Port you want to use to enable communication between the computer and the AI Command Center |
| Encryption Key | The Key used by the AI Command Center to encrypt and decrypt the password properties stored as part of AI Command Center. You can either copy your own Key inside the text area or click on Generate Key so that our installer can generate a new Key |
- After configuring, click on Next
Step-5: Application Pool Settings
- Configure the options as desired:
- Name: The hardcode Name IntelliBuddies AI Command Center is set for the application pool name.
- Identity: allows you to choose the Identity under which IntelliBuddies AI Command Center website should run. The following options are available:
- Application Pool Identity – runs under the default identity of the application pool.
- Custom account – runs under existing Windows or Domain Identity. This option enables two extra fields, sername and Password, allowing you to specify the Identity under which to run the IntelliBuddies AI Command Center website.
- Click on Next

Step-6: AI Command Center Administrator Settings
| Field | Description |
|---|---|
| First Name | The First Name of the Host Administrator |
| Last Name | The last Name of the Host Administrator |
| The email of the Host Administrator | |
| Username | The Username of the Host Administrator |
| Password | The Password to be used for Host Administrator |
- Click on Next
Step-7: Database Selection
You can configure the AI Command Center database from here.
- Database Type - Select the appropriate database provider. IntelliBuddies AI Command Center supports, as of now, the following Database types: - Microsoft SQL Server - PostgreSQL
- Database Name – the Name of the Database. By default, the Name is IntelliBuddies AI Command Center
- Click on Next
Step-8: Database Settings
- The Database Server Settings is displayed based on the Database Type you had selected in the previous step
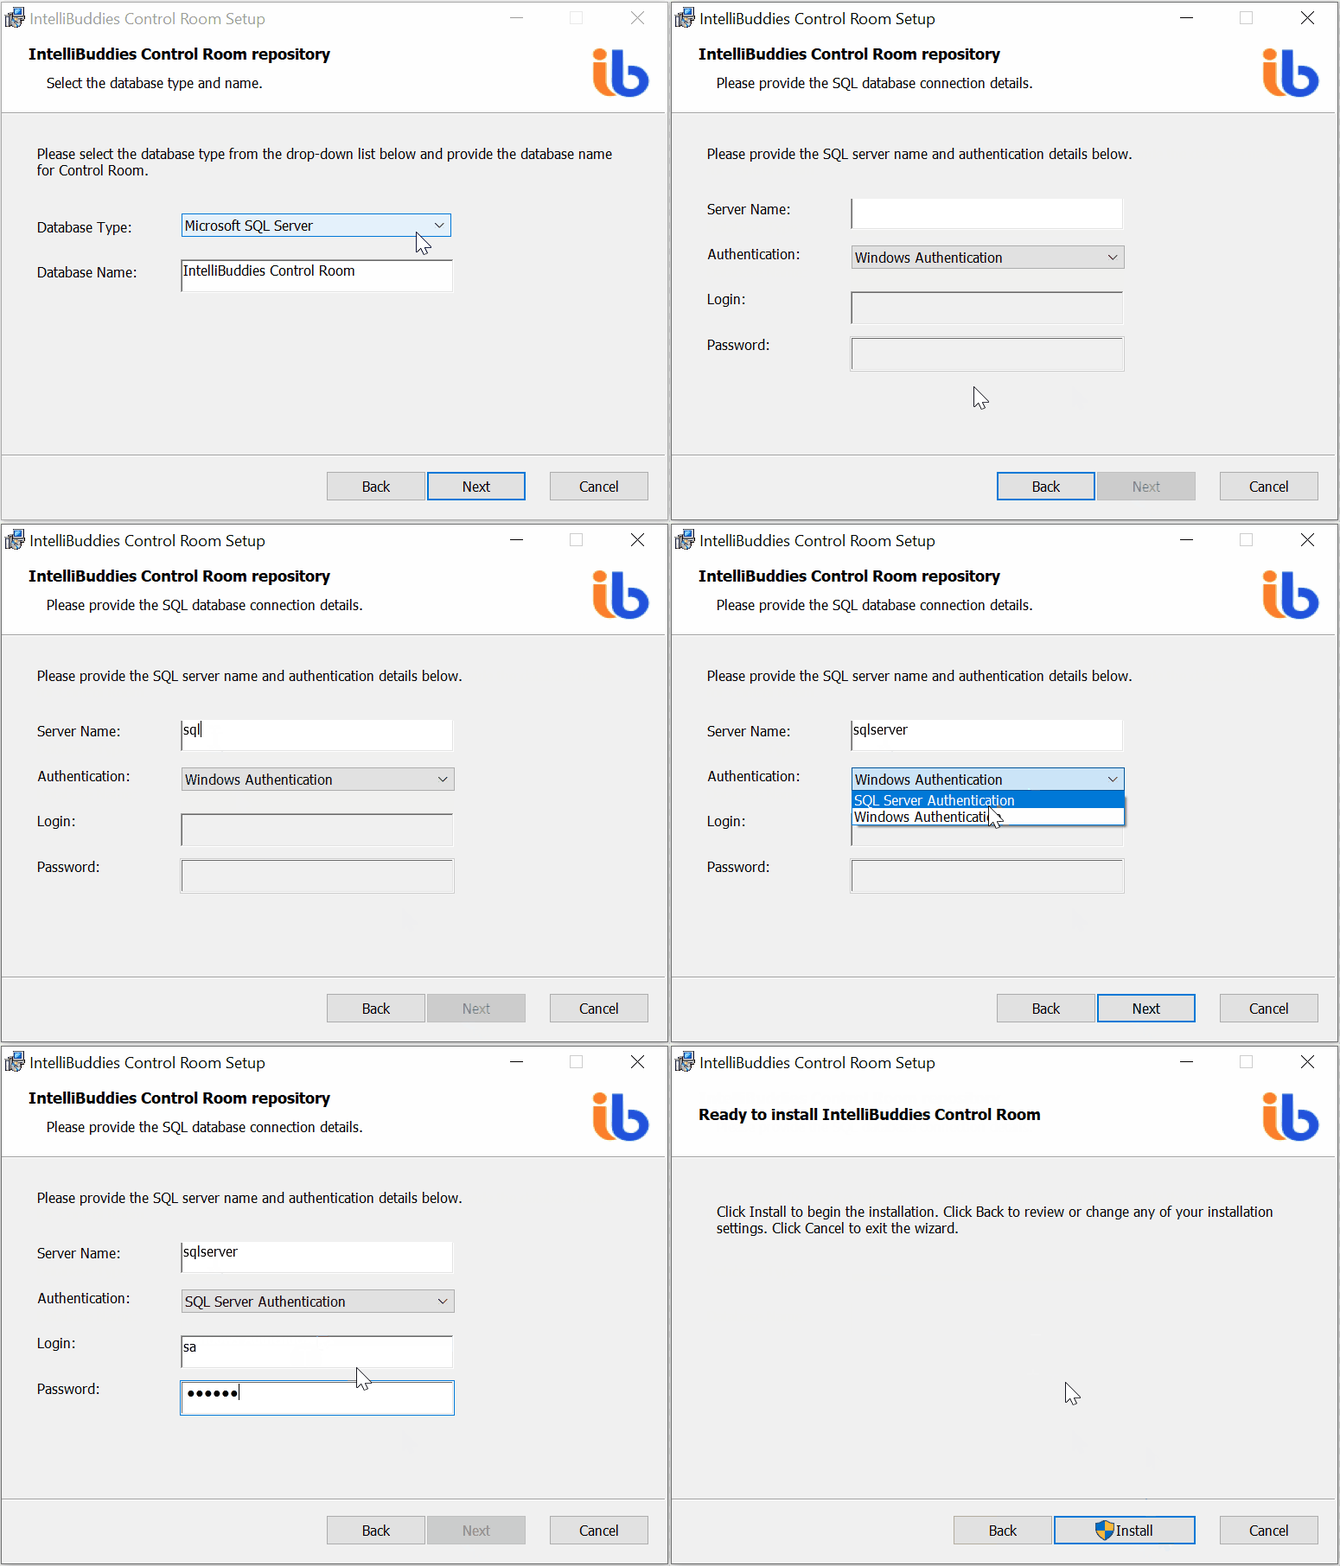
- In case you had selected the Database Type as Microsoft SQL Server

- Fill in the following details and click on Next: - Server Name – Microsoft SQL Server name - Authentication – select the appropriate Authentication to be used to connect to Microsoft SQL Server – Windows Authentication OR SQL Authentication - Login – the Username in case of SQL Authentication - Password – the Password in case of SQL Authentication
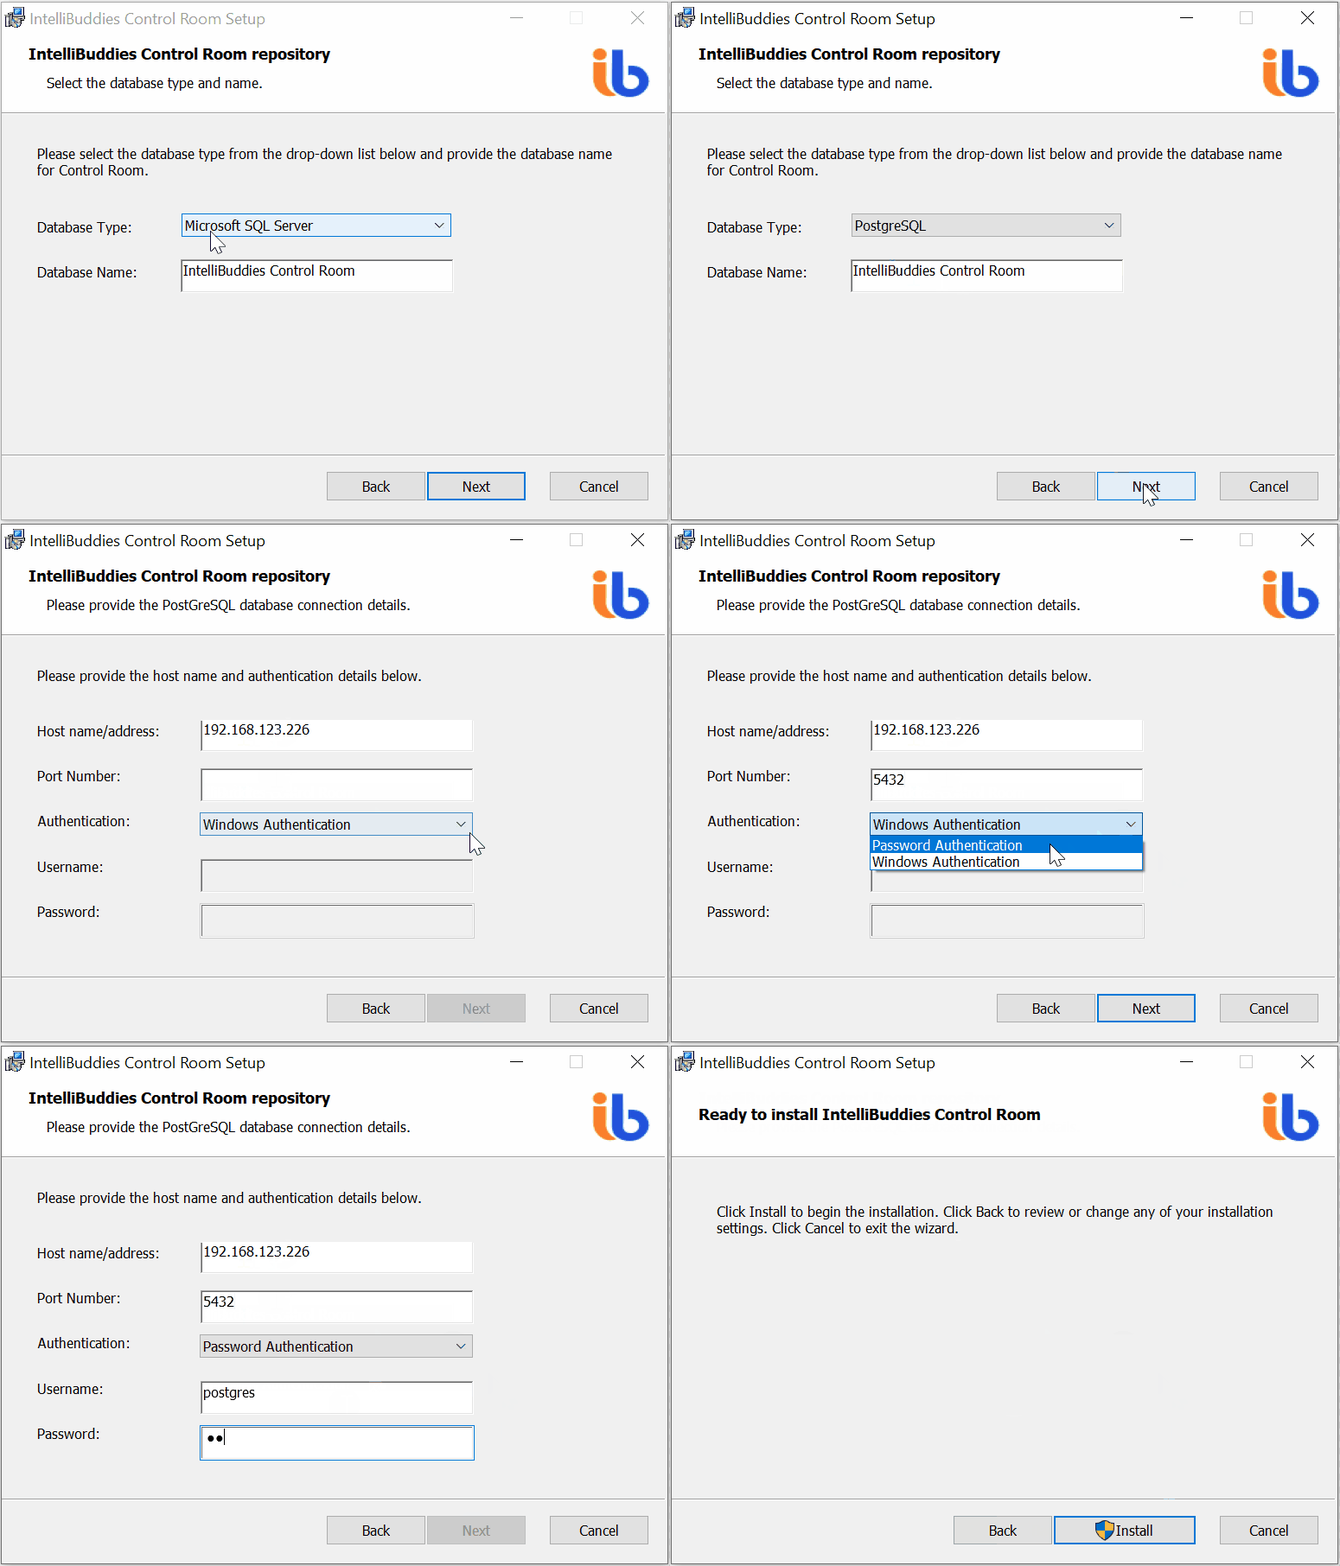
- In case you had selected the Database Type as PostgreSQL

- Fill in the following details and click on Next - Hostname / address – the PostgreSQL server name - Port Number – the port number at which the server is listening - Authentication – select the appropriate authentication type to be used to connect to PostgreSQL server – Windows Authentication OR Password Authentication - Username – the Username in case of Password Authentication - Password – the Password in case of Password Authentication
Step-9: Ready to Install
- The ready-to-install step is displayed
- Click on Install. The installation process starts and installs the IntelliBuddies AI Command Center in the selected installation folder as part of Step-3