Lists
Overview
A List is a custom table with a user-defined schema. Use the List to persist custom automation data. Our Buddies can retrieve, insert, update, and delete the data inside List.
You can create a list inside the AI Command Center based on your custom needs. The AI Command Center provides a UI approach to defining the schema for your List. Identify each List uniquely using its names.
Enabling Lists Feature
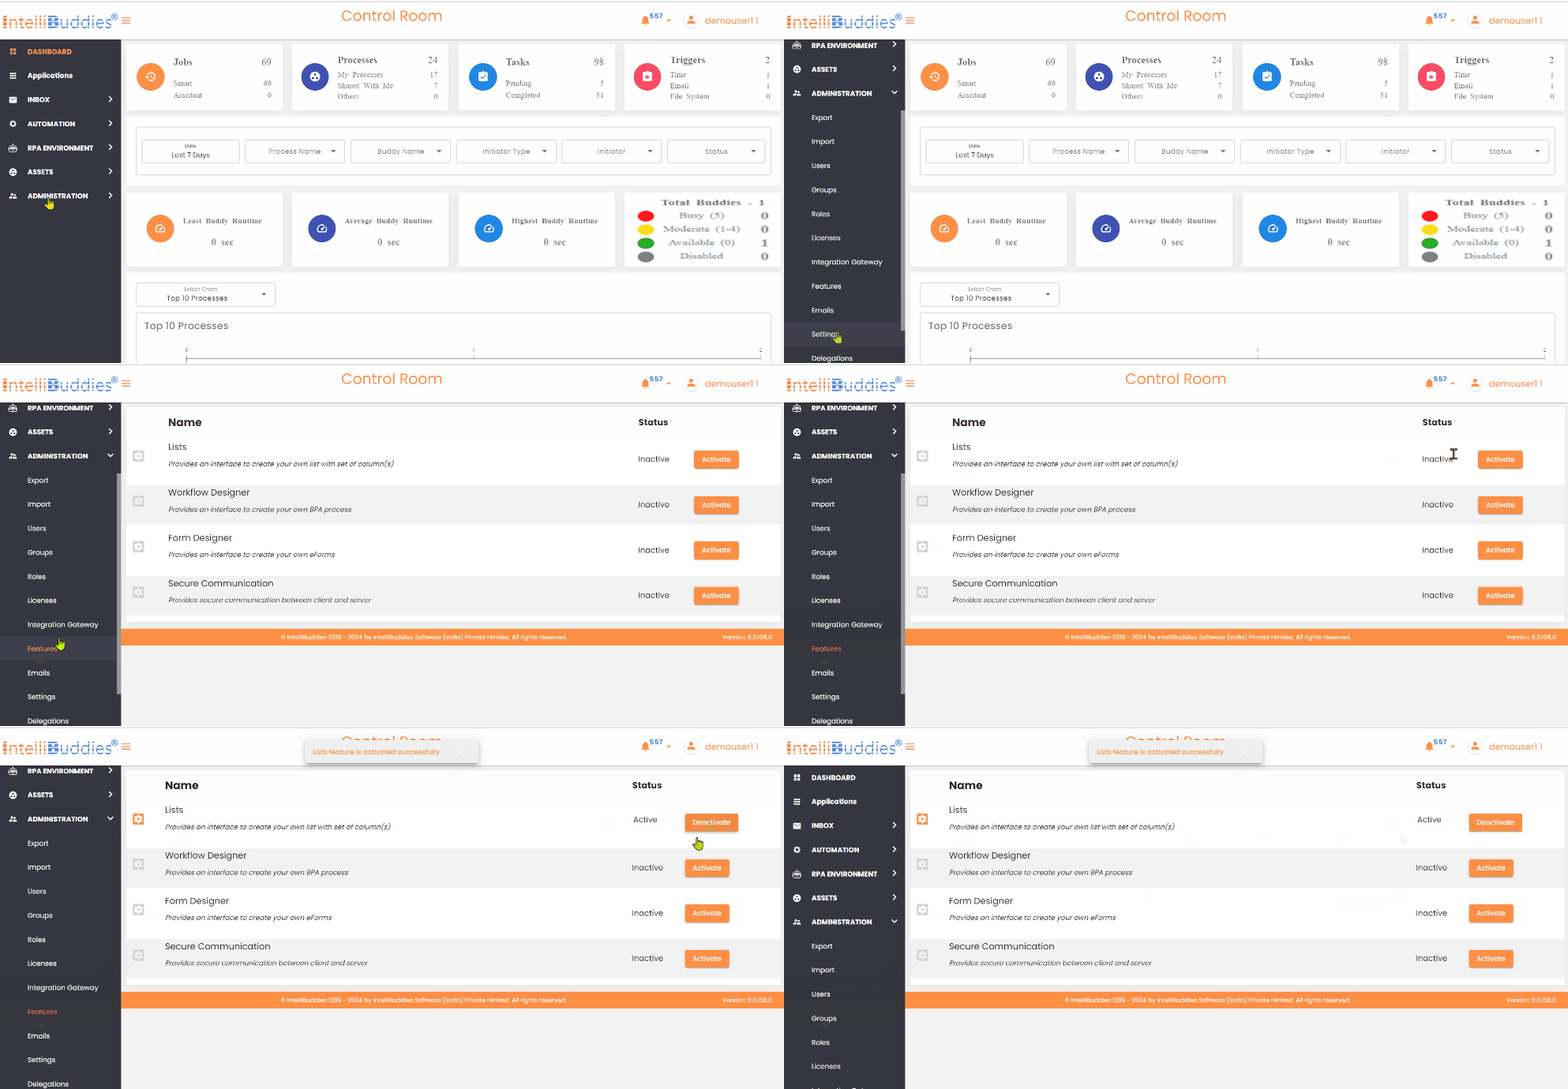
The Lists feature is not activated inside your AI Command Center by default. Administrators must activate it to view, create, and manage custom lists.
The lists feature is activated if you see the Lists item under Assets.
To enable the List, follow the steps provided below:
- Login to IntelliBuddies AI Command Center with Admin role
- Go to Administrator > Features
- Activate the Lists feature by clicking on the Activate button associated with the Lists entry

Managing your Lists
You can then manage Lists from the Lists page. You can reach this page by selecting the Assets > Lists option from the side panel.
Creating a List
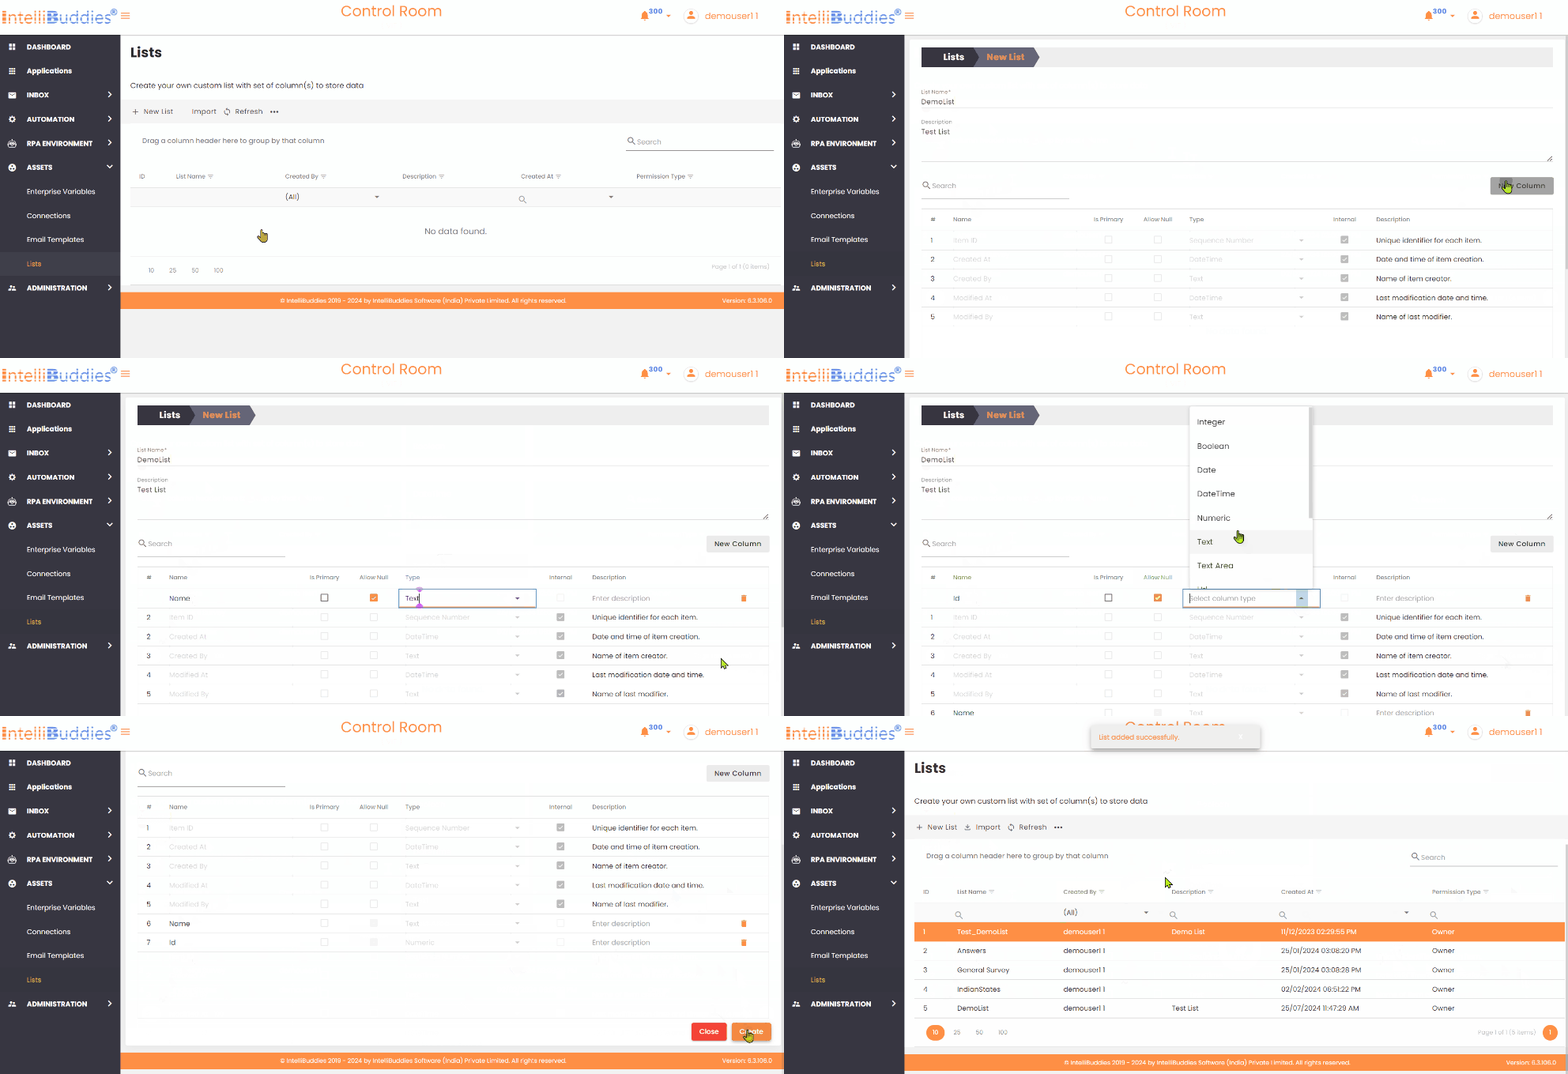
You can create a new list inside the AI Command Center from the Lists page by following the steps provided below:
- Click on Toolbar-Menu >
button
- Type in a name for this List.
- Optionally, type in a description for this List for future reference
- By default, the List will have five columns, which are as follows:
| Column Name | Description |
|---|---|
| Item ID | The unique ID of an item inside this List. |
| Created At | The item created timestamp. |
| Created By | The User who created the item. |
| Modified At | The item modified timestamp. |
| Modified By | The User who modified this item. |
It creates the above fields with their Internal property set to true.
- Click on
to add a column to this List
- Click on Create
It is mandatory to add at least one non-internal column to the List.

Column Schema
| Column Schema | Description |
|---|---|
| Display Name | The display name of the column |
| Is Primary | Check this box if the column is a primary key |
| Is Null | Check this box if the column accepts a null value |
| Column Type | Select the column data type |
| Internal | Indicates whether the column is a default column(true) or a user-added column(false) |
| Description | Describe this column |
You cannot delete the primary key column from the existing List. However, you can change the name and description of this column. You cannot delete the internal columns in the List; you can edit only the description for internal columns.
Column Types
Currently, it supports the following column types by the Lists.
| Column Type | Description |
|---|---|
| Sequence Number | Use this type to generate unique integer values in a specific sequence automatically |
| Integer | Stores numeric integer values |
| Boolean | Stores a Boolean, True or False, value |
| Date | Stores a Date value |
| DateTime | Stores a Date and Time value |
| Numeric | Stores a numeric decimal value |
| Text | Stores a text value of up to 256 characters |
| Text Area | Stores a text value of up to 65KB (PostgreSQL) to 2GB (SQL Server) |
| Url | Stores a web URL |
| Guid | Stores a value of type GUID (Global Unique IDentifier) |
| Percentage | Stores a numeric decimal value with two decimal points representing a percentage |
| Phone | Stores a phone number with a max of 12 digits |
| Stores an email id |
MSSQL allows only one identity column per table. By default, Item ID is the identity column in a list. So, for the MSSQL AI Command Center, you cannot add more columns of type Sequence Number. For Postgres AI Command Center, you can add multiple columns of type Sequence Number since Postgres allows multiple identity columns per table.
Sharing a List
The List owner can share a List inside the AI Command Center with other users. Users with the following permissions can share the Lists across the users:
| Permission Type | Description |
|---|---|
| Viewer | Users with this permission type can view the schema and data of the list |
| Editor | Users with this permission type can view the schema and edit the data inside this list |
| Owner | User with this permission type can view and edit the List's schema and data. The Owner can also share the List with other users. By default, the User who created the List inside the AI Command Center would be the Owner of that list |
Share the List by performing the following steps:
- Login to the AI Command Center
- Go to the Lists page
- Select the List to be shared
- Right-click and select the Share option
- Select the User to whom you want to share this List
- Change the permission type based on your needs. By default, a user gets Viewer permission.
- Click on Share

Editing a List Schema
Edit the schema of an existing list by following the steps below:
Users with the Owner permissions can edit the schema of an existing list.
- Login to the AI Command Center
- Go to Assets > Lists
- Select the List
- Right-click and select Schema
- Modify the Schema either by changing the details of existing columns or by adding new columns
- Click on Save

Adding new data row
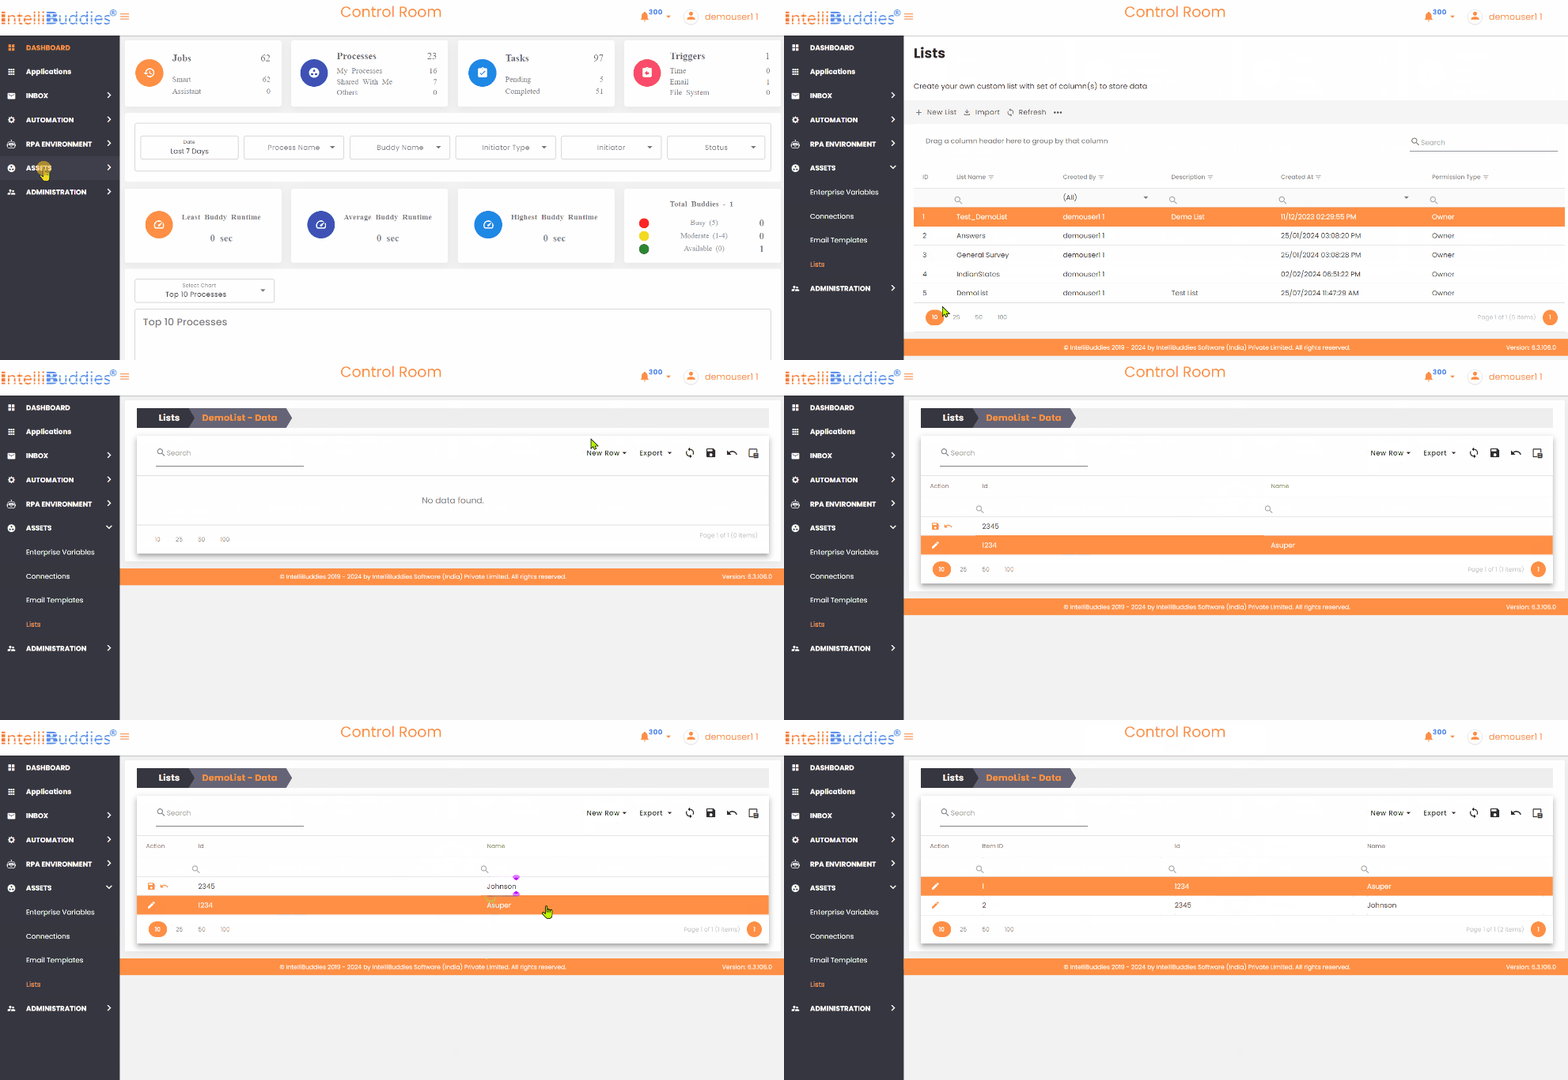
You can add a new row of data to a list by following the steps below:
Users with either Editor or Owner permission can perform this operation to the corresponding List.
- Login to the AI Command Center
- Go to Assets > Lists
- Select the List
- Right-click and select Data
- Either click on the Grid-Menu > New Row button to add a data row inline in the grid
- OR Click on
> and select Form from the menu to fill the data using a Form.
- Fill in the data
- Click on Save

Viewing List data
View the data stored inside an existing list by following the steps below:
- Login to the AI Command Center
- Go to Assets > Lists
- Select the List
- Right-click and select Data

Column Chooser
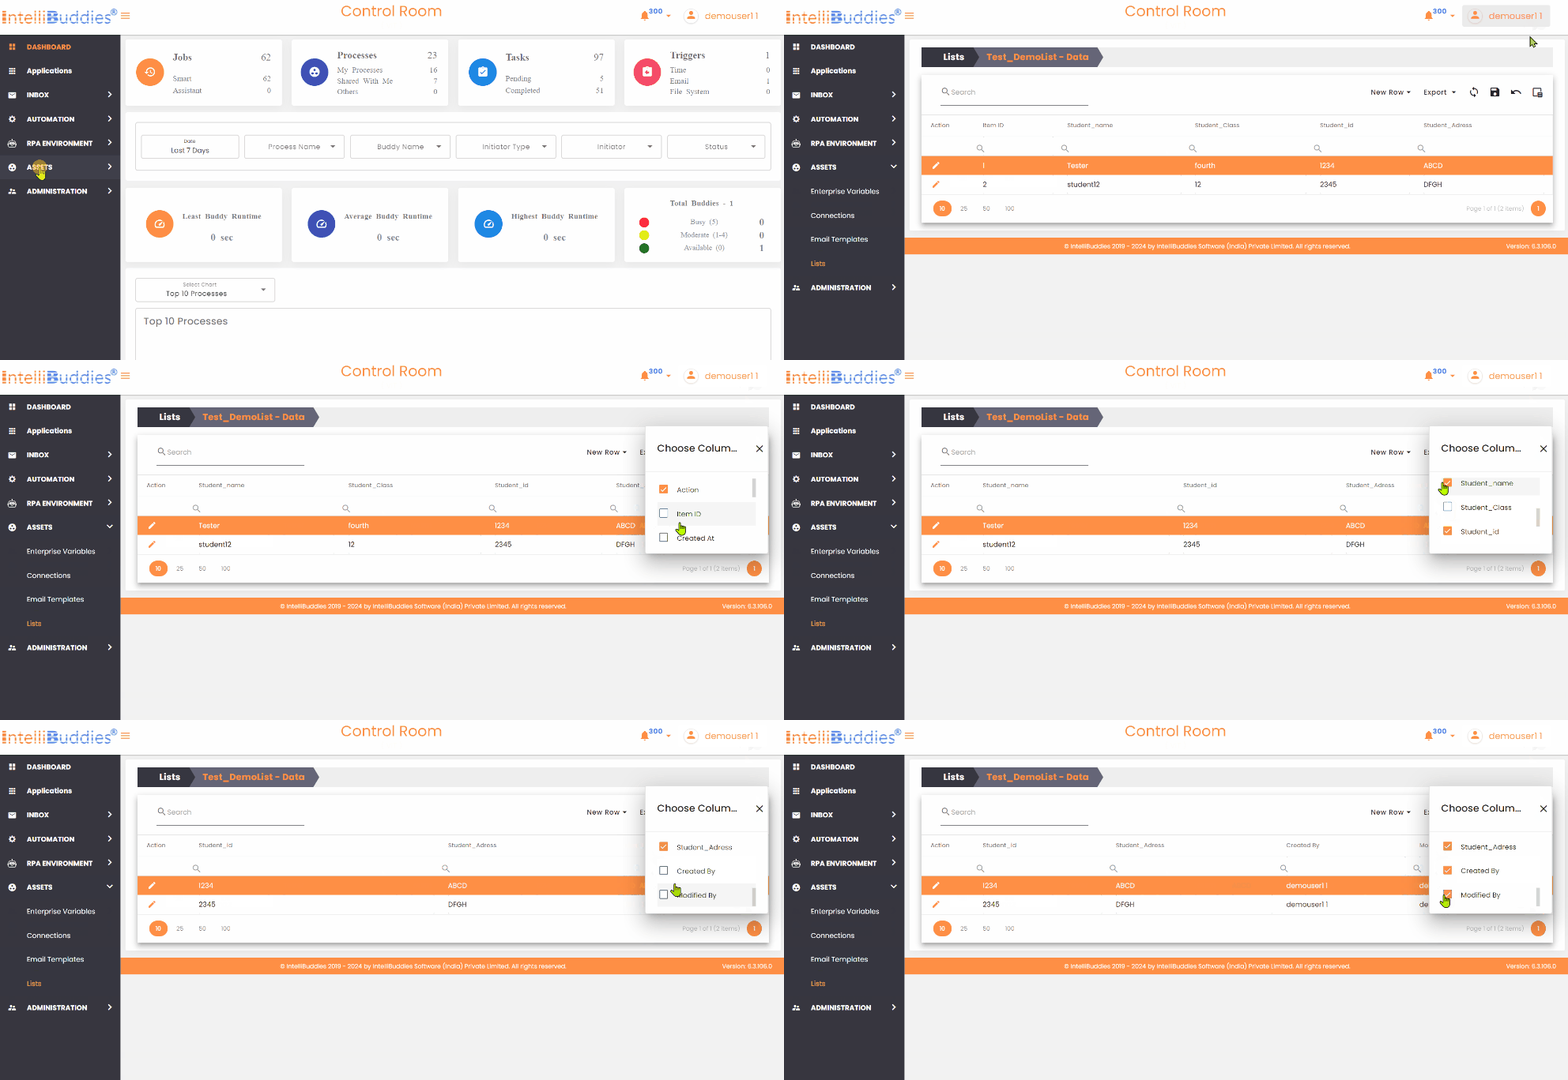
It hides the Internal columns by default in the list data grid. Users can make these columns visible by selecting them from the column chooser.
Users can hide internal and non-internal columns based on preferences in the list data grid. By clicking on "Save Page Settings," the selected column visibility settings are saved. The previously saved column visibility settings are automatically applied when they revisit the page.
- Login to the AI Command Center
- Go to Assets > Lists
- Select the List
- Right-click and select Data
- Select the column chooser icon from the data grid toolbar icons

Users will not be able to set values in the internal fields.
Editing a data row
You can edit the data inside the List by following the steps below:
Users with either Editor or Owner permission can edit the corresponding List.
- Login to the AI Command Center
- Go to Assets > Lists
- Select the List
- Right-click and select Data
- Either Click on Edit Icon >
button to edit it inline in the grid
- OR Right-Click on the Row and select Edit In Form to edit the data in the Form
- Edit the required Data
- Click on Save

Deleting a data row
Delete a data row from a List by following the steps below:
Users with either Editor or Owner permission can delete the data to the corresponding List.
- Login to the AI Command Center
- Go to Assets > Lists
- Select the List
- Right-click and select Data
- Select the Row to be deleted
- Right-click and select Delete
- Confirm your operation by clicking on Delete

Transferring Ownership of a List
You can transfer the ownership of a list from one User to another by following the steps below:
- Login to the AI Command Center
- Go to the Lists page
- Select the List for which to transfer the ownership.
- Right-click and select the Share option
- Select the User to whom you need to transfer the ownership
- Change the permission of that User to Owner.
- Allot new permission to the previous Owner. Alternatively, you can remove the User from the sharing list if not needed by clicking on the X button
- Click on Share

Deleting a List
You can delete a list from the AI Command Center by following the steps below:
Only the Owner of the List can delete a list.
- Login to the AI Command Center
- Go to Assets > Lists
- Select the List
- Right-click and select Delete
- Confirm your operation by clicking on Delete

Exporting List data to a file
You can export the list data into a file from the AI Command Center by following the steps below:
As of now, you can export to the following file formats:
- XLSX [Default]
- CSV
You can export only the visible columns.
- Login to the AI Command Center
- Go to Assets > Lists
- Select the List
- Right-click and select Data
- Click on Grid-Menu > Export button to export the list data in XLSX format
- Alternately, you can click on
and select the appropriate export format.
