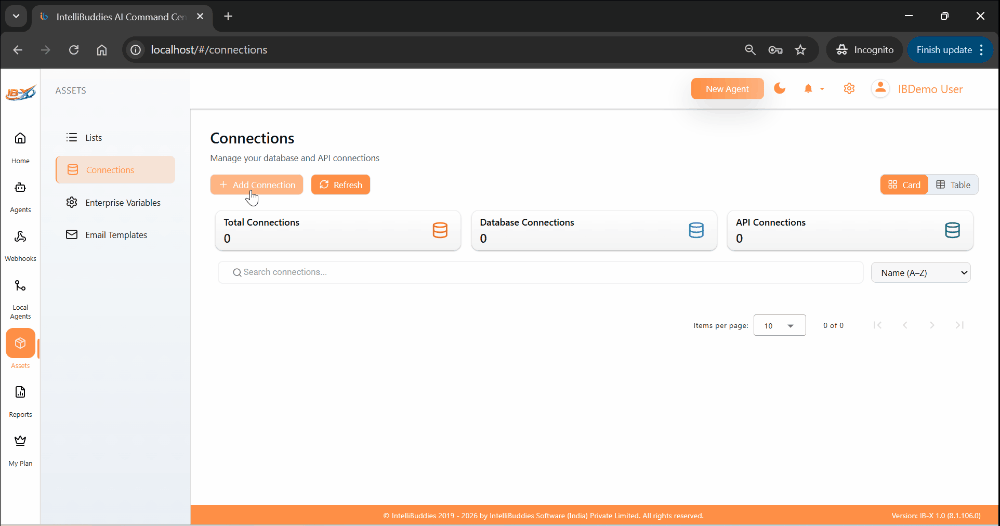
Connections
Overview
The Connections page allows administrators to create and manage secure, reusable credentials used by processes and workflows to interact with external systems and services.
Connections centralize authentication details and provide:
- Secure reuse across multiple processes
- Centralized credential management
- Simplified maintenance and updates
- Full audit traceability
The Connections page is available to users with the appropriate connection management permissions.
How to access:
From the AI Command Center, navigate to Assets → Connections from the left navigation panel.
Connections View
The Connections tab displays all configured connections in a structured table layout.
| Column | Description |
|---|---|
| Connection Name | Name of the connection. |
| Type | Type of connection (Database, Email, AI, etc.). |
| Created By | User who created the connection. |
| Modified At | Date and time of last modification. |
| Actions | Available operations such as View, Edit, Clone, Delete, or Audit (based on permissions). |
Connection Actions
From the Connections tab, the following actions are available (based on permissions):
| Action | Description |
|---|---|
| View | Opens the connection in read-only mode. |
| Edit | Modify the connection configuration. |
| Clone | Create a new connection based on an existing one. |
| Delete | Remove the selected connection (restricted if in use). |
| Audit | View the audit history of the connection. |
Viewing a Connection
To view connection details:
- Open the Connections tab.
- Select the connection.
- Click View.
The connection opens in read-only mode, displaying its configuration details.
Editing a Connection
To modify an existing connection:
- Open the Connections tab.
- Select the connection.
- Choose Edit.
- Update configuration details.
- Click Update.
Cloning a Connection
To duplicate an existing connection:
- Select the connection.
- Choose Clone.
- Provide a new name.
- Click Add.
Deleting a Connection
To delete a connection:
- Select the connection.
- Choose Delete.
- Confirm the action.
A connection cannot be deleted if it is referenced by any process.
If dependencies exist, the system displays the dependent process name and version.
Auditing a Connection
To view audit history:
- Select the connection.
- Choose Audit.
The audit log records:
- Creation events
- Configuration changes
- Deletion attempts
Creating a Connection
To create a new connection:
- Open the Connections tab.
- Click Add Connection.
- Select the required connection type.
- Provide the necessary configuration details.
- Click Test Connection to validate connectivity.
- Click Add to save.
You must have the Add Connection permission to create a new connection.
Supported Connection Types
- Database Connections
- File & Storage Connections
- AI & Cognitive Service Connections
- Email Connections
Database Connections
Used for executing database-driven activities such as Select, Insert, Update, Delete, and Stored Procedure execution.
Microsoft SQL Server
Supports both SQL Authentication and Windows Authentication (SSPI).
Key Fields
- Server Name
- Database Name
- Authentication Type (SQL / Windows)
- User Name & Password (SQL Authentication)
PostgreSQL
Used for connecting to PostgreSQL databases using username/password authentication.
Key Fields
- Server Name
- Port
- Database Name
- User Name
- Password
MySQL
Used for MySQL database connectivity.
Key Fields
- Server Name
- Port
- Database Name
- User Name
- Password
Oracle
Used for connecting to Oracle databases via SID and credentials.
Key Fields
- Server Name
- Port
- SID
- User Name
- Password
File & Storage Connections
File System
Used to access local or network file paths from workflows.
Key Fields
- Folder Path (absolute or network path)
- User Name
- Password
The AI Command Center server must have network access to the specified path.
FTP
Used to connect to remote servers using the File Transfer Protocol (FTP). FTP connections can be used by workflow activities to access files and directories stored on remote systems.
The connection supports:
- Anonymous FTP access
- Username and password authentication
- Optional TLS encryption using FTPS (Explicit or Implicit modes)
FTP and FTPS use the File Transfer Protocol. FTPS adds TLS encryption to protect data transmitted between the client and server.
Key Fields
| Field | Description |
|---|---|
| Host | Hostname or IP address of the FTP server (for example, ftp.example.com). Required. |
| Port | Port number. Defaults to 21. Automatically changes to 990 when Implicit TLS mode is selected. |
| Anonymous Login | Enables anonymous FTP access. When enabled, the Username and Password fields are hidden and cleared. |
| Username | FTP account username. Visible only when Anonymous Login is disabled. |
| Password | FTP account password. Stored encrypted. An edit icon appears on existing connections to allow replacement. |
TLS / Secure Connection
Controls the encryption mode used for the connection.
| Mode | Description |
|---|---|
| None | No encryption. Standard FTP communication on port 21. |
| Explicit (FTPES) | Establishes a standard FTP connection and upgrades to TLS after connecting. |
| Implicit (FTPS) | Requires TLS from the start of the connection. Port automatically changes to 990. |
When a TLS mode is selected, additional certificate options become available.
| Field | Description |
|---|---|
| Allow Untrusted Certificates | Allows connections to servers with self-signed, expired, or otherwise untrusted certificates. Use only in trusted environments. |
| Server Certificate | PEM-encoded certificate used to validate the remote server during TLS negotiation. Can be entered manually or extracted using the Extract Certificate tool. |
Extract Certificate Tool
Available when a TLS mode is selected and the connection is editable. Extracts a PEM certificate from a certificate file and automatically populates the Server Certificate field.
| Field | Description |
|---|---|
| Certificate File | Certificate file to extract from. Supported formats: .p12, .pfx, .pem, .crt, .cer. |
| Certificate Password | Optional password for protected certificate files such as P12 or PFX. |
| Extract | Uploads the certificate file for extraction and populates the Server Certificate field on success. |
Certificate files are transmitted only for extraction and are not persisted by the platform.
SFTP
Used to connect to remote servers using the SSH File Transfer Protocol (SFTP). SFTP provides encrypted file transfer over SSH and is commonly used in enterprise environments for secure file exchange.
The connection supports:
- Username and password authentication
- SSH private key authentication
- Passphrase-protected private key authentication
- Advanced SSH algorithm configuration
SFTP is a different protocol from FTP and FTPS. Although all three protocols transfer files, SFTP operates over SSH and uses different authentication and encryption mechanisms.
Key Fields
| Field | Description |
|---|---|
| Host | Hostname or IP address of the SFTP server (for example, sftp.example.com). Required. |
| Port | Port number. Defaults to 22. Required. |
| Username | SSH account username. Required. |
| Authentication Type | Determines the authentication method used to establish the SSH connection. |
| Call Stat on Connect | When enabled, the connection verifies access to the remote file system immediately after establishing the SSH session. This helps detect permission or connectivity issues during connection validation. Enabled by default. |
Authentication Types
Select the authentication method to use when connecting to the SFTP server.
Password
Authenticates using a username and password.
| Field | Description |
|---|---|
| Password | SSH account password. Stored encrypted. An edit icon appears on existing connections to allow replacement. |
Private Key
Authenticates using an SSH private key without a passphrase.
| Field | Description |
|---|---|
| Private Key | SSH private key in PEM, PPK, or OpenSSH format. The key can be pasted directly or uploaded from a supported key file. Required. |
Private Key + Passphrase
Authenticates using a passphrase-protected SSH private key.
| Field | Description |
|---|---|
| Private Key | SSH private key in PEM, PPK, or OpenSSH format. Required. |
| Passphrase | Passphrase used to decrypt the private key. Stored encrypted. An edit icon appears on existing connections to allow replacement. Required. |
Changing the Authentication Type clears the Password, Private Key, and Passphrase fields and resets any stored credential values.
Supported private key formats depend on the SSH server and key generation method. PEM, OpenSSH, and PPK formats are commonly used.
If authentication fails, verify that the private key format is supported by the target server.
Advanced SSH Settings
Advanced SSH settings are collapsed by default. Expand the section only when specific SSH algorithms must be configured.
Leave all fields empty to allow automatic negotiation using server defaults.
| Field | Description |
|---|---|
| Key Exchange (Kex) Algorithms | Controls how encryption keys are negotiated during SSH connection establishment. |
| Ciphers | Controls the symmetric encryption algorithms used to protect transferred data. |
| Server Host Keys | Controls which server identity algorithms are accepted during host verification. |
| HMAC Algorithms | Controls the message authentication algorithms used to verify data integrity. |
Advanced SSH settings are typically required only in environments with strict security policies or legacy server compatibility requirements.
Incorrect values may prevent a successful connection.
AI & Cognitive Service Connections
These connections can be configured using native provider keys or IB-X Currency via Integration Gateway, where supported.
OpenAI
Used to access OpenAI text generation models.
Modes
- Native OpenAI Key – Bring your own API key
- Integration Gateway – Uses IB-X Currency (no API key required)
Additional Resources
Llama
Used to access Meta Llama models.
Modes
- Native Endpoint – Custom deployed Llama endpoint
- Integration Gateway – Uses IB-X Currency
Additional Resources
Azure
Used for Azure Cognitive Services and Azure Document Analysis.
Modes
- Azure Native Key – Direct Azure endpoint and access key
- Integration Gateway – Uses IB-X Currency
Additional Resources
Email Connections
IMAP
Used to read and manage emails from mail servers.
Typical Use Cases
- Reading incoming emails
- Processing attachments
- Monitoring mail folders
Additional Resources
- IMAP provider documentation (Gmail / Microsoft 365)
SMTP
Used to send emails from workflows and notifications.
Typical Use Cases
- Task notifications
- Alerts
- Custom email activities
Outlook (Microsoft 365)
Uses Azure AD application authentication to access Microsoft 365 mailboxes via Microsoft Graph.
Authentication
- Client ID
- Tenant ID
- Client Secret
Additional Resources
Google Sheets
Used to connect to Google Sheets for reading, writing, creating, and managing spreadsheet data.
Authentication Types
- OAuth 2.0
Notes
- This connection is intended for Google Sheets activities.
- A separate Google Drive connection is available for activities that work with files and folders in Google Drive.
- Separate connections are provided because Google APIs use different permission scopes for Sheets and Drive access.
Additional Resources
Google Drive
Used to connect to Google Drive for managing files, folders, and document storage.
Authentication Types
- OAuth 2.0
Notes
- This connection is intended for Google Drive activities.
- A separate Google Sheets connection is available for spreadsheet-specific operations.
- Separate connections are provided because Google APIs use different permission scopes for Drive and Sheets access.
Additional Resources
WhatsApp Connections
WhatsApp Connections are used to configure secure integration with the WhatsApp Business Platform for sending messages, receiving incoming events, and managing media operations.
IB-X uses secure HTTPS-based communication with the WhatsApp Business Cloud API authenticated through Meta System User Access Tokens.
The connection is configured using credentials generated from Meta Business Manager, including the WhatsApp Business Account details, Phone Number ID, App credentials, and System User Access Token.
This connection enables IB-X Agents to securely interact with WhatsApp Business APIs for messaging and media handling.
Configuration Fields
| Field | Description |
|---|---|
| WABA ID | WhatsApp Business Account identifier associated with the business account. |
| Phone Number ID | Identifier of the WhatsApp-enabled phone number used for messaging. |
| System User Access Token | Access token generated for the Meta system user with WhatsApp permissions. |
| App ID | Meta application identifier associated with the integration. |
| App Secret | Secret key associated with the Meta application. |
Additional Resources
Notes
- Ensure the configured Meta System User has the required WhatsApp Business permissions assigned in Meta Business Manager.
- The System User Access Token must remain valid and may require regeneration based on Meta access token policies.
- Incoming WhatsApp webhook events must be properly configured and reachable for trigger-based activities to function correctly.
Azure Document Analysis
The Azure Document Analysis connection is used to authenticate with Azure AI Document Intelligence services using customer-managed Azure credentials.
This connection is optional. Workflow activities can also use IB-X Azure Document Analysis Credits, which routes requests through the IntelliBuddies Integration Gateway and consumes IB-X Currency.
This connection allows workflow activities to analyze documents such as PDFs, scanned images, invoices, receipts, contracts, identity documents, and forms.
Connection Properties
| Property | Description |
|---|---|
| Endpoint URL | The endpoint URL of the Azure AI Document Intelligence resource. For example: https://my-document-intelligence.cognitiveservices.azure.com/ |
| Access Key | The access key associated with the Azure AI Document Intelligence resource. |
Used By
The following workflow activities use this connection type:
Azure Text Analytics
The Azure Text Analytics connection is used to authenticate with Azure AI Language services using customer-managed Azure credentials.
This connection is optional. Workflow activities can also use IB-X Azure Text Analytics Credits, which routes requests through the IntelliBuddies Integration Gateway and consumes IB-X Currency.
Connection Properties
| Property | Description |
|---|---|
| Endpoint URL | The endpoint URL of the Azure AI Language resource. For example: https://my-language-service.cognitiveservices.azure.com/ |
| Access Key | The access key associated with the Azure AI Language resource. |
Used By
The following workflow activities use this connection type:
- Analyze Sentiment
- Detect Language
- Extract Key Phrases
- Extract Categorized Entities
- Extract PII Entities
Security Considerations
- Sensitive values (passwords, API keys, secrets) are stored encrypted.
- Integration Gateway connections consume IB-X Currency.
- Access is governed by role-based permissions.
- All configuration changes are audit-tracked.
Connections provide the secure integration foundation of the AI Command Center, enabling reliable and scalable interaction with external systems.