Introduction
Smart Buddy is a client component within IntelliBuddies designed to execute automation tasks. It serves as a logical representation of one of the entities within the AI Command Center.
Smart Buddy component is available only as part of IntelliBuddies Enterprise Edition.
Smart Buddy executes end-to-end automation without human assistance. Hence, it must be attached to a Smart Station to execute automation. Once registered and connected to a specific Smart Station, Smart Buddy will automatically log into the Smart Station, using the specified credentials, and execute the automation.
Smart Buddy utilizes a user-locked floating license. You can always move an existing Smart Buddy from one Smart Station to another within the AI Command Center.
Architecture
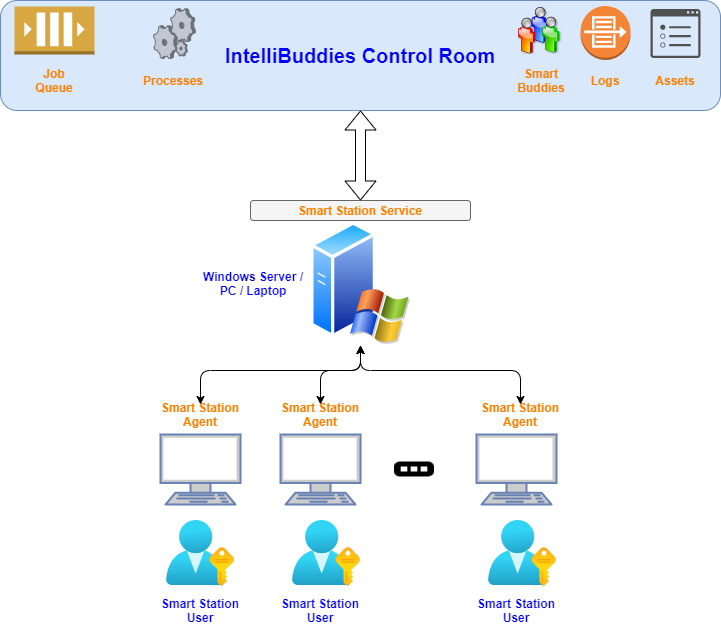
The components of Smart Buddy includes:
Smart Station Service
Smart Station Service is a Windows Service deployed on Smart Station. The functionality of Smart Station Service are:
- Managing Smart Buddies running on this Smart Station
- Provides periodic status updates on Smart Buddies to AI Command Center
Smart Station Agent (Tray)
Smart Station Agent is a Windows Tray application executed in the context of a logged-in user. The Smart Station Agent is the Smart Station's actual user interface. You can find the Smart Station Agent as part of the System Tray, and the table below summarizes the status of the Smart Station based on the icon that appears inside the System Tray.
| Icon | Description |
|---|---|
| The Smart Station is disconnected from the AI Command Center; hence, all the Smart Buddies associated with this Smart Station are currently unavailable to execute automation. | |
| The Smart Station is connected to the AI Command Center; hence, all the Smart Buddies associated with this Smart Station can execute automation. | |
| None | Smart Station Agent is not running |
You can perform the following operations using the Smart Station Agent
| Operation | Description |
|---|---|
| Disconnect | Disconnect the Smart Station from the AI Command Center. If the associated Smart Buddies are executing automation jobs and you want to disconnect forcefully, all those jobs will be aborted before disconnecting. |
| Connect | Connect to the AI Command Center. Once connected, all the Smart Buddies associated with this Smart Station will be available to execute automation. |
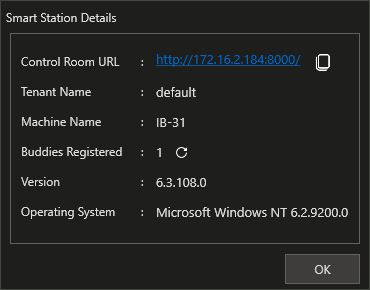
| View Details | Displays the smart station configuration details. |
Windows Execution Account
The Smart Buddy uses this Windows user account to run the automation inside the Smart Station. It executes automation under the associated Windows user context. The table below details the requirements of this Windows account.
| Requirement | Description |
|---|---|
| User Account Exists | The account must exist locally or on the domain. In the case of a domain account, the machine also should be part of the domain. |
| Local or Batch Logon Rights | Required for executing background processes. |
| Permissions to Run Executables | User account must have file and execution permissions. |
| Interactive Login Rights | Required for executing foreground processes. |
Background Process
In the case of background process execution, the Buddy will execute the job under the specified Windows execution account context with or without an interactive session. You can set a process as a background while creating the process.
Foreground Process
In other cases, the Buddy will execute the job under the specified Windows account interactive session inside the Smart Station. If the session does not exist, the Smart Buddy will log into the Smart Station using RDP with the associated Windows user account, create a session, and execute the automation.
Smart Buddy will need RDP access to Smart Station when it does not find the Smart Station User session to execute automation. Hence, ensure no manual interactions, such as Legal Disclosures, are configured while creating a user session through RDP. If there are any such manual interactions, the Smart Buddy will fail to get the user session and be faulty without executing automation.
It is recommended that each Smart Buddy be configured with its corresponding Windows Execution Account to maximize concurrency and automation performance. Suppose multiple Smart Buddies are configured to use a single Windows Execution Account session; it is your responsibility to ensure that automation executed by these Smart Buddies is consistent with resource usage such as screen, mouse, keyboard, and other shared resources within that user session.
AI Command Center Account
This is the AI Command Center User account to which the Smart Buddy license is attached. Smart Buddy is a logical entity that physically does not exist. Inside the AI Command Center, this entity binds the AI Command Center user with a Smart Station and associates the Windows Execution Account to execute automation. Smart Buddy logs in to Smart Station using this Windows Execution Account credentials to execute automation.
Enabling Smart Buddy
- Deploy Client Tools (Smart Station Agent) on the Smart Station. For more information on deploying client tools, please refer to: You can either use online Web Installer or offline by downloading and installing the Client Tools Deployment
- Provision a Smart Station inside the AI Command Center. Please refer: Provisioning Smart Station
- Save the Machine Key generated in the previous step
- Register Smart Buddy inside the AI Command Center. Please refer: Registering Smart Buddy
- Log in to Smart Station using the Windows Execution Account.
- Start the Smart Station Agent application
- Provide the AI Command Center URL and tenant name along with the Machine Key saved and log into AI Command Center**
Once you perform the above steps successfully, your Smart Buddy is ready to execute automation.
Context Menu Options
You can manage your Smart Buddy from the RPAENVIRONMENT > Buddies > Smart page inside AI Command Center. You must have appropriate permissions for this entity to access and perform operations on the RPAENVIRONMENT > Buddies > Smart page. To manage your Smart Buddies, go to the RPAENVIRONMENT > Buddies > Smart page in the AI Command Center. Please note that you need permission to access and act on this page.
| Options | Description |
|---|---|
| Share | Manage permissions to share your Buddy with other users. |
| View | View Buddy metadata in read-only mode. |
| Edit | Edit Buddy details. |
| Enable/Disable | Enable or disable a Buddy. |
| Delete | Delete a Buddy. |
| Audit | View audit logs for operations performed on the Buddy. |
| Shared With | View a list of users who have access to this Buddy. |
Sharing Buddy
The Owner can share a buddy with other users in the AI Command Center. You can share a buddy with the following permission types.
| Permission Type | Description |
|---|---|
| Viewer | Allows the user to view the Buddy. |
| Editor | Allows the user to view, update, and use the Buddy. |
| Owner | Grants full control, allowing the user to view, edit, enable/disable, delete, and share the Buddy with others. By default, the user who creates the Buddy in the AI Command Center is assigned as the Owner. |
You must be the Buddy Owner to share a buddy with other users. You can share the Buddy by performing the following actions:
- Go to RPAENVIRONMENT > Buddies > Smart page
- Select the Buddy to share inside the grid
- Select Context-Menu > Share option
- Select the User to whom you want to share this Buddy
- Change the permission type based on your needs. By default, a user gets Viewer permission.
- Click on Share
View the Sharing Information
Select the Context-Menu > Shared With option to view sharing information. This will display a list of users with access to the Buddy and their assigned permissions.
Deleting Buddy
To delete a Buddy from the AI Command Center, select the Context-Menu > Delete option. You should be the Owner to delete a Buddy.
Edit Buddy
You must be the Buddy Owner or have edit permissions to edit the metadata of a Buddy, including changing the username, Buddy name, station name, domain name, domain user, domain password, description, or enable/disable status.
- Navigate to the RPAENVIRONMENT > Buddies > Smart page.
- Select the Buddy you wish to edit from the grid.
- Open the Context Menu and choose the Edit option.
- Update the required details in the Buddy property section.
- Click Update to save your changes.
Auditing Buddy
To access detailed information on operations performed on a Buddy, follow these steps:
- Navigate to the RPAENVIRONMENT > Buddies > Smart page.
- Select the Buddy you wish to audit.
- Right-click and choose Audit from the context menu to view all operations performed on the Buddy.
Add Smart Buddy
You can add a new Smart Buddy from the RPAENVIRONMENT > Buddies > Smart page by following the steps provided below:
- Click on Toolbar-Menu >
 button
| Property | Description |
|---|---|
| User Name | Enter the user name associated with the AI Command Center. |
| Buddy Name | Specify a unique and recognizable name for the Buddy assigned to assist with automation tasks. |
| Station Name | Select the smart station name to execute the automation process. The station name refers to the designated system or environment for process execution. |
| Domain Name | Enter the domain name associated with the user's account. The domain name helps identify the network environment in which authentication and authorization are performed. |
| Domain User | Enter the username for the domain account. This should be the authorized credential used to log into the specified domain. |
| Domain Password | Enter the password associated with the domain user account. |
| Description | Add a description for the Smart Buddy to provide additional context or information. |
| Enable | Toggle this option to turn the Smart Buddy on or off. |
- Click the Add button to create and register the Smart Buddy inside the AI Command Center.
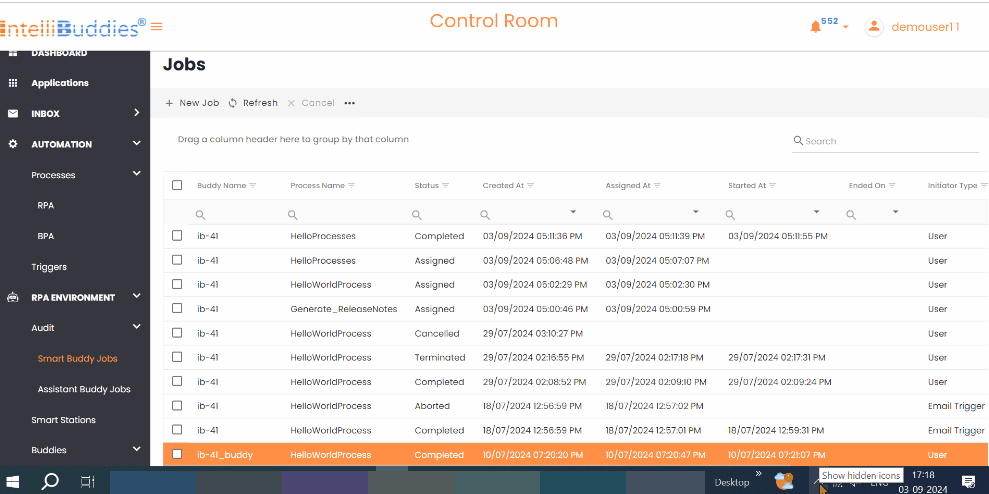
Executing a Job
You can submit an automation job to Smart Buddy in multiple ways. Please refer: Submitting Jobs
All the jobs are queued into a Job Queue inside the AI Command Center. Smart Buddy will pick up the jobs from the Queue and execute them.
Connect Smart Station Agent
Follow the below steps to Connect to the Smart Station Agent
- Right-click on the Smart Station Agent tray icon
- Click on the option Connect
- AI Command Center Settings dialog appears
- Enter the AI Command Center URL, Tenant Name, and Machine Key used during Smart Station provisioning in AI Command Center
- Click on Connect.

Disconnect Smart Station Agent
Follow the below steps to Connect to the Smart Station Agent
- Right-click on the Smart Station Agent tray icon
- Click on the Disconnect option.

View Details
It shows the details about the smart station service to which it connects the Agent.
| Field | Description |
|---|---|
| AI Command Center URL | Specifies the URL of the AI Command Center to which the Smart Station service is connected. You can copy and launch the URL directly. |
| Tenant Name | Specifies the Tenant name of the AI Command Center. |
| Machine Name | Specifies the name of the machine running the Smart Station service. |
| Buddies Registered | Indicates the number of Buddies registered with this Smart Station. Users can refresh the count using the refresh button after updating Buddy details in the AI Command Center. |
| Version | Specifies the version of the smart station service. |
| Operating System | Specifies the name and version of the operating system where the smart station service is running. |
If any jobs run when you try to disconnect the Smart Station Agent, you will receive an alert message: All job(s) will be aborted if you disconnect the Agent. Do you want to continue?
