Triggers
Overview
The Triggers tab allows administrators to configure automated execution of processes based on predefined conditions.
Triggers enable:
- Scheduled process execution
- Event-based automation
- Conditional workflow initiation
- Background monitoring and job creation
Instead of manually running processes, Triggers automatically queue jobs when their defined criteria are met.
How to Access
From the AI Command Center, navigate to: Local Agents → Triggers
Creating and Configuring a Trigger
Creating
To create a new Trigger:
- Open the Triggers tab.
- Click New Trigger.
- Complete configuration across:
- Click Create.
Configuring
Configure the basic trigger details:
- Enter a Trigger Name
- Select a Process to execute
- Choose the Trigger Type from the dropdown
- Configure criteria based on selected type:
- (Optional) Define a Start Date
- (Optional) Define an Expiry Date
By default:
- The trigger activates immediately
- The trigger never expires unless specified
Triggers View
The Triggers tab displays all configured triggers as per view filter selection.
| View | Description |
|---|---|
| My Triggers | Displays triggers created by the logged-in user (default view). |
| All Triggers | Displays all triggers available in the system. |
Trigger Actions
The following actions are available based on permissions:
| Action | Description |
|---|---|
| View | View trigger details in read-only mode. |
| Edit | Modify trigger configuration. |
| Enable / Disable | Activate or deactivate the trigger. |
| Run Now | Available only for Email Triggers. Manually checks for new emails and queues jobs immediately. |
| Delete | Permanently remove a trigger. |
| Audit | View audit history of the trigger. |
To manage triggers, you must also have appropriate View access to associated Buddies and Processes.
Execution Target Tab
Select the execution agent:
- Choose a specific Smart Buddy
- Or select Dynamic to allow any available Smart Buddy to execute the job
When Dynamic is selected, the job is picked up by any eligible Smart Buddy.
Parameters Tab
Configure job execution settings:
- Specify the Job Log Level
- Bind runtime trigger parameters to process input arguments
Parameter binding depends on the trigger type:
- Binding Email Trigger Parameters
- Binding File System Trigger Parameters
- Binding List Trigger Parameters
Trigger Types
IntelliBuddies supports the following trigger types:
| Trigger Type | Description |
|---|---|
| Time | Schedule a job to run at specific times based on defined criteria. |
| Invokes a job when a new email arrives and matches defined criteria. | |
| File System | Invokes a job when file events occur in monitored folders. |
| List | Invokes a job when data changes in a List match defined criteria. |
Time Trigger Criteria
You can configure scheduling logic by selecting a Schedule Type.
Schedule Types
| Schedule Type | Description |
|---|---|
| Daily | Execute on specified time(s) every day. |
| Specific Dates | Execute on selected calendar dates. |
| Weekly | Execute on selected weekdays. |
| Monthly | Execute on selected days within specific months. |
| Recurring | Execute repeatedly at defined time intervals. |

Email Trigger Criteria
| Field | Description |
|---|---|
| Email Server Connection | Select an Email Connection |
| Test Connection | Validate credentials |
| New Connection | Create new Email Connection |
| Incoming Email Filter Options | Apply Email Filter |
| Number of Messages | Limit number of emails processed |
| Email Processing Order | Newest → Oldest or Oldest → Newest |
| Message Polling Interval | Define polling interval (default 10 minutes) |
If using POP3, review POP3 limitations and recommended alternatives.
Email Filters
You can apply multiple filters to refine email selection.
Binding Email Trigger Parameters
| Name | Type | Description |
|---|---|---|
| $Email_Message | System.Net.MailMessage | Email that triggered the process execution |
Running Email Triggers On Demand
To manually execute an Email Trigger:
- Select the Email Trigger.
- Click Run Now.
File System Trigger Criteria
Configure folder monitoring settings:
| Field | Description |
|---|---|
| Folder To Monitor | Local or network path to monitor. |
| Filter | Wildcard filter (e.g., *.pdf). |
| Include Subfolders | Monitor nested folders. |
| Events To Monitor | Created, Modified, Deleted, Renamed. |
Folder Permissions
The monitored folder must grant:
- Read
- Read & Execute
- List Folder Contents
Depending on IIS deployment:
- App Pool Identity
- Custom Windows User
See folder configuration instructions in your server setup documentation.
Binding File System Trigger Parameters
The File System Trigger provides runtime parameters that contain detailed information about the file event that initiated the process execution.
These runtime parameters can be mapped to the corresponding input arguments of the selected process. This allows the process to dynamically respond based on the file event details.
The following runtime parameters are available when a File System Trigger is executed:
| Name | Type | Description |
|---|---|---|
| $File_EventType | System.IO.WatcherChangeTypes | Indicates the type of file event that triggered the process. Possible values include:
|
| $File_Name | System.String | The name of the file, including its extension. |
| $File_Path | System.String | The complete file path, including folder path and file name. |
| $File_FolderPath | System.String | The folder location where the file resides. |
| $File_Extension | System.String | The file extension (for example, .pdf, .txt). |
| $File_Length | System.Double | The size of the file. |
| $File_CreationTime | System.DateTime | The date and time when the file was created. |
| $File_LastWriteTime | System.DateTime | The date and time when the file was last modified. |
| $File_LastAccessTime | System.DateTime | The date and time when the file was last accessed. |
| $File_IsReadOnly | System.Boolean | Indicates whether the file is read-only. A value of true means the file is read-only. |
$File_CreationTime, $File_LastWriteTime, and $File_LastAccessTime are stored in UTC Standard format.
Working with Time Zones
Because file timestamps are stored in UTC, you may need to convert them depending on your process requirements.
Convert from UTC to a specific Time Zone:
Use the static method
TimeZoneInfo.ConvertTimeFromUtc.
Convert from a specific Time Zone to UTC:
Use the static method
TimeZoneInfo.ConvertTimeToUtc.
You can create a TimeZoneInfo instance using
TimeZoneInfo.FindSystemTimeZoneById,
by specifying the required time zone name (for example, India Standard Time).
List Trigger Criteria
The List Trigger initiates a process when specific changes occur within a selected List.
To configure a List Trigger, specify the following fields:
| Field | Description |
|---|---|
| List | Choose the List that will be monitored for changes. |
| Events To Monitor | Select the type of data change that should initiate the process:
|
| Apply Filters | Enable this option to apply additional filtering conditions using a List Trigger Filter. |
Binding List Trigger Parameters
The List Trigger supplies runtime parameters that contain detailed information about the list item responsible for triggering the event.
These parameters can be mapped to the corresponding input arguments of the selected process. This enables the process to dynamically respond based on:
- The type of event that occurred
- The data contained in the affected list row
By binding these parameters, your automation can handle each scenario appropriately according to the event type and associated list data.
Default Runtime Parameters
The following runtime parameters are automatically available when a List Trigger is executed:
| Name | Type | Description |
|---|---|---|
| $ListItem.EventType | string | Indicates the event that triggered execution (Inserted, Updated, or Deleted). |
| $ListItem | object | Contains the complete data of the list item involved in the event. |
Supported Event Types
The List Trigger responds to the following event types:
| Event Type | Description |
|---|---|
| Inserted | Triggered when a new row is added to the list. |
| Updated | Triggered when an existing row is modified. |
| Deleted | Triggered when a row is removed from the list. |
These event types allow your process logic to handle each scenario differently if required.
Managing Triggers
Updating a Trigger
- Select a Trigger.
- Click Edit.
- Modify configuration.
- Click Update.
Enabling or Disabling a Trigger
- Select a Trigger.
- Click Enable or Disable.
Disabling prevents job execution.
When you delete a process, all associated triggers are automatically disabled.
Deleting a Trigger
- Select a Trigger.
- Click Delete.
- Confirm.
Users with the Administrator role can delete triggers.
Auditing a Trigger
- Select a Trigger.
- Click Audit.
Audit logs display configuration history and state changes.
Usage Example
The following example demonstrates how a List Trigger interacts with a process.
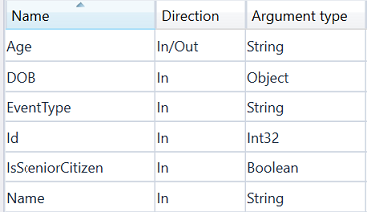
1. Process Setup
Create a process with input arguments that will receive List Trigger runtime parameters.
2. List Configuration
Create a List with the required columns.

3. Trigger Configuration
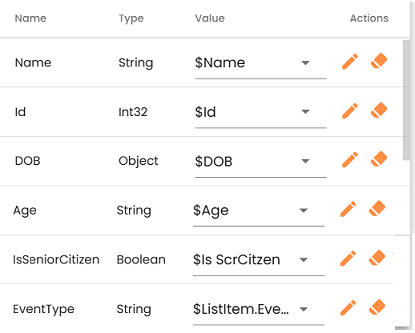
Configure a List Trigger referencing the created process and List.
Bind the runtime parameters to the corresponding process input arguments as shown below:
4. Trigger Execution
When a row in the List is:
- Inserted
- Updated
- Deleted
The trigger fires and executes the configured process.
The execution output appears as shown below:
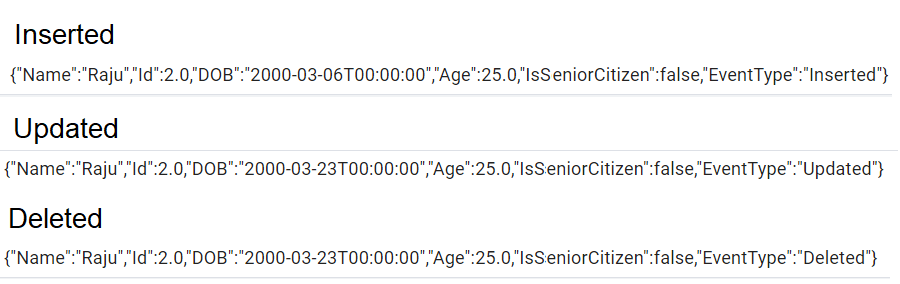
List Triggers enable fully event-driven automation based on structured data changes within Lists.