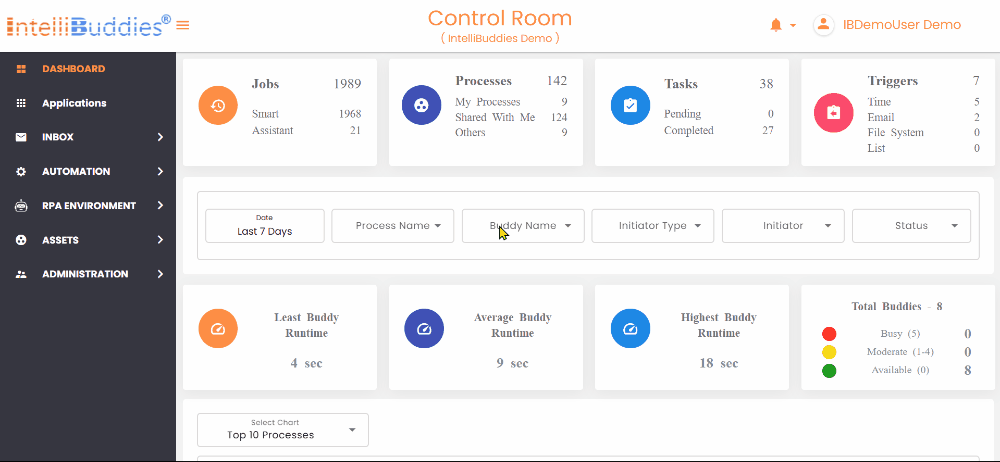
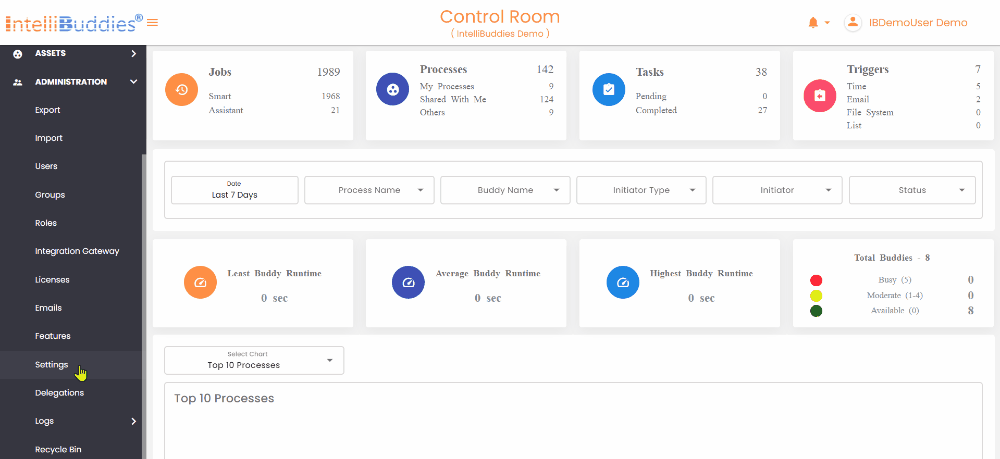
Settings
The Settings page lets you view and edit Control Room configurations such as regional, alerts, email, and domain settings.
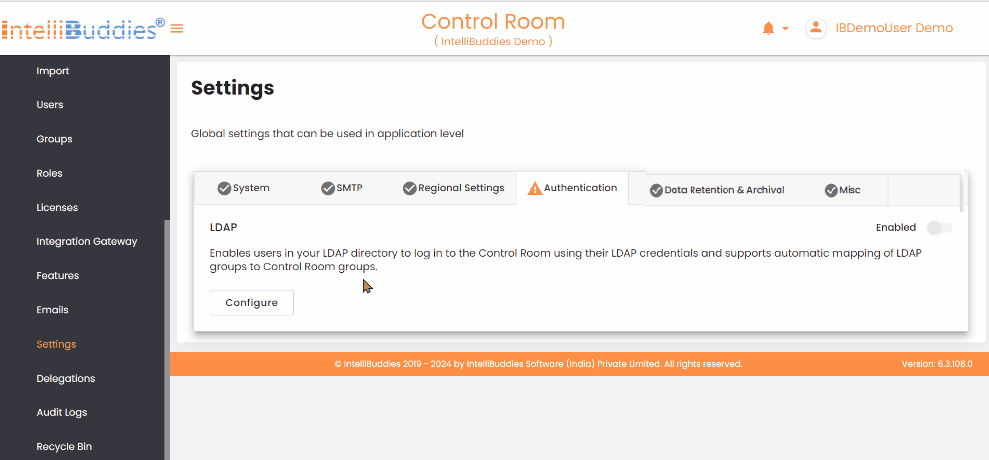
The tab displays a check mark for successful configuration and an exclamation mark for incomplete configuration, which leads to feature failure.
System
Under this tab, you can find the below details:
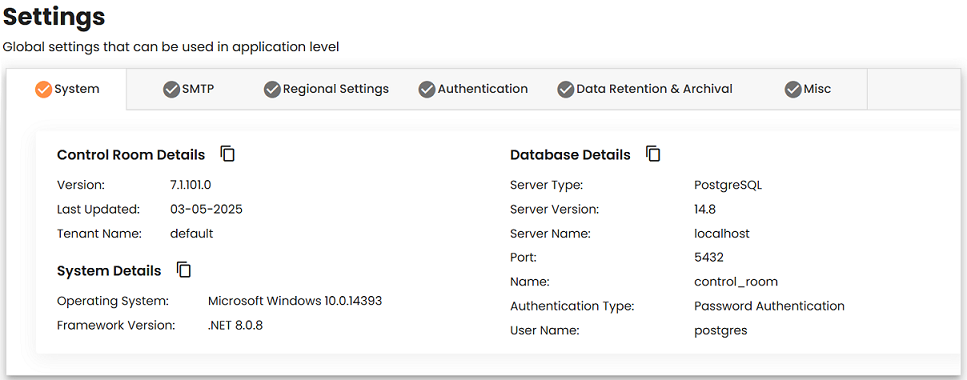
Control Room Details
All the details displayed under this tab are read-only.
| Field | Description |
|---|---|
| Version | Displays the version information of the deployed Control Room. |
| Last Updated | Displays the timestamp when the Control Room was installed or upgraded. |
| Tenant Name | Displays the current tenant name. |
System Details
| Field | Description |
|---|---|
| Operating System | Specifies the name and version of the operating system on the machine hosting the Control Room. |
| Framework Version | Specifies the name and version of the framework on the machine hosting the Control Room. |
Database Details
| Field | Description |
|---|---|
| Server Type | Displays the database server type. It can be PostgreSQL or Microsoft SQL Server. |
| Server Name | Displays the database server name. |
| Port Name | Displays the port number on which the database server runs. Available only in the case of PostgreSQL. |
| Database Name | Displays the database name configured for this Control Room. |
| Authentication Type | Displays the authentication type used to connect to the database server. |
| User Name | Displays the username used to connect to the configured database server. |
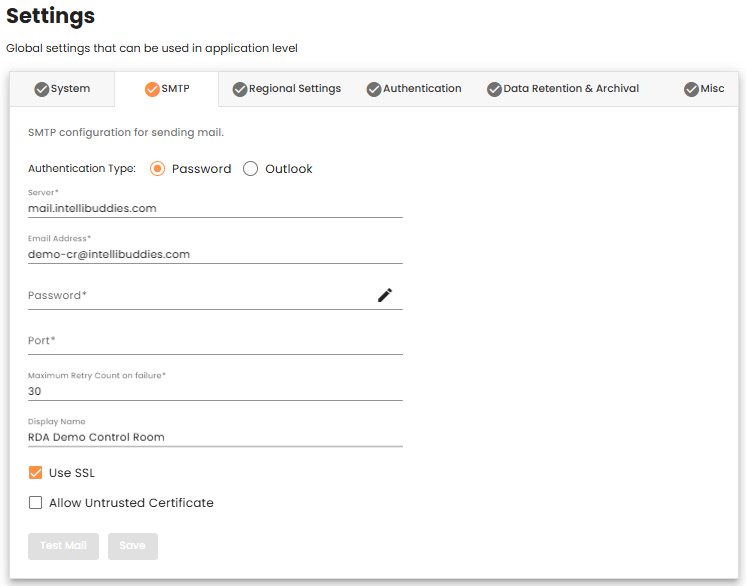
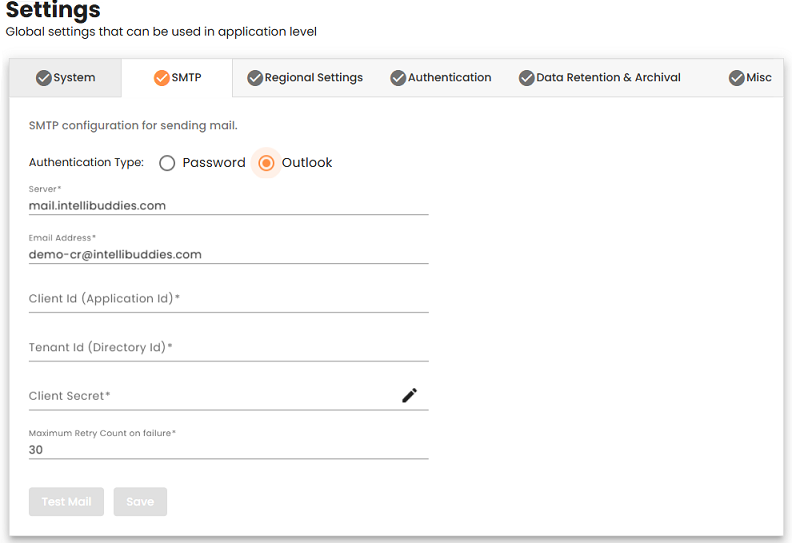
SMTP Settings
This tab enables you to view and configure SMTP-based email server settings. The Control Room uses these settings to send users notifications based on subscribed alerts.
Authentication Types
The table below outlines the available authentication types for configuring SMTP settings
| Type | Description |
|---|---|
| Password | Use this option to configure SMTP settings by specifying a port, username, and password for sending emails. |
| Outlook | Use this option to configure SMTP settings with OAuth authentication for secure email sending using Outlook. |
Authentication Configuration
The tables below outline the configuration settings for both Password Authentication and Outlook Authentication types when setting up SMTP for email communication.
Password Authentication Configuration
| Setting | Description |
|---|---|
| Server | Specify the SMTP email server name. |
| Email Address | Specify the email account required to log into the email server. |
| Password | Specify the necessary password to log into the email server. |
| Port | Specify the email server listening port. |
| Maximum Retry Count on Failure | Specify the number of times to retry in case of failures. The default retry count on failure is 30 minutes. |
| Display Name | Specify the display name to be used inside the From field while sending an email. |
| Use SSL | Check this option to send an email over Secured Socket Layer (SSL). |
| Allow Untrusted Certificate | Check this option to send an email over Untrusted certificates for outgoing mail servers. |
Outlook Authentication Configuration
| Setting | Description |
|---|---|
| Server | Specify the SMTP email server name |
| Email Address | Specify the email account required to log into email server |
| Client Id(Application Id) | Specify the Client Id. |
| Tenant Id | Specify the Tenant Id. |
| Client Secret | Specify the Client Secret. |
| Maximum Retry Count on Failure | Specify the number of times to retry in case of failures. The default retry count on failure is 30 minutes. |
For Outlook Authentication, ensure that the Mail.Send permission is added for the Microsoft Graph API to enable email sending.
Verifying Your Configuration
To verify your SMTP configuration, click the Test Mail button. A test email will be sent to your configured email account.
Save Your Configuration
For the settings to take effect, you must save the configuration by clicking the Save button.
Regional Settings
Under this tab, you can view and configure the regional settings. These are global settings applied to all automation users.
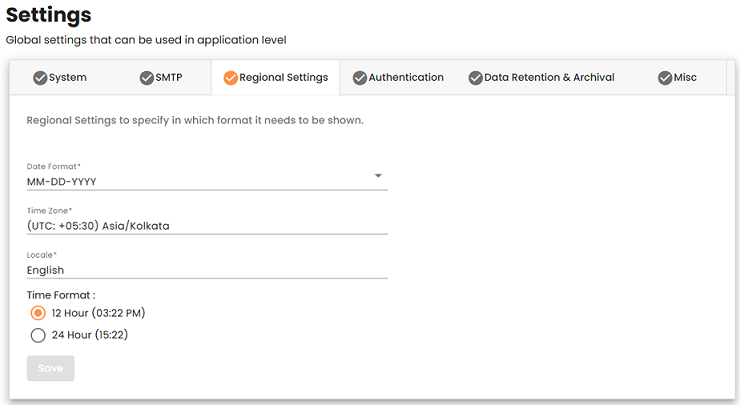
| Setting | Description |
|---|---|
| Date Format | The display format for date values. Default format: DD/MM/YYYY |
| Time Zone | The time zone of the Control Room. Default time zone: UTC |
| Locale | The language of the Control Room user interface. Default language: English |
| Time Format | The display format for Time values. The available options are either 24-hour or 12-hour representation. Default format: 12-hour |
You must save the configuration by clicking the Save button to make the settings effective.
Authentication
This tab allows you to configure the authentication providers used to verify user credentials. By default, the Basic Authentication provider can store user credentials in an encrypted format in the Control Room database.
In addition to Basic Authentication, it supports the LDAP authentication provider. You can configure any LDAP-based directory service, such as Microsoft Active Directory, OpenLDAP Directory, Apache Directory Server, or Apple Directory Server. You can set LDAP synchronization to import users and groups from your Active Directory automatically. By default, assigns the RPA Member and BPA Member roles to newly created users from LDAP.
Steps to Configure Active Directory/LDAP Authentication
- Click the
Configurebutton under the LDAP Authentication provider.
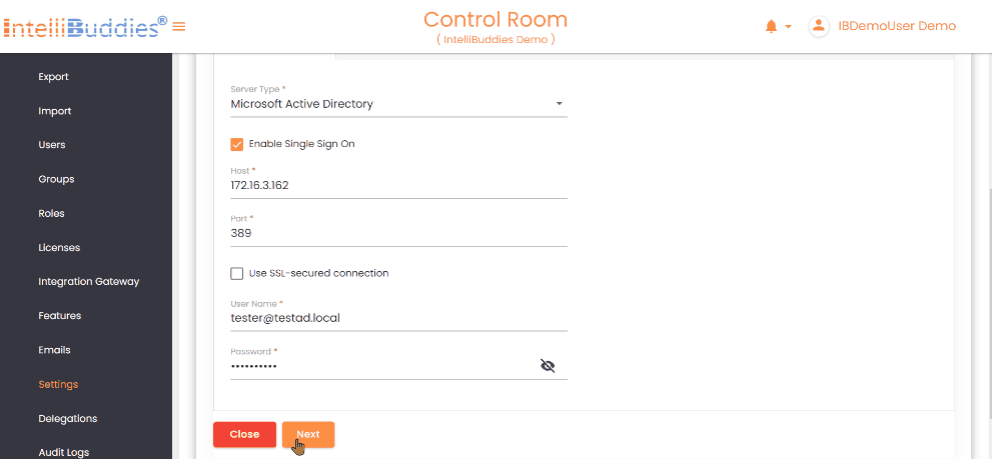
- In the
LDAP Server Settingstab, select the type of LDAP server.
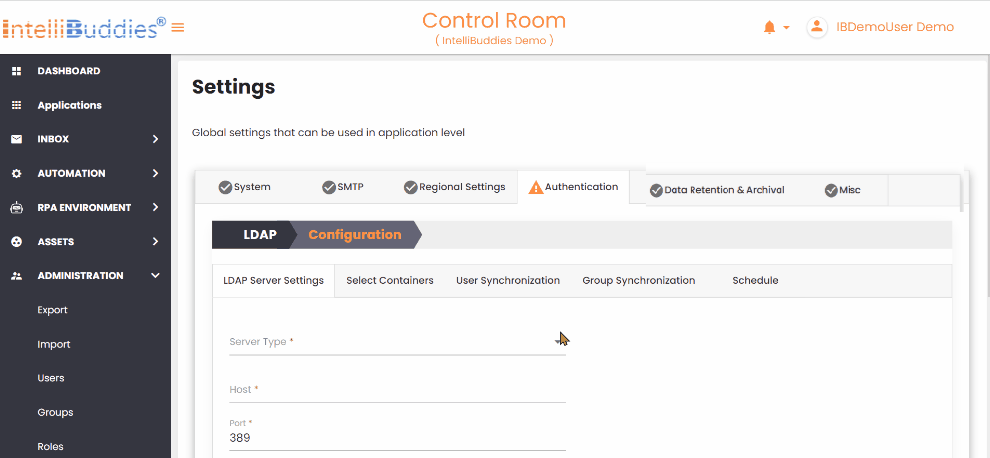
| Setting | Description |
|---|---|
| Server Type | Select the type of LDAP server Microsoft Active Directory and LDAP. If you use Microsoft Active Directory, choose that option; for other LDAP servers, select LDAP from the dropdown. |
| Enable Single Sign On | Selecting Microsoft Active Directory provides an additional option to enable Single Sign-On (SSO). |
| Host | Specify the LDAP server name or IP address. |
| Port | Specify the port. By default, set to 389 |
| Use SSL-secured connection | If SSL is enabled, check this option for secure data transmitted between your browser and the server to protect from unauthorized access. |
| User Name | Specify username to retrieve details of domains, organizational units, groups, and users. You can also enter the distinguished name of the user, e.g., CN=admin, CN=Users, DC=TestDomain, DC=com. |
| Password | Specify password |
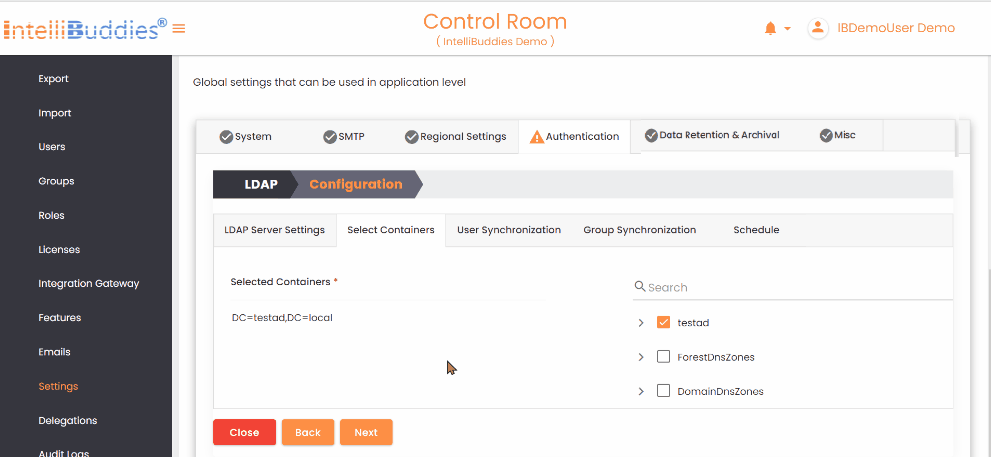
- In the Select Containers tab, choose the containers to import from users and groups to the Control Room.
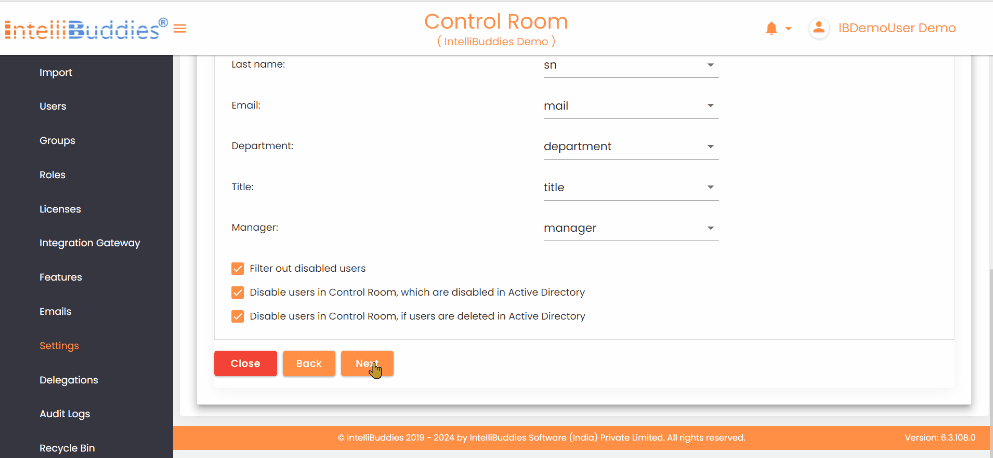
- In the User Synchronization tab, map the Control Room user attributes to the corresponding LDAP attributes.
Ensure the user has Read, List Content, and Search permissions on the schema to retrieve attributes successfully.
| Options | Description |
|---|---|
Filter out disabled users | Check this option to exclude the disabled users from Active Directory |
Disable users in Control Room, which are disabled in Active Directory | Check this option to automatically disable Control Room users who are disabled from the Active Directory |
Disable users in Control Room, if users are deleted in Active Directory | Check this option to automatically disable Control Room users who are disabled or deleted from the Active Directory |
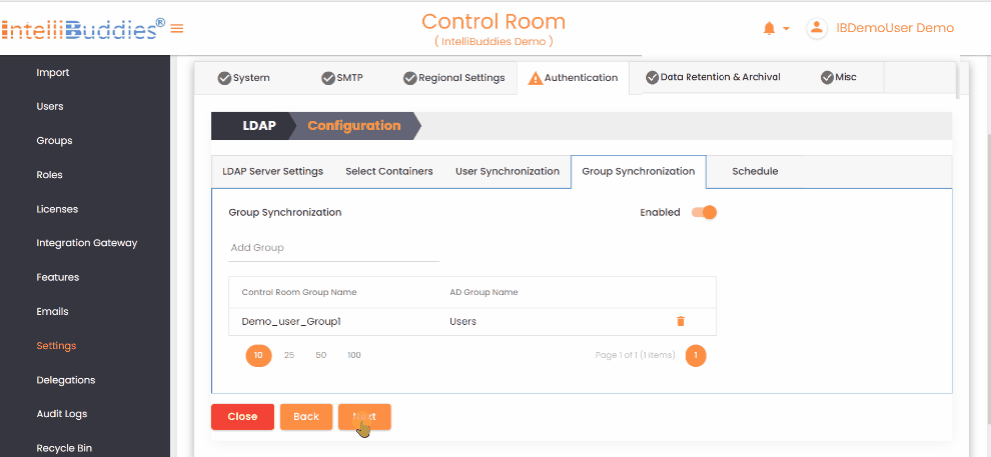
- To synchronize groups from Active Directory, first create the groups in the Control Room and then map them to the corresponding Active Directory groups in the
Group Synchronizationtab. This synchronization only affects the mapped groups and reflects any changes in membership within the Active Directory group in the mapped Control Room group.
- Set up periodic user and group synchronization in the
Scheduletab.
- Use appropriate Schedule Types
Enable LDAP Authentication
To enable LDAP authentication, toggle the Enabled button in the Authentication tab's upper-right corner.
Disable LDAP Authentication
To turn off LDAP authentication, toggle the Enabled button in the Authentication tab's upper-right corner.
LDAP Configuration Options
Use the following LDAP configuration options to Update, View, check the Last Sync Status, and Run Sync to sync immediately.
| Options | Description | Description |
|---|---|---|
Configure |  | Click on this button under the LDAP Authentication provider to configure LDAP authentication |
View Configuration | 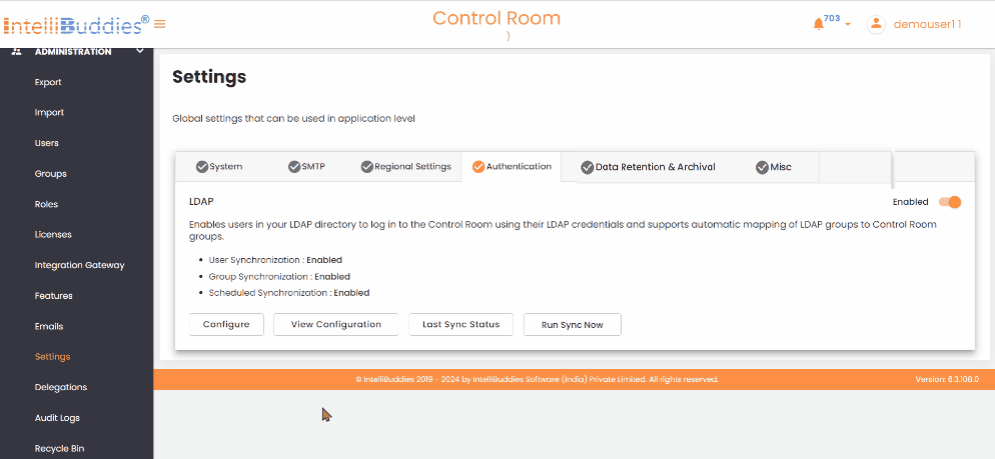 | Click on this button under the LDAP Authentication provider to view configured LDAP authentication |
Last Sync Status |  | To check the status of the most recent Sync, click the Last Sync Status button. |
Run Sync Now |  | To run synchronization immediately, click the Run Sync Now button in the Authentication tab. |
After synchronizing users from Active Directory, they can log in using their AD credentials and set a password. Users can log in with either Basic or LDAP Authentication if they have set a password for their account. For organizations using Active Directory with single sign-on enabled, users can log in seamlessly using SSO.
Data Retention & Archival
Under this tab, you can find and adjust the settings listed below.
Control Room Server Logs
The following table provides details on configuring logging settings for the Control Room server:
| Setting | Description |
|---|---|
| Log Level | Defines the log level for the Control Room server. Available log levels, in order of severity, are Fatal, Error, Warn, Info, Debug, and Trace (with Fatal being the highest and Trace the lowest). Setting a specific log level ensures that all higher severity logs are captured. For instance, selecting Info will also include logs for Fatal, Error, and Warn levels. |
| Retain logs | You can set the log retention policy for the Control Room server. By default, logs are retained for 30 days. Based on your needs, you can adjust this duration to anywhere between 30 and 7,300 days (up to 20 years). If you want to turn off log retention altogether, uncheck this option. |
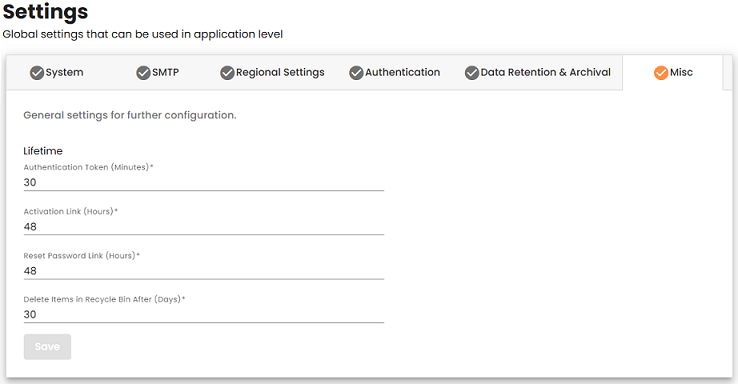
Misc
The following table outlines various system configurations and their default values:
| Setting | Description |
|---|---|
| Authentication Token | Specifies the duration (in minutes) before an authentication token expires. The default value is 30 minutes. |
| Activation Link | Defines the expiration time (in hours) for activation links. For Basic Authentication, the default expiry is 48 hours. This setting does not apply to other authentication methods. |
| Reset Password Link | Determines how long (in hours) a reset password link remains valid. By default, reset password links for Basic Authentication expire after 48 hours. |
| Delete Items in Recycle Bin After | Sets the retention period (in days) before items in the Recycle Bin are permanently deleted. By default, items are removed after 30 days. |
You must save the configuration by clicking the Save button to make the settings effective.